Lenovo ThinkPad T520 (English) User Guide - Page 158
Close the computer display, and turn it over.
 |
View all Lenovo ThinkPad T520 manuals
Add to My Manuals
Save this manual to your list of manuals |
Page 158 highlights
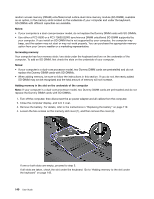
random access memory (DRAM) unbuffered small outline dual inline memory module (SO-DIMM), available as an option, in the memory slots located on the underside of your computer and under the keyboard. SO-DIMMs with different capacities are available. Notes: • If your computer is a dual-core processor model, do not replace the Dummy DIMM cards with SO-DIMMs. • Use either a PC3-8500 or a PC3-10600 DDR3 synchronous DRAM unbuffered SO-DIMM supported by your computer. If you install an SO-DIMM that is not supported by your computer, the computer may beep, and the system may not start or may not work properly. You can purchase the appropriate memory option from your Lenovo reseller or a marketing representative. Increasing memory Your computer has four memory slots: two slots under the keyboard and two on the underside of the computer. To add an SO-DIMM, first check the slots on the underside of your computer. Notes: • If your computer is a dual-core processor model, two Dummy DIMM cards are preinstalled and do not replace the Dummy DIMM cards with SO-DIMMs. • When adding memory, be sure to follow the instructions in this section. If you do not, the newly added SO-DIMM may not be recognized and the total amount of memory will not increase. Adding memory in the slot on the underside of the computer Note: If your computer is a dual-core processor model, two Dummy DIMM cards are preinstalled and do not replace the Dummy DIMM cards with SO-DIMMs. 1. Turn off the computer; then disconnect the ac power adapter and all cables from the computer. 2. Close the computer display, and turn it over. 3. Remove the battery. For details, refer to the instructions in "Replacing the battery" on page 119. 4. Loosen the two screws on the memory slot cover (1), and then remove the cover (2). If one or both slots are empty, proceed to step 5. If all slots are taken, check the slot under the keyboard. Go to "Adding memory to the slot under the keyboard" on page 142. 140 User Guide
-
 1
1 -
2
-
3
-
4
-
5
-
6
-
7
-
8
-
9
-
10
-
11
-
12
-
13
-
14
-
15
-
16
-
17
-
18
-
19
-
20
-
21
-
22
-
23
-
24
-
25
-
26
-
27
-
28
-
29
-
30
-
31
-
32
-
33
-
34
-
35
-
36
-
37
-
38
-
39
-
40
-
41
-
42
-
43
-
44
-
45
-
46
-
47
-
48
-
49
-
50
-
51
-
52
-
53
-
54
-
55
-
56
-
57
-
58
-
59
-
60
-
61
-
62
-
63
-
64
-
65
-
66
-
67
-
68
-
69
-
70
-
71
-
72
-
73
-
74
-
75
-
76
-
77
-
78
-
79
-
80
-
81
-
82
-
83
-
84
-
85
-
86
-
87
-
88
-
89
-
90
-
91
-
92
-
93
-
94
-
95
-
96
-
97
-
98
-
99
-
100
-
101
-
102
-
103
-
104
-
105
-
106
-
107
-
108
-
109
-
110
-
111
-
112
-
113
-
114
-
115
-
116
-
117
-
118
-
119
-
120
-
121
-
122
-
123
-
124
-
125
-
126
-
127
-
128
-
129
-
130
-
131
-
132
-
133
-
134
-
135
-
136
-
137
-
138
-
139
-
140
-
141
-
142
-
143
-
144
-
145
-
146
-
147
-
148
-
149
-
150
-
151
-
152
-
 153
153 -
 154
154 -
 155
155 -
 156
156 -
 157
157 -
 158
158 -
 159
159 -
 160
160 -
 161
161 -
 162
162 -
 163
163 -
164
-
165
-
166
-
167
-
168
-
169
-
170
-
171
-
172
-
173
-
174
-
175
-
176
-
177
-
178
-
179
-
180
-
181
-
182
-
183
-
184
-
185
-
186
-
187
-
188
-
189
-
190
-
191
-
192
-
193
-
194
-
195
-
196
-
197
-
198
-
199
-
200
-
201
-
202
-
203
-
204
-
205
-
206
-
207
-
208
-
209
-
210
-
211
-
212
-
213
-
214
-
215
-
216
-
217
-
218
-
219
-
220
-
221
-
222
-
223
-
224
-
225
-
226
-
227
-
228
-
229
-
230
-
231
-
232
-
233
-
234
-
235
-
236
-
237
-
238
-
239
-
240
-
241
-
242
-
243
-
244
-
245
-
246
-
247
-
248
-
249
-
250
-
251
-
252
-
253
-
254
-
255
-
256
-
257
-
258
-
259
-
260
-
261
-
262
-
263
-
264
-
265
-
266
-
267
-
268
-
269
-
270
-
271
-
272
-
273
-
274
-
275
-
276
-
277
-
278
-
279
-
280
-
281
-
282
-
283
-
284
-
285
-
286
-
287
-
288
-
289
-
290
-
291
-
292
-
293
-
294
-
295
-
296
-
297
 |
 |
