Lenovo ThinkPad T520 (English) User Guide - Page 53
Control Panel or use the Power Manager., Power Management driver - network driver
 |
View all Lenovo ThinkPad T520 manuals
Add to My Manuals
Save this manual to your list of manuals |
Page 53 highlights
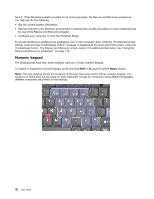
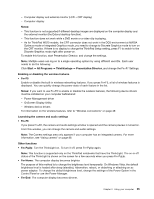
- Computer display and external monitor (LCD + CRT display) - Computer display Notes: - This function is not supported if different desktop images are displayed on the computer display and the external monitor (the Extend desktop function). - This function does not work while a DVD movie or a video clip is playing. - As for ThinkPad W520 models, the CRT connector does not work in the DOS environment at NVIDIA Optimus mode or Integrated Graphics mode, you need to change to Discrete Graphics mode to turn on the CRT monitor. If there is no display to change the ThinkPad Setup setting, press F7 to switch to the Discrete Graphics mode right after power-on. To enable this function, start Presentation Director, and change the settings. Note: Multiple users can log on to a single operating system by using different user IDs. Each user needs to do the following: Click Start ➙ All Programs ➙ ThinkVantage ➙ Presentation Director, and change the Fn+F7 Settings. Enabling or disabling the wireless features • Fn+F5 Enable or disable the built-in wireless networking features. If you press Fn+F5, a list of wireless features is displayed. You can quickly change the power state of each feature in the list. Notes: If you want to use Fn+F5 to enable or disable the wireless features, the following device drivers must be installed on your computer beforehand: - Power Management driver - OnScreen Display Utility - Wireless device drivers For information on the wireless features, refer to "Wireless connections" on page 49. Launching the camera and audio settings • Fn+F6 If you press Fn+F6, the camera and audio settings window is opened and the camera preview is turned on. From this window, you can change the camera and audio settings. Note: The Camera settings area only appears if your computer has an integrated camera. For more information, see "Using camera" on page 86. Other functions • Fn+PgUp: Turn the ThinkLight on. To turn it off, press Fn+PgUp again. Note: This function is supported only on the ThinkPad notebooks that have the ThinkLight. The on or off status of the ThinkLight is shown on the screen for a few seconds when you press Fn+PgUp. • Fn+Home: The computer display becomes brighter. The purpose of this method is to change the brightness level temporarily. On Windows Vista, the default brightness level is loaded after sleep (standby), hibernation, reboot, or detaching or attaching an ac power adapter. To change the default brightness level, change the settings of the Power Option in the Control Panel or use the Power Manager. • Fn+End: The computer display becomes dimmer. Chapter 2. Using your computer 35
-
 1
1 -
2
-
3
-
4
-
5
-
6
-
7
-
8
-
9
-
10
-
11
-
12
-
13
-
14
-
15
-
16
-
17
-
18
-
19
-
20
-
21
-
22
-
23
-
24
-
25
-
26
-
27
-
28
-
29
-
30
-
31
-
32
-
33
-
34
-
35
-
36
-
37
-
38
-
39
-
40
-
41
-
42
-
43
-
44
-
45
-
46
-
47
-
 48
48 -
 49
49 -
 50
50 -
 51
51 -
 52
52 -
 53
53 -
 54
54 -
 55
55 -
 56
56 -
 57
57 -
 58
58 -
59
-
60
-
61
-
62
-
63
-
64
-
65
-
66
-
67
-
68
-
69
-
70
-
71
-
72
-
73
-
74
-
75
-
76
-
77
-
78
-
79
-
80
-
81
-
82
-
83
-
84
-
85
-
86
-
87
-
88
-
89
-
90
-
91
-
92
-
93
-
94
-
95
-
96
-
97
-
98
-
99
-
100
-
101
-
102
-
103
-
104
-
105
-
106
-
107
-
108
-
109
-
110
-
111
-
112
-
113
-
114
-
115
-
116
-
117
-
118
-
119
-
120
-
121
-
122
-
123
-
124
-
125
-
126
-
127
-
128
-
129
-
130
-
131
-
132
-
133
-
134
-
135
-
136
-
137
-
138
-
139
-
140
-
141
-
142
-
143
-
144
-
145
-
146
-
147
-
148
-
149
-
150
-
151
-
152
-
153
-
154
-
155
-
156
-
157
-
158
-
159
-
160
-
161
-
162
-
163
-
164
-
165
-
166
-
167
-
168
-
169
-
170
-
171
-
172
-
173
-
174
-
175
-
176
-
177
-
178
-
179
-
180
-
181
-
182
-
183
-
184
-
185
-
186
-
187
-
188
-
189
-
190
-
191
-
192
-
193
-
194
-
195
-
196
-
197
-
198
-
199
-
200
-
201
-
202
-
203
-
204
-
205
-
206
-
207
-
208
-
209
-
210
-
211
-
212
-
213
-
214
-
215
-
216
-
217
-
218
-
219
-
220
-
221
-
222
-
223
-
224
-
225
-
226
-
227
-
228
-
229
-
230
-
231
-
232
-
233
-
234
-
235
-
236
-
237
-
238
-
239
-
240
-
241
-
242
-
243
-
244
-
245
-
246
-
247
-
248
-
249
-
250
-
251
-
252
-
253
-
254
-
255
-
256
-
257
-
258
-
259
-
260
-
261
-
262
-
263
-
264
-
265
-
266
-
267
-
268
-
269
-
270
-
271
-
272
-
273
-
274
-
275
-
276
-
277
-
278
-
279
-
280
-
281
-
282
-
283
-
284
-
285
-
286
-
287
-
288
-
289
-
290
-
291
-
292
-
293
-
294
-
295
-
296
-
297
 |
 |
