Lenovo ThinkPad T520 (English) User Guide - Page 55
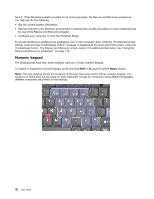
Sounds, Speech, and Audio Devices, Press Fn+F6. The Communications settings window opens.
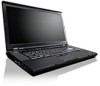 |
View all Lenovo ThinkPad T520 manuals
Add to My Manuals
Save this manual to your list of manuals |
Page 55 highlights
Setting the volume Each device has volume controls, which you can set. To open the window for adjusting the output volume or the recording volume, do the following: For Windows 7 and Windows Vista: 1. Click Start ➙ Control Panel ➙ Hardware and Sound ➙ Sound. The Sound window appears. 2. Click the Playback tab or Recording tab, and then click a device, which you want to customize. 3. Click the Properties button. 4. Click the Levels tab, and then change the volume by moving the slider. For Windows XP: 1. Click Start ➙ Control Panel ➙ Sounds, Speech, and Audio Devices ➙ Sounds and Audio Device. The Sounds and Audio Device Properties window appears. 2. Click the Audio tab, and then click the Volume button in Sound Playback or Sound Recording. Notes: • You can also get access to the desktop volume control by using the volume icon in the task bar at the lower right of the screen. To open the Volume Control window, click the volume icon. To control the volume, move the volume control slider up or down. To turn off the sound, select Mute speakers (in Windows Vista and Windows XP, Mute). • The names of windows or fields are slightly different depending on the operating system you use. • For details about controlling volume, refer to your Windows online help. Setting the microphone mute button in Windows 7 and Windows Vista By default, you can toggle all of your recording devices between the mute state and the un-mute state by pressing the microphone mute button. If you want to toggle one of the recording devices between the mute state and the un-mute state, do the following: 1. Press Fn+F6. The Communications settings window opens. 2. Click the Manage Settings button. The Communications Utility window opens. 3. On the VoIP Call Settings tab, click Microphone mute button settings. The Setting for Microphone Mute window opens. 4. Select Only the recording device selected below:. Then select the recording device from the drop-down list box. 5. Click OK. Chapter 2. Using your computer 37
-
 1
1 -
2
-
3
-
4
-
5
-
6
-
7
-
8
-
9
-
10
-
11
-
12
-
13
-
14
-
15
-
16
-
17
-
18
-
19
-
20
-
21
-
22
-
23
-
24
-
25
-
26
-
27
-
28
-
29
-
30
-
31
-
32
-
33
-
34
-
35
-
36
-
37
-
38
-
39
-
40
-
41
-
42
-
43
-
44
-
45
-
46
-
47
-
48
-
49
-
 50
50 -
 51
51 -
 52
52 -
 53
53 -
 54
54 -
 55
55 -
 56
56 -
 57
57 -
 58
58 -
 59
59 -
 60
60 -
61
-
62
-
63
-
64
-
65
-
66
-
67
-
68
-
69
-
70
-
71
-
72
-
73
-
74
-
75
-
76
-
77
-
78
-
79
-
80
-
81
-
82
-
83
-
84
-
85
-
86
-
87
-
88
-
89
-
90
-
91
-
92
-
93
-
94
-
95
-
96
-
97
-
98
-
99
-
100
-
101
-
102
-
103
-
104
-
105
-
106
-
107
-
108
-
109
-
110
-
111
-
112
-
113
-
114
-
115
-
116
-
117
-
118
-
119
-
120
-
121
-
122
-
123
-
124
-
125
-
126
-
127
-
128
-
129
-
130
-
131
-
132
-
133
-
134
-
135
-
136
-
137
-
138
-
139
-
140
-
141
-
142
-
143
-
144
-
145
-
146
-
147
-
148
-
149
-
150
-
151
-
152
-
153
-
154
-
155
-
156
-
157
-
158
-
159
-
160
-
161
-
162
-
163
-
164
-
165
-
166
-
167
-
168
-
169
-
170
-
171
-
172
-
173
-
174
-
175
-
176
-
177
-
178
-
179
-
180
-
181
-
182
-
183
-
184
-
185
-
186
-
187
-
188
-
189
-
190
-
191
-
192
-
193
-
194
-
195
-
196
-
197
-
198
-
199
-
200
-
201
-
202
-
203
-
204
-
205
-
206
-
207
-
208
-
209
-
210
-
211
-
212
-
213
-
214
-
215
-
216
-
217
-
218
-
219
-
220
-
221
-
222
-
223
-
224
-
225
-
226
-
227
-
228
-
229
-
230
-
231
-
232
-
233
-
234
-
235
-
236
-
237
-
238
-
239
-
240
-
241
-
242
-
243
-
244
-
245
-
246
-
247
-
248
-
249
-
250
-
251
-
252
-
253
-
254
-
255
-
256
-
257
-
258
-
259
-
260
-
261
-
262
-
263
-
264
-
265
-
266
-
267
-
268
-
269
-
270
-
271
-
272
-
273
-
274
-
275
-
276
-
277
-
278
-
279
-
280
-
281
-
282
-
283
-
284
-
285
-
286
-
287
-
288
-
289
-
290
-
291
-
292
-
293
-
294
-
295
-
296
-
297
 |
 |
