Lenovo ThinkPad T520 (English) User Guide - Page 194
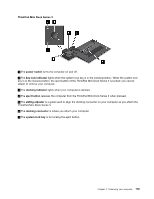
Inserting the hard disk drive adapter into the bay
 |
View all Lenovo ThinkPad T520 manuals
Add to My Manuals
Save this manual to your list of manuals |
Page 194 highlights
5. Close the hard disk drive stopper. Notes: • Make sure that the hard disk drive is inserted tightly into the hard disk drive adapter. • Do not push the cover too hard; you could damage the hard disk drive or the hard disk drive adapter. • You cannot insert a hard disk drive for other ThinkPad series computers into this ThinkPad Serial Hard Drive Bay Adapter III. If you want to use the files on the hard disk drive of another ThinkPad notebook, copy the files to a removable storage device. Inserting the hard disk drive adapter into the bay Notes: • Use the ThinkPad Serial Hard Drive Bay Adapter III designed specifically for use with your computer. • The ThinkPad Serial Hard Drive Bay Adapter III supports only 2.5 inch (7 mm height) hard disk drive. After you insert a hard disk drive into a hard disk drive adapter, you can insert the adapter into the serial Ultrabay enhanced of your computer, provided that the computer is in one of the following conditions: Note: You can install a 9.5-mm-thick serial Ultrabay slim or a 12.7-mm-thick serial Ultrabay enhanced device in the serial Ultrabay enhanced. • The computer is turned off. For how to insert the adapter, refer to "Replacing the device" on page 170. • The computer is in sleep (standby) mode. You can insert the adapter while the computer is in sleep (standby) mode. For how to insert the adapter, refer to "Performing a warm swap" on page 172. • The computer is operating. You can insert the adapter while the computer is operating. For how to insert the adapter, refer to "Performing a hot swap" on page 171. Notes: If you insert the hard disk drive adapter into the bay while the computer is in sleep (standby) mode or operating, and the hard disk drive is protected by a password, you cannot get access to the drive right after inserting the adapter into the bay. To get access to it, do the following: 1. Press Fn+F12 to put your computer in Hibernate mode. You may have to wait for a while till the computer enters Hibernate mode. 2. Press power switch to return to normal operation. The hard disk password icon appears at the upper left of the screen. 3. Type the password. Now you can get access to the hard disk drive. 176 User Guide
-
 1
1 -
2
-
3
-
4
-
5
-
6
-
7
-
8
-
9
-
10
-
11
-
12
-
13
-
14
-
15
-
16
-
17
-
18
-
19
-
20
-
21
-
22
-
23
-
24
-
25
-
26
-
27
-
28
-
29
-
30
-
31
-
32
-
33
-
34
-
35
-
36
-
37
-
38
-
39
-
40
-
41
-
42
-
43
-
44
-
45
-
46
-
47
-
48
-
49
-
50
-
51
-
52
-
53
-
54
-
55
-
56
-
57
-
58
-
59
-
60
-
61
-
62
-
63
-
64
-
65
-
66
-
67
-
68
-
69
-
70
-
71
-
72
-
73
-
74
-
75
-
76
-
77
-
78
-
79
-
80
-
81
-
82
-
83
-
84
-
85
-
86
-
87
-
88
-
89
-
90
-
91
-
92
-
93
-
94
-
95
-
96
-
97
-
98
-
99
-
100
-
101
-
102
-
103
-
104
-
105
-
106
-
107
-
108
-
109
-
110
-
111
-
112
-
113
-
114
-
115
-
116
-
117
-
118
-
119
-
120
-
121
-
122
-
123
-
124
-
125
-
126
-
127
-
128
-
129
-
130
-
131
-
132
-
133
-
134
-
135
-
136
-
137
-
138
-
139
-
140
-
141
-
142
-
143
-
144
-
145
-
146
-
147
-
148
-
149
-
150
-
151
-
152
-
153
-
154
-
155
-
156
-
157
-
158
-
159
-
160
-
161
-
162
-
163
-
164
-
165
-
166
-
167
-
168
-
169
-
170
-
171
-
172
-
173
-
174
-
175
-
176
-
177
-
178
-
179
-
180
-
181
-
182
-
183
-
184
-
185
-
186
-
187
-
188
-
 189
189 -
 190
190 -
 191
191 -
 192
192 -
 193
193 -
 194
194 -
 195
195 -
 196
196 -
 197
197 -
 198
198 -
 199
199 -
200
-
201
-
202
-
203
-
204
-
205
-
206
-
207
-
208
-
209
-
210
-
211
-
212
-
213
-
214
-
215
-
216
-
217
-
218
-
219
-
220
-
221
-
222
-
223
-
224
-
225
-
226
-
227
-
228
-
229
-
230
-
231
-
232
-
233
-
234
-
235
-
236
-
237
-
238
-
239
-
240
-
241
-
242
-
243
-
244
-
245
-
246
-
247
-
248
-
249
-
250
-
251
-
252
-
253
-
254
-
255
-
256
-
257
-
258
-
259
-
260
-
261
-
262
-
263
-
264
-
265
-
266
-
267
-
268
-
269
-
270
-
271
-
272
-
273
-
274
-
275
-
276
-
277
-
278
-
279
-
280
-
281
-
282
-
283
-
284
-
285
-
286
-
287
-
288
-
289
-
290
-
291
-
292
-
293
-
294
-
295
-
296
-
297
 |
 |
