Lenovo ThinkPad T520 (English) User Guide - Page 166
Installing and replacing the mSATA solid state drive, hibernation mode.
 |
View all Lenovo ThinkPad T520 manuals
Add to My Manuals
Save this manual to your list of manuals |
Page 166 highlights
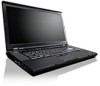
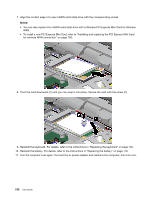
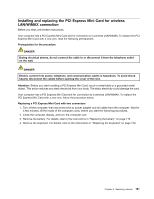
Installing and replacing the mSATA solid state drive Before you start, print these instructions. Some ThinkPad models have an mSATA solid state drive. You can replace the mSATA solid state drive with a new one which can be purchased from your Lenovo reseller or a marketing representative. To replace the mSATA solid state drive, read the following prerequisites. Notes: • You can also replace the mSATA solid state drive with a Wireless PCI Express Mini Card for Wireless WAN. • Replace the mSATA solid state drive only if you need to have it repaired. Prerequisites for the procedure When replacing the mSATA solid state drive, be sure to follow the precautions. Attention: When you are handling an mSATA solid state drive: • Do not drop the mSATA solid state drive or subject it to physical shocks. Put the mSATA solid state drive on a material, such as soft cloth that absorbs any physical shocks. • Do not apply pressure to the cover of the mSATA solid state drive. The mSATA solid state drive is very sensitive. Incorrect handling can cause damage and permanent loss of data. Before removing the mSATA solid state drive, make a backup copy of all the information on it, and then turn the computer off. Never remove the mSATA solid state drive while the system is operating, in sleep (standby) mode, or in hibernation mode. If an mSATA solid state drive is available in your computer, to replace the mSATA solid state drive, do as follows. 1. Turn off the computer; then disconnect the ac power adapter and all cables from the computer. Wait for a few minutes, till the inside of the computer cools, before you start the following procedures. 2. Close the computer display, and turn the computer over. 3. Remove the battery. For details, refer to the instructions in "Replacing the battery" on page 119. 4. Remove the keyboard. For details, refer to the instructions in "Replacing the keyboard" on page 130. 148 User Guide
-
 1
1 -
2
-
3
-
4
-
5
-
6
-
7
-
8
-
9
-
10
-
11
-
12
-
13
-
14
-
15
-
16
-
17
-
18
-
19
-
20
-
21
-
22
-
23
-
24
-
25
-
26
-
27
-
28
-
29
-
30
-
31
-
32
-
33
-
34
-
35
-
36
-
37
-
38
-
39
-
40
-
41
-
42
-
43
-
44
-
45
-
46
-
47
-
48
-
49
-
50
-
51
-
52
-
53
-
54
-
55
-
56
-
57
-
58
-
59
-
60
-
61
-
62
-
63
-
64
-
65
-
66
-
67
-
68
-
69
-
70
-
71
-
72
-
73
-
74
-
75
-
76
-
77
-
78
-
79
-
80
-
81
-
82
-
83
-
84
-
85
-
86
-
87
-
88
-
89
-
90
-
91
-
92
-
93
-
94
-
95
-
96
-
97
-
98
-
99
-
100
-
101
-
102
-
103
-
104
-
105
-
106
-
107
-
108
-
109
-
110
-
111
-
112
-
113
-
114
-
115
-
116
-
117
-
118
-
119
-
120
-
121
-
122
-
123
-
124
-
125
-
126
-
127
-
128
-
129
-
130
-
131
-
132
-
133
-
134
-
135
-
136
-
137
-
138
-
139
-
140
-
141
-
142
-
143
-
144
-
145
-
146
-
147
-
148
-
149
-
150
-
151
-
152
-
153
-
154
-
155
-
156
-
157
-
158
-
159
-
160
-
 161
161 -
 162
162 -
 163
163 -
 164
164 -
 165
165 -
 166
166 -
 167
167 -
 168
168 -
 169
169 -
 170
170 -
 171
171 -
172
-
173
-
174
-
175
-
176
-
177
-
178
-
179
-
180
-
181
-
182
-
183
-
184
-
185
-
186
-
187
-
188
-
189
-
190
-
191
-
192
-
193
-
194
-
195
-
196
-
197
-
198
-
199
-
200
-
201
-
202
-
203
-
204
-
205
-
206
-
207
-
208
-
209
-
210
-
211
-
212
-
213
-
214
-
215
-
216
-
217
-
218
-
219
-
220
-
221
-
222
-
223
-
224
-
225
-
226
-
227
-
228
-
229
-
230
-
231
-
232
-
233
-
234
-
235
-
236
-
237
-
238
-
239
-
240
-
241
-
242
-
243
-
244
-
245
-
246
-
247
-
248
-
249
-
250
-
251
-
252
-
253
-
254
-
255
-
256
-
257
-
258
-
259
-
260
-
261
-
262
-
263
-
264
-
265
-
266
-
267
-
268
-
269
-
270
-
271
-
272
-
273
-
274
-
275
-
276
-
277
-
278
-
279
-
280
-
281
-
282
-
283
-
284
-
285
-
286
-
287
-
288
-
289
-
290
-
291
-
292
-
293
-
294
-
295
-
296
-
297
 |
 |
