Lexmark CX317 User Guide - Page 222
Step 2, Enter, Web sites including the Embedded Web Server.
 |
View all Lexmark CX317 manuals
Add to My Manuals
Save this manual to your list of manuals |
Page 222 highlights
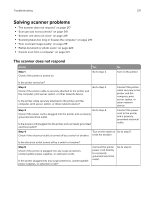
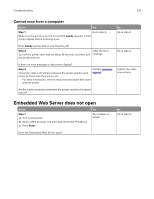
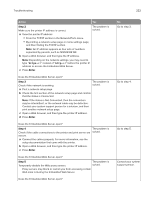
Troubleshooting 222 Action Yes Step 2 Make sure the printer IP address is correct. a View the printer IP address: • From the TCP/IP section in the Network/Ports menu • By printing a network setup page or menu settings page, and then finding the TCP/IP section The problem is solved. Note: An IP address appears as four sets of numbers separated by periods, such as 123.123.123.123. b Open a Web browser, and then type the IP address. Note: Depending on the network settings, you may need to type "https://" instead of "http://" before the printer IP address to access the Embedded Web Server. c Press Enter. Does the Embedded Web Server open? Step 3 Check if the network is working. The problem is solved. a Print a network setup page. b Check the first section of the network setup page and confirm that the status is Connected. Note: If the status is Not Connected, then the connection may be intermittent, or the network cable may be defective. Contact your system support person for a solution, and then print another network setup page. c Open a Web browser, and then type the printer IP address. d Press Enter. Does the Embedded Web Server open? Step 4 The problem is Check if the cable connections to the printer and print server are solved. secure. a Connect the cables properly. For more information, see the setup documentation that came with the printer. b Open a Web browser, and then type the printer IP address. c Press Enter. Does the Embedded Web Server open? Step 5 Temporarily disable the Web proxy servers. The problem is solved. Proxy servers may block or restrict you from accessing certain Web sites including the Embedded Web Server. Does the Embedded Web Server open? No Go to step 3. Go to step 4. Go to step 5. Contact your system support person.
-
 1
1 -
2
-
3
-
4
-
5
-
6
-
7
-
8
-
9
-
10
-
11
-
12
-
13
-
14
-
15
-
16
-
17
-
18
-
19
-
20
-
21
-
22
-
23
-
24
-
25
-
26
-
27
-
28
-
29
-
30
-
31
-
32
-
33
-
34
-
35
-
36
-
37
-
38
-
39
-
40
-
41
-
42
-
43
-
44
-
45
-
46
-
47
-
48
-
49
-
50
-
51
-
52
-
53
-
54
-
55
-
56
-
57
-
58
-
59
-
60
-
61
-
62
-
63
-
64
-
65
-
66
-
67
-
68
-
69
-
70
-
71
-
72
-
73
-
74
-
75
-
76
-
77
-
78
-
79
-
80
-
81
-
82
-
83
-
84
-
85
-
86
-
87
-
88
-
89
-
90
-
91
-
92
-
93
-
94
-
95
-
96
-
97
-
98
-
99
-
100
-
101
-
102
-
103
-
104
-
105
-
106
-
107
-
108
-
109
-
110
-
111
-
112
-
113
-
114
-
115
-
116
-
117
-
118
-
119
-
120
-
121
-
122
-
123
-
124
-
125
-
126
-
127
-
128
-
129
-
130
-
131
-
132
-
133
-
134
-
135
-
136
-
137
-
138
-
139
-
140
-
141
-
142
-
143
-
144
-
145
-
146
-
147
-
148
-
149
-
150
-
151
-
152
-
153
-
154
-
155
-
156
-
157
-
158
-
159
-
160
-
161
-
162
-
163
-
164
-
165
-
166
-
167
-
168
-
169
-
170
-
171
-
172
-
173
-
174
-
175
-
176
-
177
-
178
-
179
-
180
-
181
-
182
-
183
-
184
-
185
-
186
-
187
-
188
-
189
-
190
-
191
-
192
-
193
-
194
-
195
-
196
-
197
-
198
-
199
-
200
-
201
-
202
-
203
-
204
-
205
-
206
-
207
-
208
-
209
-
210
-
211
-
212
-
213
-
214
-
215
-
216
-
 217
217 -
 218
218 -
 219
219 -
 220
220 -
 221
221 -
 222
222 -
 223
223 -
 224
224 -
 225
225 -
 226
226 -
 227
227 -
228
-
229
-
230
-
231
-
232
-
233
-
234
-
235
-
236
-
237
-
238
-
239
-
240
-
241
-
242
-
243
 |
 |