Lexmark X5450 User's Guide - Page 123
Resetting to factory default settings, Removing and reinstalling the software
 |
View all Lexmark X5450 manuals
Add to My Manuals
Save this manual to your list of manuals |
Page 123 highlights
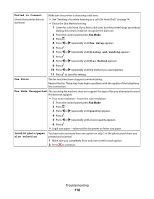
Resetting to factory default settings You can reset your printer to the original settings without using the printer menus. Note: Resetting to factory default settings will delete all printer settings you selected, including Speed Dial and Group Dial numbers. If you want to print out those numbers before you reset the printer, see "Using the Phone Book" on page 77. 1 Press , , and Start Color at the same time. Warning-Potential Damage: Do not release the buttons until Language appears on the display, indicating that the printer has been reset. 2 Follow the prompts on the display to choose your language, country or region code, date, time, and fax number. Notes: • To reenter your Speed Dial or Group Dial numbers using the computer, see "Customizing settings using the Fax Setup Utility" on page 80. • To reenter your Speed Dial or Group Dial numbers using the control panel, see "Using the Phone Book" on page 77. Removing and reinstalling the software If the printer is not functioning properly, or if a communications error message appears when you try to use the printer, you may need to remove and reinstall the printer software. 1 Click Start Œ Programs or All Programs Œ Lexmark 5400 Series. 2 Select Uninstall. 3 Follow the instructions on the computer screen to remove the printer software. 4 Restart the computer before reinstalling the printer software. 5 Click Cancel on all New Hardware Found screens. 6 Insert the CD, and then follow the instructions on the computer screen to reinstall the software. Note: If the install screen does not appear automatically after you restart your computer, click Start Œ Run, and then type D:\setup, where D is the letter of your CD-ROM drive. Troubleshooting 123
-
 1
1 -
2
-
3
-
4
-
5
-
6
-
7
-
8
-
9
-
10
-
11
-
12
-
13
-
14
-
15
-
16
-
17
-
18
-
19
-
20
-
21
-
22
-
23
-
24
-
25
-
26
-
27
-
28
-
29
-
30
-
31
-
32
-
33
-
34
-
35
-
36
-
37
-
38
-
39
-
40
-
41
-
42
-
43
-
44
-
45
-
46
-
47
-
48
-
49
-
50
-
51
-
52
-
53
-
54
-
55
-
56
-
57
-
58
-
59
-
60
-
61
-
62
-
63
-
64
-
65
-
66
-
67
-
68
-
69
-
70
-
71
-
72
-
73
-
74
-
75
-
76
-
77
-
78
-
79
-
80
-
81
-
82
-
83
-
84
-
85
-
86
-
87
-
88
-
89
-
90
-
91
-
92
-
93
-
94
-
95
-
96
-
97
-
98
-
99
-
100
-
101
-
102
-
103
-
104
-
105
-
106
-
107
-
108
-
109
-
110
-
111
-
112
-
113
-
114
-
115
-
116
-
117
-
 118
118 -
 119
119 -
 120
120 -
 121
121 -
 122
122 -
 123
123 -
 124
124 -
 125
125 -
 126
126 -
 127
127 -
 128
128 -
129
-
130
-
131
-
132
-
133
-
134
-
135
-
136
-
137
 |
 |
