Lexmark X5450 User's Guide - Page 78
Customizing dial settings, Setting up a dialing prefix, Setting the distinctive ring
 |
View all Lexmark X5450 manuals
Add to My Manuals
Save this manual to your list of manuals |
Page 78 highlights
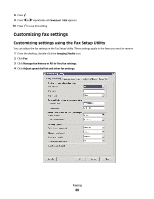
Use this View Add Remove Modify Print To View Phone Book entries. Create a new Speed Dial or Group Dial entry. Delete a Speed Dial or Group Dial entry. Edit a Speed Dial or Group Dial entry. Print all Speed Dial and Group Dial entries in the Phone Book. Note: For instructions on how to add Speed Dial or Group Dial entries to the Phone Book using the computer, see "Setting up Speed Dial numbers" on page 76. Customizing dial settings Setting up a dialing prefix You can add a prefix of up to eight characters to the beginning of each number dialed. Characters can include numbers, commas, and/or the symbols * and #. 1 From the control panel, press Fax Mode. 2 Press . 3 Press or repeatedly until Fax Setup appears. 4 Press . 5 Press or repeatedly until Dialing and Sending appears. 6 Press . 7 Press or repeatedly until Dial Prefix appears. 8 Press . 9 To change the setting, press or repeatedly until Create appears. 10 Press . 11 Enter the prefix to be dialed before each telephone number. 12 Press to save the setting. Setting the distinctive ring Distinctive ring is a service provided by some telephone companies that assigns multiple phone numbers to a single telephone line. If you subscribe to this service, you can program your printer to have a distinctive ring pattern and phone number for incoming faxes. 1 From the control panel, press Fax Mode. 2 Press . 3 Press or repeatedly until Fax Setup appears. 4 Press . Faxing 78
-
 1
1 -
2
-
3
-
4
-
5
-
6
-
7
-
8
-
9
-
10
-
11
-
12
-
13
-
14
-
15
-
16
-
17
-
18
-
19
-
20
-
21
-
22
-
23
-
24
-
25
-
26
-
27
-
28
-
29
-
30
-
31
-
32
-
33
-
34
-
35
-
36
-
37
-
38
-
39
-
40
-
41
-
42
-
43
-
44
-
45
-
46
-
47
-
48
-
49
-
50
-
51
-
52
-
53
-
54
-
55
-
56
-
57
-
58
-
59
-
60
-
61
-
62
-
63
-
64
-
65
-
66
-
67
-
68
-
69
-
70
-
71
-
72
-
 73
73 -
 74
74 -
 75
75 -
 76
76 -
 77
77 -
 78
78 -
 79
79 -
 80
80 -
 81
81 -
 82
82 -
 83
83 -
84
-
85
-
86
-
87
-
88
-
89
-
90
-
91
-
92
-
93
-
94
-
95
-
96
-
97
-
98
-
99
-
100
-
101
-
102
-
103
-
104
-
105
-
106
-
107
-
108
-
109
-
110
-
111
-
112
-
113
-
114
-
115
-
116
-
117
-
118
-
119
-
120
-
121
-
122
-
123
-
124
-
125
-
126
-
127
-
128
-
129
-
130
-
131
-
132
-
133
-
134
-
135
-
136
-
137
 |
 |