Lexmark X5450 User's Guide - Page 91
Achieving better print quality, Improving print quality, Aligning print cartridges
 |
View all Lexmark X5450 manuals
Add to My Manuals
Save this manual to your list of manuals |
Page 91 highlights
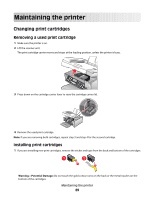
Achieving better print quality Improving print quality If you are not satisfied with the print quality of a document, make sure you: • Use the appropriate paper for the document. If you are printing photos or other high quality images, for best results use Lexmark Premium Photo Paper or Lexmark Photo Paper. • Use a paper that is a heavier weight or bright white. • Select a higher print quality. If the document still does not have the print quality you want, follow these steps: 1 Align the print cartridges. For more information, see "Aligning print cartridges" on page 91. If print quality has not improved, continue to step 2. 2 Clean the print cartridge nozzles. For more information, see "Cleaning the print cartridge nozzles" on page 92. If print quality has not improved, continue to step 3. 3 Remove and reinsert the cartridges. For more information, see "Removing a used print cartridge" on page 89 and "Installing print cartridges" on page 89. If print quality has not improved, continue to step 4. 4 Wipe the print cartridge nozzles and contacts. For more information, see "Wiping the print cartridge nozzles and contacts" on page 92. If print quality is still not satisfactory, replace the cartridge. For more information, see "Ordering supplies" on page 94. Aligning print cartridges 1 Load plain or heavyweight matte paper. 2 From the control panel, press Copy Mode. 3 Press . 4 Press or repeatedly until Tools appears. 5 Press . 6 Press or repeatedly until Maintenance appears. 7 Press . 8 Press or repeatedly until Align Cartridges appears 9 Press . An alignment page prints. If you aligned the cartridges to improve print quality, print your document again. If print quality has not improved, clean the print cartridge nozzles. Maintaining the printer 91
-
 1
1 -
2
-
3
-
4
-
5
-
6
-
7
-
8
-
9
-
10
-
11
-
12
-
13
-
14
-
15
-
16
-
17
-
18
-
19
-
20
-
21
-
22
-
23
-
24
-
25
-
26
-
27
-
28
-
29
-
30
-
31
-
32
-
33
-
34
-
35
-
36
-
37
-
38
-
39
-
40
-
41
-
42
-
43
-
44
-
45
-
46
-
47
-
48
-
49
-
50
-
51
-
52
-
53
-
54
-
55
-
56
-
57
-
58
-
59
-
60
-
61
-
62
-
63
-
64
-
65
-
66
-
67
-
68
-
69
-
70
-
71
-
72
-
73
-
74
-
75
-
76
-
77
-
78
-
79
-
80
-
81
-
82
-
83
-
84
-
85
-
 86
86 -
 87
87 -
 88
88 -
 89
89 -
 90
90 -
 91
91 -
 92
92 -
 93
93 -
 94
94 -
 95
95 -
 96
96 -
97
-
98
-
99
-
100
-
101
-
102
-
103
-
104
-
105
-
106
-
107
-
108
-
109
-
110
-
111
-
112
-
113
-
114
-
115
-
116
-
117
-
118
-
119
-
120
-
121
-
122
-
123
-
124
-
125
-
126
-
127
-
128
-
129
-
130
-
131
-
132
-
133
-
134
-
135
-
136
-
137
 |
 |