Lexmark X5450 User's Guide - Page 88
Configuring a network printer manually, Finding a printer/print server located on remote subnets
 |
View all Lexmark X5450 manuals
Add to My Manuals
Save this manual to your list of manuals |
Page 88 highlights
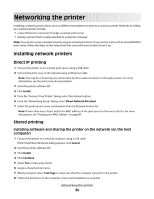
Configuring a network printer manually 1 From the "Configure Network Printers" dialog, highlight the printer you want to configure, and then click Configure. 2 Select DHCP or Configure IP Address Manually. 3 Enter the desired IP address, subnet mask, and gateway for the printer. 4 Click OK. Finding a printer/print server located on remote subnets The printer software CD can automatically find the printers that are located on the same network as the computer. If the printer and print server are located on another network (called a subnet), you must manually enter an IP address during printer software installation. Network troubleshooting tips 1 Make sure the printer is set up correctly. For more information, see the printer setup documentation. 2 Make sure all cable connections are secure. For more information, see the printer or print server setup documentation. 3 Make sure the correct lights are showing on the print server. For more information, see the print server documentation. 4 If the printer software CD cannot find the printer/print server, wait a few minutes, and then try running the CD again. Network traffic speeds vary. 5 Make sure the computer you are using to install the printer is connected to the network. 6 See the print server documentation for additional troubleshooting. Networking the printer 88
-
 1
1 -
2
-
3
-
4
-
5
-
6
-
7
-
8
-
9
-
10
-
11
-
12
-
13
-
14
-
15
-
16
-
17
-
18
-
19
-
20
-
21
-
22
-
23
-
24
-
25
-
26
-
27
-
28
-
29
-
30
-
31
-
32
-
33
-
34
-
35
-
36
-
37
-
38
-
39
-
40
-
41
-
42
-
43
-
44
-
45
-
46
-
47
-
48
-
49
-
50
-
51
-
52
-
53
-
54
-
55
-
56
-
57
-
58
-
59
-
60
-
61
-
62
-
63
-
64
-
65
-
66
-
67
-
68
-
69
-
70
-
71
-
72
-
73
-
74
-
75
-
76
-
77
-
78
-
79
-
80
-
81
-
82
-
 83
83 -
 84
84 -
 85
85 -
 86
86 -
 87
87 -
 88
88 -
 89
89 -
 90
90 -
 91
91 -
 92
92 -
 93
93 -
94
-
95
-
96
-
97
-
98
-
99
-
100
-
101
-
102
-
103
-
104
-
105
-
106
-
107
-
108
-
109
-
110
-
111
-
112
-
113
-
114
-
115
-
116
-
117
-
118
-
119
-
120
-
121
-
122
-
123
-
124
-
125
-
126
-
127
-
128
-
129
-
130
-
131
-
132
-
133
-
134
-
135
-
136
-
137
 |
 |