Lexmark X5450 User's Guide - Page 21
Learning about the printer, Understanding the parts of the printer, Use
 |
View all Lexmark X5450 manuals
Add to My Manuals
Save this manual to your list of manuals |
Page 21 highlights
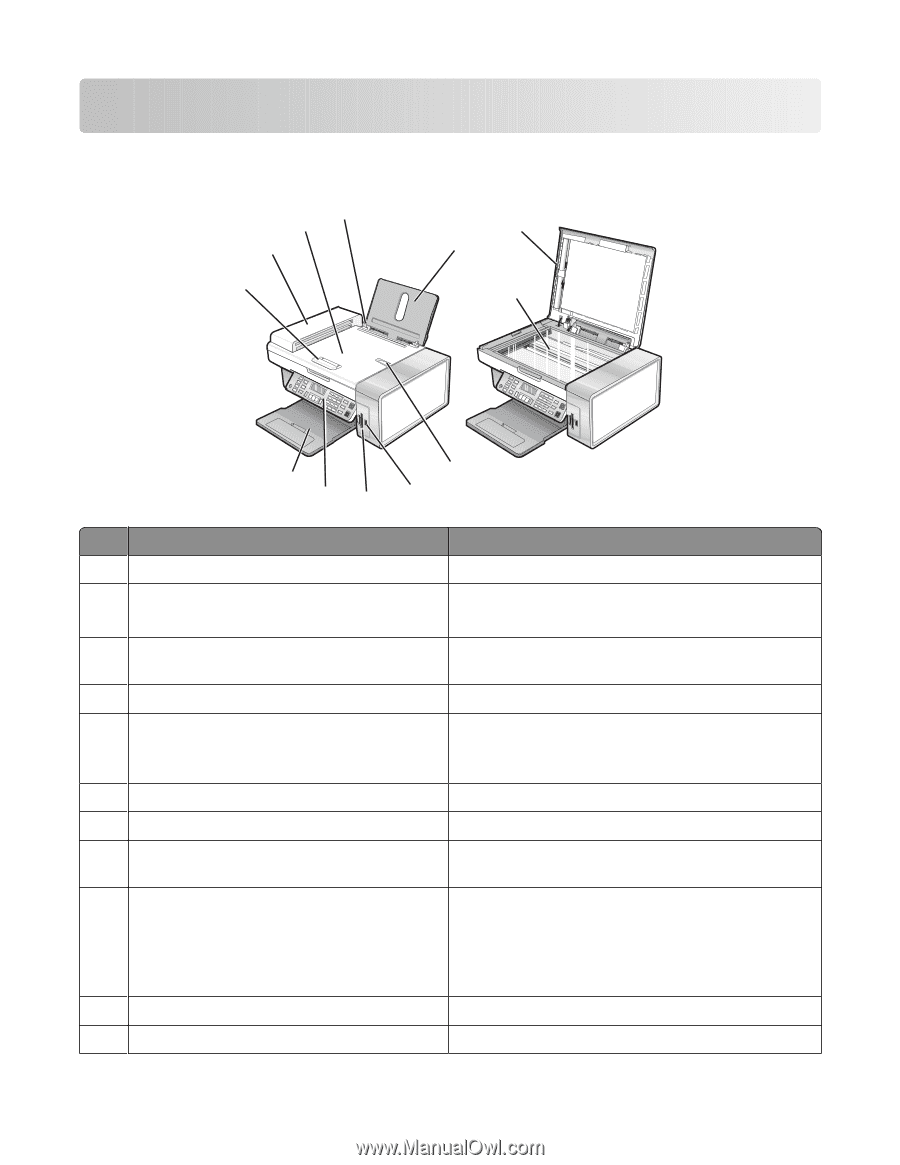
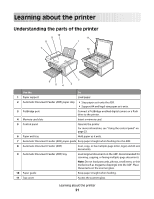
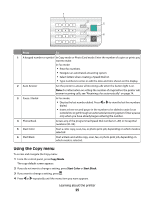
Learning about the printer Understanding the parts of the printer 10 9 8 11 1 7 12 6 54 2 3 Use the To 1 Paper support Load paper. 2 Automatic Document Feeder (ADF) paper stop • Stop paper as it exits the ADF. • Support A4 and legal-size paper as it exits. 3 PictBridge port Connect a PictBridge-enabled digital camera or a flash drive to the printer. 4 Memory card slots Insert a memory card. 5 Control panel Operate the printer. For more information, see "Using the control panel" on page 23. 6 Paper exit tray Hold paper as it exits. 7 Automatic Document Feeder (ADF) paper guide Keep paper straight when feeding into the ADF. 8 Automatic Document Feeder (ADF) Scan, copy, or fax multiple-page letter, legal, and A4 size documents. 9 Automatic Document Feeder (ADF) tray Load original documents in the ADF. Recommended for scanning, copying, or faxing multiple-page documents. Note: Do not load postcards, photos, small items, or thin media (such as magazine clippings) into the ADF. Place these items on the scanner glass. 10 Paper guide Keep paper straight when feeding. 11 Top cover Access the scanner glass. Learning about the printer 21
-
 1
1 -
2
-
3
-
4
-
5
-
6
-
7
-
8
-
9
-
10
-
11
-
12
-
13
-
14
-
15
-
 16
16 -
 17
17 -
 18
18 -
 19
19 -
 20
20 -
 21
21 -
 22
22 -
 23
23 -
 24
24 -
 25
25 -
 26
26 -
27
-
28
-
29
-
30
-
31
-
32
-
33
-
34
-
35
-
36
-
37
-
38
-
39
-
40
-
41
-
42
-
43
-
44
-
45
-
46
-
47
-
48
-
49
-
50
-
51
-
52
-
53
-
54
-
55
-
56
-
57
-
58
-
59
-
60
-
61
-
62
-
63
-
64
-
65
-
66
-
67
-
68
-
69
-
70
-
71
-
72
-
73
-
74
-
75
-
76
-
77
-
78
-
79
-
80
-
81
-
82
-
83
-
84
-
85
-
86
-
87
-
88
-
89
-
90
-
91
-
92
-
93
-
94
-
95
-
96
-
97
-
98
-
99
-
100
-
101
-
102
-
103
-
104
-
105
-
106
-
107
-
108
-
109
-
110
-
111
-
112
-
113
-
114
-
115
-
116
-
117
-
118
-
119
-
120
-
121
-
122
-
123
-
124
-
125
-
126
-
127
-
128
-
129
-
130
-
131
-
132
-
133
-
134
-
135
-
136
-
137
 |
 |