Nokia N72 User Guide - Page 35
Edit images, Reset user mode - manual
 |
View all Nokia N72 manuals
Add to My Manuals
Save this manual to your list of manuals |
Page 35 highlights
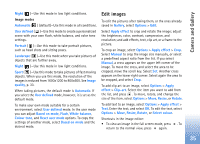
Camera and Gallery Night ( )-Use this mode in low light conditions. Image modes Automatic ( ) (default)-Use this mode in all conditions. User defined ( )-Use this mode to create a personalized scene with your own flash, white balance, and color tone settings. Portrait ( )-Use this mode to take portrait pictures, such as head shots and sitting poses. Landscape ( )-Use this mode when you take pictures of objects that are further away. Night ( )-Use this mode in low light conditions. Sport ( )-Use this mode to take pictures of fast moving objects. When you use this mode, the resolution of the images is reduced from 1600x1200 to 800x600. See Image quality, p. 33. When taking pictures, the default mode is Automatic. If you select the User defined mode, however, it is set as the default mode. To make your own mode suitable for a certain environment, select User defined mode. In the user mode you can adjust Based on mode, Flash, White balance, Colour tone, and Reset user mode options. To copy the settings of another mode, select Based on mode and the desired mode. Edit images To edit the pictures after taking them, or the ones already saved in Gallery, select Options > Edit. Select Apply effect to crop and rotate the image; adjust the brightness, color, contrast, compression, and resolution; and add effects, text, clip art, or a frame to the picture. To crop an image, select Options > Apply effect > Crop. Select Manual to crop the image size manually, or select a predefined aspect ratio from the list. If you select Manual, a cross appears on the upper left corner of the image. To move the cross, and select the area to be cropped, move the scroll key. Select Set. Another cross appears on the lower right corner. Select again the area to be cropped, and select Crop. To add clip art to an image, select Options > Apply effect > Clip-art. Select the item you want to add from the list, and press . To move, rotate, and change the size of the item, select Options > Move, Resize, or Rotate. To add text to an image, select Options > Apply effect > Text. Enter the text, and select OK. To edit the text, select Options > Move, Resize, Rotate, or Select colour. Shortcuts in the image editor: • To view an image in the full screen mode, press . To return to the normal view, press again. 35
-
 1
1 -
2
-
3
-
4
-
5
-
6
-
7
-
8
-
9
-
10
-
11
-
12
-
13
-
14
-
15
-
16
-
17
-
18
-
19
-
20
-
21
-
22
-
23
-
24
-
25
-
26
-
27
-
28
-
29
-
 30
30 -
 31
31 -
 32
32 -
 33
33 -
 34
34 -
 35
35 -
 36
36 -
 37
37 -
 38
38 -
 39
39 -
 40
40 -
41
-
42
-
43
-
44
-
45
-
46
-
47
-
48
-
49
-
50
-
51
-
52
-
53
-
54
-
55
-
56
-
57
-
58
-
59
-
60
-
61
-
62
-
63
-
64
-
65
-
66
-
67
-
68
-
69
-
70
-
71
-
72
-
73
-
74
-
75
-
76
-
77
-
78
-
79
-
80
-
81
-
82
-
83
-
84
-
85
-
86
-
87
-
88
-
89
-
90
-
91
-
92
-
93
-
94
-
95
-
96
-
97
-
98
-
99
-
100
-
101
-
102
-
103
-
104
-
105
-
106
-
107
-
108
-
109
-
110
-
111
-
112
-
113
-
114
-
115
-
116
-
117
-
118
-
119
-
120
 |
 |
