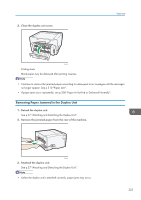
Ricoh Aficio SG 3110DN User Guide - Page 228
See p.80 Paper Handling Precautions, p.77 Loadable Paper Sizes and Quantities.
 |
View all Ricoh Aficio SG 3110DN manuals
Add to My Manuals
Save this manual to your list of manuals |
Page 228 highlights
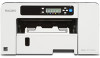
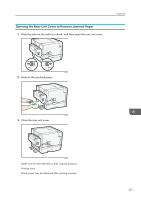
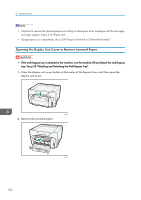
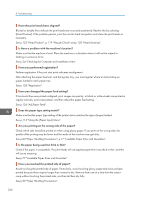
8. Troubleshooting Have the print heads been aligned? Blurred or double lines indicate the print heads are incorrectly positioned. Resolve this by selecting [Head Position]. If the problem persists, print the nozzle check test pattern and clean the print heads as necessary. See p.123 "Head Position", p.119 "Nozzle Check" and p.120 "Head-cleaning". Is there a problem with the machine's location? Make sure that the machine is level. Place the machine in a location where it will not be subject to shaking or excessive force. See p.34 "Checking the Computer and Installation Area". Have you performed registration? Perform registration if the print start point indicates misalignment. After attaching the paper feed unit, and the bypass tray, you must register where to start printing on paper loaded in each paper tray. See p.128 "Registration". Have you changed the paper feed setting? If horizontal lines are printed unaligned, print images are patchy, or black or white streaks are printed at regular intervals, print a test pattern, and then adjust the paper feed setting. See p.126 "Adj.Paper Feed". Does the paper type setting match? Make sure that the paper type setting of the printer driver matches the type of paper loaded. See p.114 "Using the [Paper Input] Menu". Are you printing on the wrong side of the paper? Check which side should be printed on when using glossy paper. If you print on the wrong side, the quality of the printing may be lower and the inside of the machine may get dirty. See p.80 "Paper Handling Precautions", p.77 "Loadable Paper Sizes and Quantities". Is the paper being used too thick or thin? Check if the paper is compatible. The print heads will rub against paper that is too thick or thin, and this will cause smearing. See p.77 "Loadable Paper Sizes and Quantities". Have you touched the printed side of paper? Avoid touching the printed side of paper. Particularly, avoid touching glossy paper that have just been printed because these require longer than normal to dry. Remove them one at a time from the output ramp without touching the printed side, and then let them dry fully. See p.80 "Paper Handling Precautions". 226
-
 1
1 -
2
-
3
-
4
-
5
-
6
-
7
-
8
-
9
-
10
-
11
-
12
-
13
-
14
-
15
-
16
-
17
-
18
-
19
-
20
-
21
-
22
-
23
-
24
-
25
-
26
-
27
-
28
-
29
-
30
-
31
-
32
-
33
-
34
-
35
-
36
-
37
-
38
-
39
-
40
-
41
-
42
-
43
-
44
-
45
-
46
-
47
-
48
-
49
-
50
-
51
-
52
-
53
-
54
-
55
-
56
-
57
-
58
-
59
-
60
-
61
-
62
-
63
-
64
-
65
-
66
-
67
-
68
-
69
-
70
-
71
-
72
-
73
-
74
-
75
-
76
-
77
-
78
-
79
-
80
-
81
-
82
-
83
-
84
-
85
-
86
-
87
-
88
-
89
-
90
-
91
-
92
-
93
-
94
-
95
-
96
-
97
-
98
-
99
-
100
-
101
-
102
-
103
-
104
-
105
-
106
-
107
-
108
-
109
-
110
-
111
-
112
-
113
-
114
-
115
-
116
-
117
-
118
-
119
-
120
-
121
-
122
-
123
-
124
-
125
-
126
-
127
-
128
-
129
-
130
-
131
-
132
-
133
-
134
-
135
-
136
-
137
-
138
-
139
-
140
-
141
-
142
-
143
-
144
-
145
-
146
-
147
-
148
-
149
-
150
-
151
-
152
-
153
-
154
-
155
-
156
-
157
-
158
-
159
-
160
-
161
-
162
-
163
-
164
-
165
-
166
-
167
-
168
-
169
-
170
-
171
-
172
-
173
-
174
-
175
-
176
-
177
-
178
-
179
-
180
-
181
-
182
-
183
-
184
-
185
-
186
-
187
-
188
-
189
-
190
-
191
-
192
-
193
-
194
-
195
-
196
-
197
-
198
-
199
-
200
-
201
-
202
-
203
-
204
-
205
-
206
-
207
-
208
-
209
-
210
-
211
-
212
-
213
-
214
-
215
-
216
-
217
-
218
-
219
-
220
-
221
-
222
-
 223
223 -
 224
224 -
 225
225 -
 226
226 -
 227
227 -
 228
228 -
 229
229 -
 230
230 -
 231
231 -
 232
232 -
 233
233 -
234
-
235
-
236
-
237
-
238
-
239
-
240
-
241
-
242
-
243
-
244
-
245
-
246
-
247
-
248
-
249
-
250
-
251
-
252
-
253
-
254
-
255
-
256
-
257
-
258
-
259
-
260
-
261
-
262
-
263
-
264
-
265
-
266
-
267
-
268
-
269
-
270
-
271
-
272
-
273
-
274
-
275
-
276
-
277
-
278
-
279
-
280
-
281
-
282
-
283
-
284
-
285
-
286
-
287
-
288
-
289
-
290
-
291
-
292
-
293
-
294
-
295
-
296
-
297
-
298
-
299
-
300
-
301
-
302
-
303
-
304
-
305
-
306
-
307
-
308
-
309
-
310
-
311
-
312
-
313
-
314
-
315
-
316
-
317
-
318
-
319
-
320
-
321
-
322
-
323
-
324
-
325
-
326
-
327
-
328
-
329
-
330
-
331
-
332
-
333
-
334
-
335
-
336
-
337
-
338
 |
 |