Ricoh Aficio SG 3110DN User Guide - Page 60
Click [Quick Install for Network].
 |
View all Ricoh Aficio SG 3110DN manuals
Add to My Manuals
Save this manual to your list of manuals |
Page 60 highlights
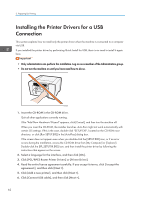
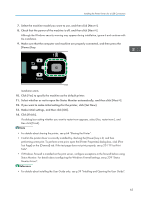
2. Preparing for Printing • Only administrators can perform this installation. Log on as a member of the Administrators group. Notes on the Installation Although the Windows security warning may appear during installation, ignore it and continue with the installation. 1. Insert the CD-ROM in the CD-ROM drive. Quit all other applications currently running. 2. Select a language for the interface, and then click [OK]. 3. Click [Quick Install for Network]. 4. Read the entire license agreement carefully. If you accept its terms, click [I accept the agreement.], and then click [Next >]. The search for the network printer starts. 5. Select the model of printer you want to use, and then click [Install]. Installation starts. If the machine cannot be found and only "Printer Port" appears in the [Printer Selection] dialog box, either the machine's IP address has not been specified or the computer and machine are not on the same network segment. Before installing the software, check the machine's IP address and the network topology. Otherwise, select "Printer Port" in the dialog box, and then install the printer driver. 6. Click [Finish]. The printer driver and the User Guide are now installed. • The installer launch automatically as Auto Run programs when you insert the CD-ROM. Auto Run might not work automatically with certain OS settings. If this is the case, double-click "SETUP.EXE", located on the CD-ROM root directory, or click [Run SETUP.EXE] in the [AutoPlay] dialog box. • When installation is complete, the User Guide icon appears on your desktop. • If a message prompting you to restart the computer appears, restart the computer. • Confirm the printer driver is correctly installed by checking the [Power] key is lit, and then performing a test print. See p.116 "Using the [List/Test Print] Menu". 58
-
 1
1 -
2
-
3
-
4
-
5
-
6
-
7
-
8
-
9
-
10
-
11
-
12
-
13
-
14
-
15
-
16
-
17
-
18
-
19
-
20
-
21
-
22
-
23
-
24
-
25
-
26
-
27
-
28
-
29
-
30
-
31
-
32
-
33
-
34
-
35
-
36
-
37
-
38
-
39
-
40
-
41
-
42
-
43
-
44
-
45
-
46
-
47
-
48
-
49
-
50
-
51
-
52
-
53
-
54
-
 55
55 -
 56
56 -
 57
57 -
 58
58 -
 59
59 -
 60
60 -
 61
61 -
 62
62 -
 63
63 -
 64
64 -
 65
65 -
66
-
67
-
68
-
69
-
70
-
71
-
72
-
73
-
74
-
75
-
76
-
77
-
78
-
79
-
80
-
81
-
82
-
83
-
84
-
85
-
86
-
87
-
88
-
89
-
90
-
91
-
92
-
93
-
94
-
95
-
96
-
97
-
98
-
99
-
100
-
101
-
102
-
103
-
104
-
105
-
106
-
107
-
108
-
109
-
110
-
111
-
112
-
113
-
114
-
115
-
116
-
117
-
118
-
119
-
120
-
121
-
122
-
123
-
124
-
125
-
126
-
127
-
128
-
129
-
130
-
131
-
132
-
133
-
134
-
135
-
136
-
137
-
138
-
139
-
140
-
141
-
142
-
143
-
144
-
145
-
146
-
147
-
148
-
149
-
150
-
151
-
152
-
153
-
154
-
155
-
156
-
157
-
158
-
159
-
160
-
161
-
162
-
163
-
164
-
165
-
166
-
167
-
168
-
169
-
170
-
171
-
172
-
173
-
174
-
175
-
176
-
177
-
178
-
179
-
180
-
181
-
182
-
183
-
184
-
185
-
186
-
187
-
188
-
189
-
190
-
191
-
192
-
193
-
194
-
195
-
196
-
197
-
198
-
199
-
200
-
201
-
202
-
203
-
204
-
205
-
206
-
207
-
208
-
209
-
210
-
211
-
212
-
213
-
214
-
215
-
216
-
217
-
218
-
219
-
220
-
221
-
222
-
223
-
224
-
225
-
226
-
227
-
228
-
229
-
230
-
231
-
232
-
233
-
234
-
235
-
236
-
237
-
238
-
239
-
240
-
241
-
242
-
243
-
244
-
245
-
246
-
247
-
248
-
249
-
250
-
251
-
252
-
253
-
254
-
255
-
256
-
257
-
258
-
259
-
260
-
261
-
262
-
263
-
264
-
265
-
266
-
267
-
268
-
269
-
270
-
271
-
272
-
273
-
274
-
275
-
276
-
277
-
278
-
279
-
280
-
281
-
282
-
283
-
284
-
285
-
286
-
287
-
288
-
289
-
290
-
291
-
292
-
293
-
294
-
295
-
296
-
297
-
298
-
299
-
300
-
301
-
302
-
303
-
304
-
305
-
306
-
307
-
308
-
309
-
310
-
311
-
312
-
313
-
314
-
315
-
316
-
317
-
318
-
319
-
320
-
321
-
322
-
323
-
324
-
325
-
326
-
327
-
328
-
329
-
330
-
331
-
332
-
333
-
334
-
335
-
336
-
337
-
338
 |
 |