Ricoh Aficio SG 3110DN User Guide - Page 230
Positions Do Not Match the Displayed Image, Other Problems, On the [Detailed Settings] tab
 |
View all Ricoh Aficio SG 3110DN manuals
Add to My Manuals
Save this manual to your list of manuals |
Page 230 highlights
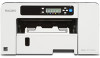
8. Troubleshooting Positions Do Not Match the Displayed Image If the position of printed items differs from the position of displayed items, refer to the following questions: Have the settings for page layout been made? Check whether page layout settings have been made with the application. Does the paper size setting match? Make sure that the paper size selected in the [Print On:] list of the [Printer Properties] dialog box matches the size of the paper loaded. Have the print heads been aligned? When bidirectional printing is performed, select [Head Position] to align the print heads. If the problem persists, print the nozzle check test pattern and clean the print heads as necessary. See p.123 "Head Position", p.119 "Nozzle Check" and p.120 "Head-cleaning". Have you changed Printable area? The problem may be solved by changing [Printable Area:] in the [Printer Properties] dialog box. On the [Detailed Settings] tab, set [Printable Area:] to [Maximum]. Have you changed Print Quality? In [Print Quality] on the [Accessories] tab, select the [Uni-directional print only] check box. Note, however, that this will slow printing down. Is Image Position set correctly? On the [Detailed Settings] tab, select [Edit], and then click [Set Image Position...]. When the [Set Image Position] dialog box is displayed, specify [Adjust Image Position] correctly. Other Problems You may eliminate certain problems by changing the printer driver settings as described below: Cannot print certain data properly when using a certain application, or cannot print image data properly. • In the [Select Print Quality:], select [Quality Priority], and then print. • On the [Detailed Settings] tab, select [Print Quality], and then select [Photographic], [Text], or [Thin lines] in [Dithering:]. • On the [Detailed Settings] tab, select [Driver Options], and then select the [Spool Data in EMF Format] check box. • On the [Detailed Settings] tab, select [Print Quality], and then clear the [Adjust Photographs] and [Smooth Low Resolution Images] check boxes. 228
-
 1
1 -
2
-
3
-
4
-
5
-
6
-
7
-
8
-
9
-
10
-
11
-
12
-
13
-
14
-
15
-
16
-
17
-
18
-
19
-
20
-
21
-
22
-
23
-
24
-
25
-
26
-
27
-
28
-
29
-
30
-
31
-
32
-
33
-
34
-
35
-
36
-
37
-
38
-
39
-
40
-
41
-
42
-
43
-
44
-
45
-
46
-
47
-
48
-
49
-
50
-
51
-
52
-
53
-
54
-
55
-
56
-
57
-
58
-
59
-
60
-
61
-
62
-
63
-
64
-
65
-
66
-
67
-
68
-
69
-
70
-
71
-
72
-
73
-
74
-
75
-
76
-
77
-
78
-
79
-
80
-
81
-
82
-
83
-
84
-
85
-
86
-
87
-
88
-
89
-
90
-
91
-
92
-
93
-
94
-
95
-
96
-
97
-
98
-
99
-
100
-
101
-
102
-
103
-
104
-
105
-
106
-
107
-
108
-
109
-
110
-
111
-
112
-
113
-
114
-
115
-
116
-
117
-
118
-
119
-
120
-
121
-
122
-
123
-
124
-
125
-
126
-
127
-
128
-
129
-
130
-
131
-
132
-
133
-
134
-
135
-
136
-
137
-
138
-
139
-
140
-
141
-
142
-
143
-
144
-
145
-
146
-
147
-
148
-
149
-
150
-
151
-
152
-
153
-
154
-
155
-
156
-
157
-
158
-
159
-
160
-
161
-
162
-
163
-
164
-
165
-
166
-
167
-
168
-
169
-
170
-
171
-
172
-
173
-
174
-
175
-
176
-
177
-
178
-
179
-
180
-
181
-
182
-
183
-
184
-
185
-
186
-
187
-
188
-
189
-
190
-
191
-
192
-
193
-
194
-
195
-
196
-
197
-
198
-
199
-
200
-
201
-
202
-
203
-
204
-
205
-
206
-
207
-
208
-
209
-
210
-
211
-
212
-
213
-
214
-
215
-
216
-
217
-
218
-
219
-
220
-
221
-
222
-
223
-
224
-
 225
225 -
 226
226 -
 227
227 -
 228
228 -
 229
229 -
 230
230 -
 231
231 -
 232
232 -
 233
233 -
 234
234 -
 235
235 -
236
-
237
-
238
-
239
-
240
-
241
-
242
-
243
-
244
-
245
-
246
-
247
-
248
-
249
-
250
-
251
-
252
-
253
-
254
-
255
-
256
-
257
-
258
-
259
-
260
-
261
-
262
-
263
-
264
-
265
-
266
-
267
-
268
-
269
-
270
-
271
-
272
-
273
-
274
-
275
-
276
-
277
-
278
-
279
-
280
-
281
-
282
-
283
-
284
-
285
-
286
-
287
-
288
-
289
-
290
-
291
-
292
-
293
-
294
-
295
-
296
-
297
-
298
-
299
-
300
-
301
-
302
-
303
-
304
-
305
-
306
-
307
-
308
-
309
-
310
-
311
-
312
-
313
-
314
-
315
-
316
-
317
-
318
-
319
-
320
-
321
-
322
-
323
-
324
-
325
-
326
-
327
-
328
-
329
-
330
-
331
-
332
-
333
-
334
-
335
-
336
-
337
-
338
 |
 |