Ricoh Aficio SG 3110DN User Guide - Page 31
Before installing or removing options, always disconnect the power cord plugs from the wall outlet.
 |
View all Ricoh Aficio SG 3110DN manuals
Add to My Manuals
Save this manual to your list of manuals |
Page 31 highlights
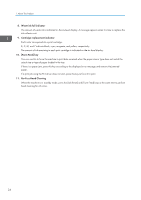
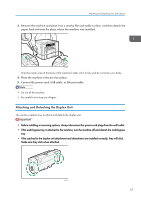
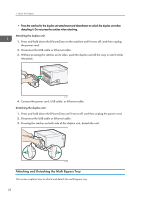
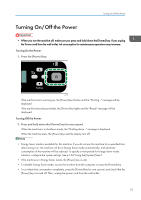
Attaching and Detaching Units and Options • Before installing or removing options, always disconnect the power cord plugs from the wall outlet. • Do not forcefully press down on the multi bypass tray. It may come off the machine and paper misfeeds or positioning problems may result. Attaching the multi bypass tray 1. Press and hold down the [Power] key until it turns off, and then unplug the power cord. 2. Disconnect the USB cable or Ethernet cable. 3. Take the multi bypass tray out of the box, and remove the tape. 4. Attach the multi bypass tray while pressing the tabs on each side, and then push it in all the way. CHU083 Make sure to return the tabs to their original positions. 5. Connect the power cord, USB cable, or Ethernet cable. • After attaching an option, check that the printer driver has recognized it. See p.97 "Specifying Settings on [Accessories] Tab", p.173 "Displaying the Machine Status on a Macintosh". • After attaching the multi bypass tray, you must register where to start printing on paper loaded in the multi bypass tray. See p.128 "Registration". • The coin screw on the underside of the multi bypass tray is used when setting the side fence. Detaching the multi bypass tray 1. Press and hold down the [Power] key until it turns off, and then unplug the power cord. 2. Disconnect the USB cable or Ethernet cable. 3. Remove any paper in the bypass tray. 4. If the bypass tray extension is pulled out, push it back in. 29
-
 1
1 -
2
-
3
-
4
-
5
-
6
-
7
-
8
-
9
-
10
-
11
-
12
-
13
-
14
-
15
-
16
-
17
-
18
-
19
-
20
-
21
-
22
-
23
-
24
-
25
-
 26
26 -
 27
27 -
 28
28 -
 29
29 -
 30
30 -
 31
31 -
 32
32 -
 33
33 -
 34
34 -
 35
35 -
 36
36 -
37
-
38
-
39
-
40
-
41
-
42
-
43
-
44
-
45
-
46
-
47
-
48
-
49
-
50
-
51
-
52
-
53
-
54
-
55
-
56
-
57
-
58
-
59
-
60
-
61
-
62
-
63
-
64
-
65
-
66
-
67
-
68
-
69
-
70
-
71
-
72
-
73
-
74
-
75
-
76
-
77
-
78
-
79
-
80
-
81
-
82
-
83
-
84
-
85
-
86
-
87
-
88
-
89
-
90
-
91
-
92
-
93
-
94
-
95
-
96
-
97
-
98
-
99
-
100
-
101
-
102
-
103
-
104
-
105
-
106
-
107
-
108
-
109
-
110
-
111
-
112
-
113
-
114
-
115
-
116
-
117
-
118
-
119
-
120
-
121
-
122
-
123
-
124
-
125
-
126
-
127
-
128
-
129
-
130
-
131
-
132
-
133
-
134
-
135
-
136
-
137
-
138
-
139
-
140
-
141
-
142
-
143
-
144
-
145
-
146
-
147
-
148
-
149
-
150
-
151
-
152
-
153
-
154
-
155
-
156
-
157
-
158
-
159
-
160
-
161
-
162
-
163
-
164
-
165
-
166
-
167
-
168
-
169
-
170
-
171
-
172
-
173
-
174
-
175
-
176
-
177
-
178
-
179
-
180
-
181
-
182
-
183
-
184
-
185
-
186
-
187
-
188
-
189
-
190
-
191
-
192
-
193
-
194
-
195
-
196
-
197
-
198
-
199
-
200
-
201
-
202
-
203
-
204
-
205
-
206
-
207
-
208
-
209
-
210
-
211
-
212
-
213
-
214
-
215
-
216
-
217
-
218
-
219
-
220
-
221
-
222
-
223
-
224
-
225
-
226
-
227
-
228
-
229
-
230
-
231
-
232
-
233
-
234
-
235
-
236
-
237
-
238
-
239
-
240
-
241
-
242
-
243
-
244
-
245
-
246
-
247
-
248
-
249
-
250
-
251
-
252
-
253
-
254
-
255
-
256
-
257
-
258
-
259
-
260
-
261
-
262
-
263
-
264
-
265
-
266
-
267
-
268
-
269
-
270
-
271
-
272
-
273
-
274
-
275
-
276
-
277
-
278
-
279
-
280
-
281
-
282
-
283
-
284
-
285
-
286
-
287
-
288
-
289
-
290
-
291
-
292
-
293
-
294
-
295
-
296
-
297
-
298
-
299
-
300
-
301
-
302
-
303
-
304
-
305
-
306
-
307
-
308
-
309
-
310
-
311
-
312
-
313
-
314
-
315
-
316
-
317
-
318
-
319
-
320
-
321
-
322
-
323
-
324
-
325
-
326
-
327
-
328
-
329
-
330
-
331
-
332
-
333
-
334
-
335
-
336
-
337
-
338
 |
 |