Ricoh Aficio SP 9100DN Software Guide - Page 62
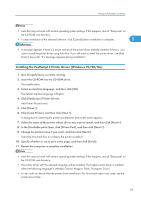
If Bidirectional Communication is Disabled, Under Windows 2000/XP and Windows Server 2003
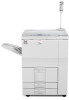 |
View all Ricoh Aficio SP 9100DN manuals
Add to My Manuals
Save this manual to your list of manuals |
Page 62 highlights
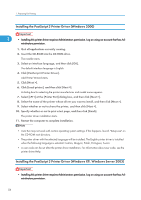
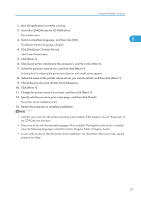
1. Preparing for Printing • The standard TCP/IP port must be used without changing the default port name (for Windows 2000/XP and Windows Server 2003). • Microsoft TCP/IP print IPv4 address must be specified for use (for Windows NT 4.0). 1 • IPP port name must include the IPv4 address when using the IPP protocol. When connected with USB The printer must be connected to the computer's USB port using the USB interface cable. The computer must support bidirectional communication. • Install SmartDeviceMonitor for Client from the CD-ROM provided. If Bidirectional Communication is Disabled Set up option settings when bidirectional communications are disabled. • Under Windows 2000/XP and Windows Server 2003, Manage Printers permission is required to change the printer properties in the [Printers] folder. Log on as an Administrators or Power Users group member. • Under Windows NT 4.0, Full Control permission is required to change the printer properties in the [Printers] folder. Log on as an Administrators or Power Users group member. 1. On the [Start] menu, point to [Settings], and then click [Printers]. The [Printers] window appears. 2. Click the icon of the printer you want to use. 3. On the [File] menu, click [Properties]. 4. Click the [Change Accessories] tab. If options in the [Change Accessories] tab are disabled, bidirectional connection is enabled. In this case, no change is necessary for option settings. If you are using the RPCS printer driver, click the [Change Accessories] tab. If you are using the PS printer driver, click the [Device Settings] tab. 5. Select options installed from the [Option] area, and then make the necessary settings. 6. Select the total amount of the memory in [Total Memory:], when the optional SDRAM module is added. 7. Under [Paper source tray settings:], click and highlight the tray to be used, and then select the appropriate size, position, and type for the tray. Select the [Tray locking] check box to exclude the tray from the targets of automatic tray selection. 8. Click [OK] to close the printer properties dialog box. 60
-
 1
1 -
2
-
3
-
4
-
5
-
6
-
7
-
8
-
9
-
10
-
11
-
12
-
13
-
14
-
15
-
16
-
17
-
18
-
19
-
20
-
21
-
22
-
23
-
24
-
25
-
26
-
27
-
28
-
29
-
30
-
31
-
32
-
33
-
34
-
35
-
36
-
37
-
38
-
39
-
40
-
41
-
42
-
43
-
44
-
45
-
46
-
47
-
48
-
49
-
50
-
51
-
52
-
53
-
54
-
55
-
56
-
 57
57 -
 58
58 -
 59
59 -
 60
60 -
 61
61 -
 62
62 -
 63
63 -
 64
64 -
 65
65 -
 66
66 -
 67
67 -
68
-
69
-
70
-
71
-
72
-
73
-
74
-
75
-
76
-
77
-
78
-
79
-
80
-
81
-
82
-
83
-
84
-
85
-
86
-
87
-
88
-
89
-
90
-
91
-
92
-
93
-
94
-
95
-
96
-
97
-
98
-
99
-
100
-
101
-
102
-
103
-
104
-
105
-
106
-
107
-
108
-
109
-
110
-
111
-
112
-
113
-
114
-
115
-
116
-
117
-
118
-
119
-
120
-
121
-
122
-
123
-
124
-
125
-
126
-
127
-
128
-
129
-
130
-
131
-
132
-
133
-
134
-
135
-
136
-
137
-
138
-
139
-
140
-
141
-
142
-
143
-
144
-
145
-
146
-
147
-
148
-
149
-
150
-
151
-
152
-
153
-
154
-
155
-
156
-
157
-
158
-
159
-
160
-
161
-
162
-
163
-
164
-
165
-
166
-
167
-
168
-
169
-
170
-
171
-
172
-
173
-
174
-
175
-
176
-
177
-
178
-
179
-
180
-
181
-
182
-
183
-
184
-
185
-
186
-
187
-
188
-
189
-
190
-
191
-
192
-
193
-
194
-
195
-
196
-
197
-
198
-
199
-
200
-
201
-
202
-
203
-
204
-
205
-
206
-
207
-
208
-
209
-
210
-
211
-
212
-
213
-
214
-
215
-
216
-
217
-
218
-
219
-
220
-
221
-
222
-
223
-
224
-
225
-
226
-
227
-
228
-
229
-
230
-
231
-
232
-
233
-
234
-
235
-
236
-
237
-
238
-
239
-
240
-
241
-
242
-
243
-
244
-
245
-
246
-
247
-
248
-
249
-
250
-
251
-
252
-
253
-
254
-
255
-
256
-
257
-
258
-
259
-
260
-
261
-
262
-
263
-
264
-
265
-
266
-
267
-
268
-
269
-
270
-
271
-
272
-
273
-
274
-
275
-
276
-
277
-
278
-
279
-
280
-
281
-
282
-
283
-
284
-
285
-
286
-
287
-
288
-
289
-
290
-
291
-
292
-
293
-
294
-
295
-
296
-
297
-
298
-
299
-
300
-
301
-
302
-
303
-
304
-
305
-
306
-
307
-
308
-
309
-
310
-
311
-
312
-
313
-
314
-
315
-
316
-
317
-
318
-
319
-
320
-
321
-
322
-
323
-
324
-
325
-
326
-
327
-
328
-
329
-
330
-
331
-
332
-
333
-
334
-
335
-
336
-
337
-
338
-
339
-
340
-
341
-
342
-
343
-
344
 |
 |
