Samsung SCH R500 User Manual (ENGLISH) - Page 110
Multimedia, My Sounds, Erase, Erase Sound?, Options, Set As, Rename, Unlock, Erase all, Sound Info
 |
View all Samsung SCH R500 manuals
Add to My Manuals
Save this manual to your list of manuals |
Page 110 highlights
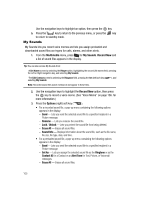
3. Press the PLAY key ( ) to play the voice memo. • To stop the memo, press the STOP key ( ). Press the key again to restart playing the memo. When the voice memo finishes playing, the selected voice memo remains highlighted in the list of sound files. Erase One Voice Memo 1. From the Multimedia menu, press pqrs for My Sounds. A list of sound files appears in the display. 2. Use the navigation keys to highlight the voice memo you wish to erase. 3. Press the Erase (left) soft key ( display. ). "Erase Sound?" appears in the 4. Press the Yes (left) soft key ( press the No (right) soft key ( ) to erase the selected voice memo, or ) to return to the list of sound files. Erase All Voice Memos at One Time 1. From the Multimedia menu, press pqrs for My Sounds. A list of sound files appears in the display. 2. Use the navigation keys to highlight a voice memo. 3. Press the Options (right) soft key ( ). The following options appear in the display: • Send - Lets you send a copy of this voice memo as part of a picture message. • Set As - preloaded sound files only - Lets you set this sound file as a Ringtone, Contact ID ringer, or Alert Tone. • Rename - Lets you change the name of this voice memo. • Lock/Unlock - Blocks/permits erasure of this voice memo. • Erase all - Erases all unlocked sound files that are not preloaded. • Sound Info - Shows you the Name, Size, Type, Date, and Time for this sound file. 4. Use the navigation keys to highlight Erase all, then press the key. "Erase All Sounds?" appears in the display. 5. Press the Yes (left) soft key ( ) to all of the sound files or press the No (right) soft key ( ) to return to the list of sound files. 107
-
 1
1 -
2
-
3
-
4
-
5
-
6
-
7
-
8
-
9
-
10
-
11
-
12
-
13
-
14
-
15
-
16
-
17
-
18
-
19
-
20
-
21
-
22
-
23
-
24
-
25
-
26
-
27
-
28
-
29
-
30
-
31
-
32
-
33
-
34
-
35
-
36
-
37
-
38
-
39
-
40
-
41
-
42
-
43
-
44
-
45
-
46
-
47
-
48
-
49
-
50
-
51
-
52
-
53
-
54
-
55
-
56
-
57
-
58
-
59
-
60
-
61
-
62
-
63
-
64
-
65
-
66
-
67
-
68
-
69
-
70
-
71
-
72
-
73
-
74
-
75
-
76
-
77
-
78
-
79
-
80
-
81
-
82
-
83
-
84
-
85
-
86
-
87
-
88
-
89
-
90
-
91
-
92
-
93
-
94
-
95
-
96
-
97
-
98
-
99
-
100
-
101
-
102
-
103
-
104
-
 105
105 -
 106
106 -
 107
107 -
 108
108 -
 109
109 -
 110
110 -
 111
111 -
 112
112 -
 113
113 -
 114
114 -
 115
115 -
116
-
117
-
118
-
119
-
120
-
121
-
122
-
123
-
124
-
125
-
126
-
127
-
128
-
129
-
130
-
131
-
132
-
133
-
134
-
135
-
136
-
137
-
138
-
139
-
140
-
141
-
142
-
143
-
144
-
145
-
146
-
147
-
148
-
149
-
150
-
151
-
152
-
153
-
154
-
155
-
156
-
157
-
158
-
159
-
160
-
161
-
162
-
163
-
164
-
165
-
166
-
167
-
168
-
169
-
170
-
171
-
172
-
173
-
174
-
175
-
176
-
177
-
178
-
179
-
180
 |
 |
