Tripp Lite 0SU70032 Owner's Manual for 0SU70030 / 0SU70032 KVM Switches 933207 - Page 36
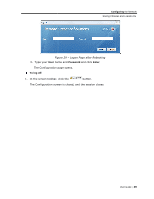
Device Version Upgrade Reboot Confirmation
 |
View all Tripp Lite 0SU70032 manuals
Add to My Manuals
Save this manual to your list of manuals |
Page 36 highlights
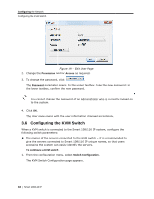
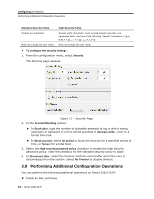
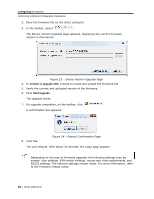
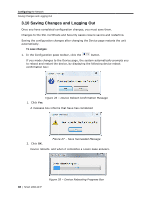
Configuring the Network Performing Additional Configuration Operations 2. Save the firmware file on the client computer. 3. In the toolbar, select . The Device Version Upgrade page appears, displaying the current firmware version on the device. Figure 23 - Device Version Upgrade Page 4. In Version to upgrade with, browse to locate and upload the firmware file. 5. Verify the current and uploaded version of the firmware. 6. Click Start Upgrade. The upgrade starts. 7. On upgrade completion, on the toolbar, click . A confirmation box appears. 8. Click Yes. Figure 24 - Reboot Confirmation Page The unit reboots. After about 30 seconds, the Login page appears. Depending on the type of firmware upgrade, the following settings may be erased: User settings, KVM switch settings, mouse and video adjustments, and RS232 settings. The network settings remain intact. For more information, refer to the firmware release notes. 36 | Smart 108/116 IP
-
 1
1 -
2
-
3
-
4
-
5
-
6
-
7
-
8
-
9
-
10
-
11
-
12
-
13
-
14
-
15
-
16
-
17
-
18
-
19
-
20
-
21
-
22
-
23
-
24
-
25
-
26
-
27
-
28
-
29
-
30
-
 31
31 -
 32
32 -
 33
33 -
 34
34 -
 35
35 -
 36
36 -
 37
37 -
 38
38 -
 39
39 -
 40
40 -
 41
41 -
42
-
43
-
44
-
45
-
46
-
47
-
48
-
49
-
50
-
51
-
52
-
53
-
54
-
55
-
56
-
57
-
58
-
59
-
60
-
61
-
62
-
63
-
64
-
65
-
66
-
67
-
68
-
69
-
70
-
71
-
72
-
73
-
74
-
75
-
76
-
77
-
78
-
79
-
80
-
81
-
82
-
83
-
84
-
85
-
86
 |
 |
