Uniden BCD325P2 Owners Manual - Page 61
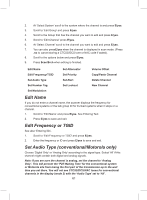
Edit Name, Set Audio Type conventional/Motorola only
 |
View all Uniden BCD325P2 manuals
Add to My Manuals
Save this manual to your list of manuals |
Page 61 highlights
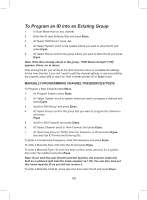
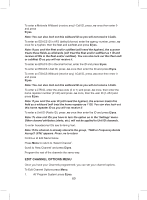
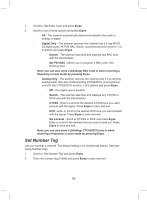
2. At 'Select System' scroll to the system where the channel is and press E/yes. 3. Scroll to 'Edit Group' and press E/yes. 4. Scroll to the Group that has the channel you want to edit and press E/yes. 5. Scroll to 'Edit Channel' press E/yes. 6. At 'Select Channel' scroll to the channel you want to edit and press E/yes. 7. You can also pressE/yes when the channel is displayed in scan mode. (Press .no to cancel storing a CTCSS/DCS tone or NAC code if asked). 8. Scroll to the options below and press E/yes. 9. Press Scan/Srch when editing is finished. Edit Name Edit Frequency/TGID Set Audio Type Set Number Tag Set Modulation Set Attenuator Set Priority Set Alert Set Lockout Volume Offset Copy/Paste Channel Delete Channel New Channel Edit Name If you do not enter a channel name, the scanner displays the frequency for conventional systems or the talk group ID for trunked systems when it stops on a channel. 1. Scroll to 'Edit Name' and press E/yes. See Entering Text. 2. Press E/yes to save and exit. Edit Frequency or TGID See also 'Entering IDs'. 1. Scroll to 'Edit Frequency or TGID' and press E/yes. 2. Enter the frequency or ID and press E/yes to save and exit. Set Audio Type (conventional/Motorola only) Choose 'Digital Only' or 'Analog Only' according to the signal type. Select 'All' if this channel might contain both digital and analog signals. Note: If you are sure the channel is analog, set the channel to 'Analog Only'. This will prevent the 'P25 Waiting Time' for the conventional system or Motorola site from losing the first part of the transmission up to the wait time you set there. You will not see CTCSS/DCS/NAC tones for conventional channels in the display (mode 2) with the 'Audio Type' set to 'All'. 61
-
 1
1 -
2
-
3
-
4
-
5
-
6
-
7
-
8
-
9
-
10
-
11
-
12
-
13
-
14
-
15
-
16
-
17
-
18
-
19
-
20
-
21
-
22
-
23
-
24
-
25
-
26
-
27
-
28
-
29
-
30
-
31
-
32
-
33
-
34
-
35
-
36
-
37
-
38
-
39
-
40
-
41
-
42
-
43
-
44
-
45
-
46
-
47
-
48
-
49
-
50
-
51
-
52
-
53
-
54
-
55
-
 56
56 -
 57
57 -
 58
58 -
 59
59 -
 60
60 -
 61
61 -
 62
62 -
 63
63 -
 64
64 -
 65
65 -
 66
66 -
67
-
68
-
69
-
70
-
71
-
72
-
73
-
74
-
75
-
76
-
77
-
78
-
79
-
80
-
81
-
82
-
83
-
84
-
85
-
86
-
87
-
88
-
89
-
90
-
91
-
92
-
93
-
94
-
95
-
96
-
97
-
98
-
99
-
100
-
101
-
102
-
103
-
104
-
105
-
106
-
107
-
108
-
109
-
110
-
111
-
112
-
113
-
114
-
115
-
116
-
117
-
118
-
119
-
120
-
121
-
122
-
123
-
124
-
125
-
126
-
127
-
128
-
129
-
130
-
131
-
132
 |
 |
