Uniden BCD325P2 Owners Manual - Page 66
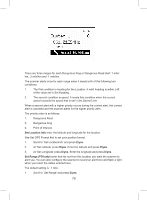
To Program a New Location press Menu. Scroll to 'Program Location' and press
 |
View all Uniden BCD325P2 manuals
Add to My Manuals
Save this manual to your list of manuals |
Page 66 highlights
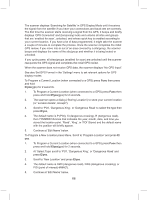
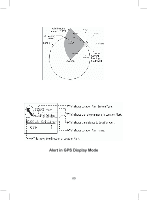
The scanner displays 'Searching for Satellite' in GPS Display Mode until it receives the signal from the satellite if you have your connections and baud rate set correctly. The first time the scanner starts receiving a signal from the GPS, it beeps and briefly displays 'GPS Connected' and (temporary) locks and unlocks all sites and groups that are 'enabled for scan', unlocked, and whose quick key is enabled according to your current location. If you have a lot of data programmed, it might take the scanner a couple of minutes to complete the process. Once the scanner completes the initial GPS review, if you move into or out of an area covered by a site/group, the scanner beeps and displays the name of the site/group and whether it is being locked or unlocked. If you cycle power, all sites/groups (enabled for scan) are unlocked until the scanner reacquires the GPS signal and completes the initial GPS review. When the scanner does not receive GPS data, the scanner displays "No GPS Input". See also Set GPS Format in the 'Settings' menu to set relevant options for GPS display modes. To Program a Current Location (when connected to a GPS) press Func then press and hold E/yes(gps) for 2 seconds. 1. To Program a Current Location (when connected to a GPS) press Func then press and hold E/yes(gps) for 2 seconds. 2. The scanner opens a dialog ('Storing Location') to store your current location (or 'Location Exists', Accept?). 3. Scroll to 'POI', 'Dangerous Xing', or 'Dangerous Road' to select the type then press E/yes. 4. The default name is P (POI), X (dangerous crossing), R (dangerous road), then YYMMDD hhmmss that indicates the year, month, date, and time you stored the location point. 'Road', 'Xing', or 'POI' Stored and the default name with the position will briefly appear. 5. Continue at 'Edit Name' below. To Program a New Location press Menu. Scroll to 'Program Location' and press E/ yes. 1. To Program a Current Location (when connected to a GPS) press Func then press and hold E/yes(gps) for 2 seconds. 2. At 'Select Type' scroll to 'POI', 'Dangerous Xing', or 'Dangerous Road' and press E/yes. 3. Scroll to 'New Location' and press E/yes. 4. The default name is DRD (dangerous road), DXG (dangerous crossing), or POI (point of interest)-####(?). 5. Continue at 'Edit Name' below. 66
-
 1
1 -
2
-
3
-
4
-
5
-
6
-
7
-
8
-
9
-
10
-
11
-
12
-
13
-
14
-
15
-
16
-
17
-
18
-
19
-
20
-
21
-
22
-
23
-
24
-
25
-
26
-
27
-
28
-
29
-
30
-
31
-
32
-
33
-
34
-
35
-
36
-
37
-
38
-
39
-
40
-
41
-
42
-
43
-
44
-
45
-
46
-
47
-
48
-
49
-
50
-
51
-
52
-
53
-
54
-
55
-
56
-
57
-
58
-
59
-
60
-
 61
61 -
 62
62 -
 63
63 -
 64
64 -
 65
65 -
 66
66 -
 67
67 -
 68
68 -
 69
69 -
 70
70 -
 71
71 -
72
-
73
-
74
-
75
-
76
-
77
-
78
-
79
-
80
-
81
-
82
-
83
-
84
-
85
-
86
-
87
-
88
-
89
-
90
-
91
-
92
-
93
-
94
-
95
-
96
-
97
-
98
-
99
-
100
-
101
-
102
-
103
-
104
-
105
-
106
-
107
-
108
-
109
-
110
-
111
-
112
-
113
-
114
-
115
-
116
-
117
-
118
-
119
-
120
-
121
-
122
-
123
-
124
-
125
-
126
-
127
-
128
-
129
-
130
-
131
-
132
 |
 |
