ZyXEL ES-2108PWR User Guide - Page 116
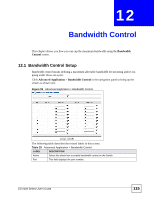
Bandwidth Control, ES-2108 Series User's Guide, Advanced Application > Bandwidth
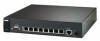 |
View all ZyXEL ES-2108PWR manuals
Add to My Manuals
Save this manual to your list of manuals |
Page 116 highlights
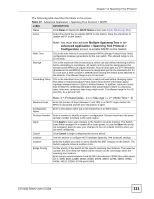
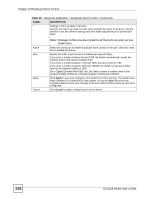
Chapter 12 Bandwidth Control Table 29 Advanced Application > Bandwidth Control (continued) LABEL DESCRIPTION * Settings in this row apply to all ports. Use this row only if you want to make some settings the same for all ports. Use this row first to set the common settings and then make adjustments on a port-by-port basis. Active Ingress Rate Active Egress Rate Apply Cancel Note: Changes in this row are copied to all the ports as soon as you make them. Make sure to select this check box to activate ingress limits on a port. Specify the maximum bandwidth allowed in Kilobits per second (Kbps) for the incoming traffic flow on a port. If you enter a number between 64 and 1728, the Switch automatically rounds the number down to the nearest multiple of 64. If you enter a number between 1729 and 1999, the rate is fixed at 1792. If you enter a number between 2000 and 103999, the Switch rounds the number down to the nearest multiple of 1000. On a Gigabit Ethernet/ Mini-GBIC slot, the Switch rounds a number down to the nearest multiple of 8000 for a number between 104000 and 1000000. Make sure to select this check box to activate egress limits on a port. Specify the maximum bandwidth allowed in Kilobits per second (Kbps) for the outgoing traffic flow on a port. If you enter a number between 64 and 1728, the Switch automatically rounds the number down to the nearest multiple of 64. If you enter a number between 1729 and 1999, the rate is fixed at 1792. If you enter a number between 2000 and 103999, the Switch rounds the number down to the nearest multiple of 1000. On a Gigabit Ethernet/ Mini-GBIC slot, the Switch rounds a number down to the nearest multiple of 8000 for a number between 104000 and 1000000. Click Apply to save your changes to the Switch's run-time memory. The Switch loses these changes if it is turned off or loses power, so use the Save link on the top navigation panel to save your changes to the non-volatile memory when you are done configuring. Click Cancel to reset the fields to your previous configuration. 116 ES-2108 Series User's Guide
-
 1
1 -
2
-
3
-
4
-
5
-
6
-
7
-
8
-
9
-
10
-
11
-
12
-
13
-
14
-
15
-
16
-
17
-
18
-
19
-
20
-
21
-
22
-
23
-
24
-
25
-
26
-
27
-
28
-
29
-
30
-
31
-
32
-
33
-
34
-
35
-
36
-
37
-
38
-
39
-
40
-
41
-
42
-
43
-
44
-
45
-
46
-
47
-
48
-
49
-
50
-
51
-
52
-
53
-
54
-
55
-
56
-
57
-
58
-
59
-
60
-
61
-
62
-
63
-
64
-
65
-
66
-
67
-
68
-
69
-
70
-
71
-
72
-
73
-
74
-
75
-
76
-
77
-
78
-
79
-
80
-
81
-
82
-
83
-
84
-
85
-
86
-
87
-
88
-
89
-
90
-
91
-
92
-
93
-
94
-
95
-
96
-
97
-
98
-
99
-
100
-
101
-
102
-
103
-
104
-
105
-
106
-
107
-
108
-
109
-
110
-
 111
111 -
 112
112 -
 113
113 -
 114
114 -
 115
115 -
 116
116 -
 117
117 -
 118
118 -
 119
119 -
 120
120 -
 121
121 -
122
-
123
-
124
-
125
-
126
-
127
-
128
-
129
-
130
-
131
-
132
-
133
-
134
-
135
-
136
-
137
-
138
-
139
-
140
-
141
-
142
-
143
-
144
-
145
-
146
-
147
-
148
-
149
-
150
-
151
-
152
-
153
-
154
-
155
-
156
-
157
-
158
-
159
-
160
-
161
-
162
-
163
-
164
-
165
-
166
-
167
-
168
-
169
-
170
-
171
-
172
-
173
-
174
-
175
-
176
-
177
-
178
-
179
-
180
-
181
-
182
-
183
-
184
-
185
-
186
-
187
-
188
-
189
-
190
-
191
-
192
-
193
-
194
-
195
-
196
-
197
-
198
-
199
-
200
-
201
-
202
-
203
-
204
-
205
-
206
-
207
-
208
-
209
-
210
-
211
-
212
-
213
-
214
-
215
-
216
-
217
-
218
-
219
-
220
-
221
-
222
-
223
-
224
-
225
-
226
-
227
-
228
-
229
-
230
-
231
-
232
-
233
-
234
-
235
-
236
-
237
-
238
-
239
-
240
-
241
-
242
-
243
-
244
-
245
-
246
-
247
-
248
-
249
-
250
-
251
-
252
-
253
-
254
-
255
-
256
-
257
-
258
-
259
-
260
-
261
-
262
-
263
-
264
-
265
-
266
-
267
-
268
-
269
-
270
-
271
-
272
-
273
-
274
-
275
-
276
-
277
-
278
-
279
-
280
-
281
-
282
-
283
-
284
 |
 |