ZyXEL ES-2108PWR User Guide - Page 157
Authentication & Accounting, ES-2108 Series User's Guide, Advanced Application >
 |
View all ZyXEL ES-2108PWR manuals
Add to My Manuals
Save this manual to your list of manuals |
Page 157 highlights
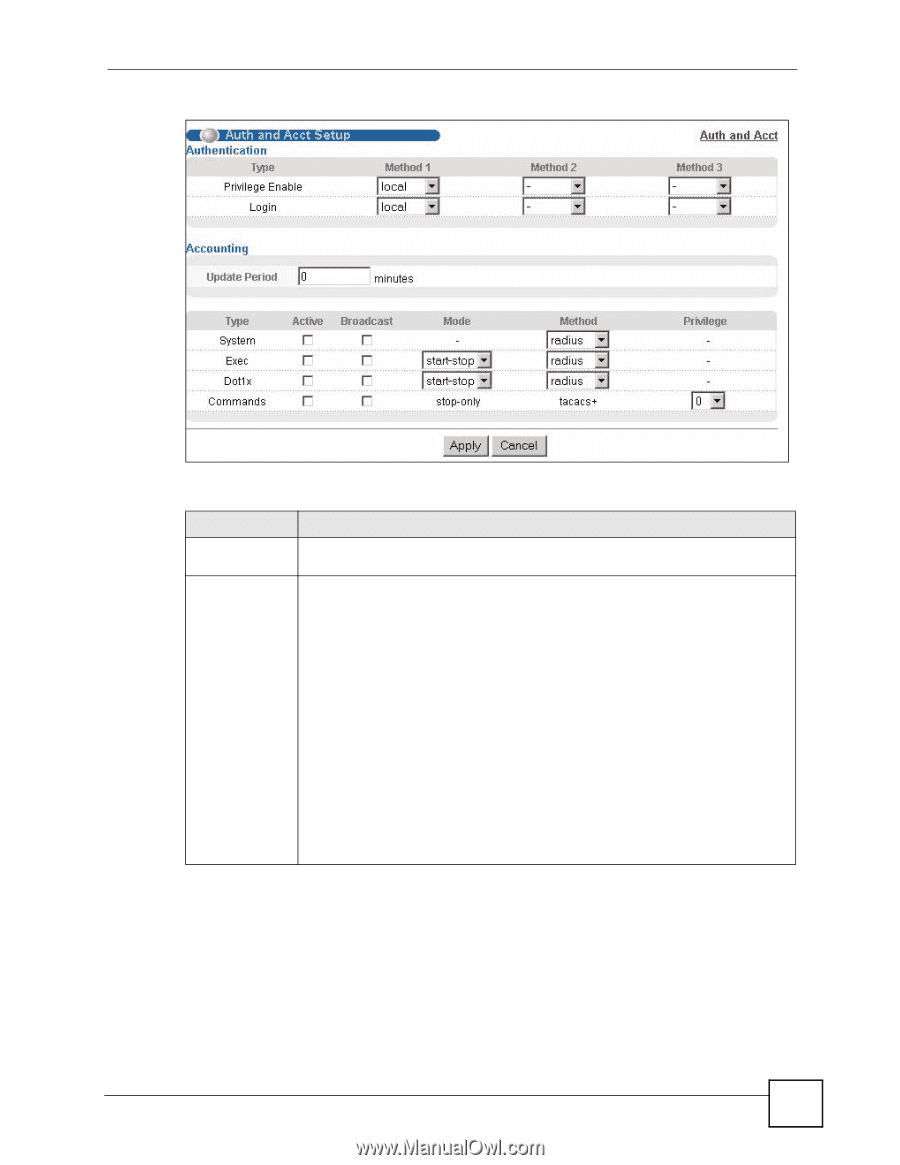
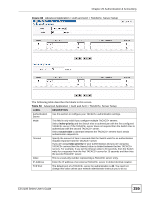
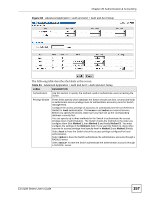
Chapter 20 Authentication & Accounting Figure 89 Advanced Application > Auth and Acct > Auth and Acct Setup The following table describes the labels in this screen. Table 51 Advanced Application > Auth and Acct > Auth and Acct Setup LABEL DESCRIPTION Authentication Use this section to specify the methods used to authenticate users accessing the Switch. Privilege Enable These fields specify which database the Switch should use (first, second and third) to authenticate access privilege level for administrator accounts (users for Switch management). Configure the access privilege of accounts via commands (see the CLI Reference Guide) for local authentication. The tacacs+ and radius are external servers. Before you specify the priority, make sure you have set up the corresponding database correctly first. You can specify up to three methods for the Switch to authenticate the access privilege level of administrators. The Switch checks the methods in the order you configure them (first Method 1, then Method 2 and finally Method 3). You must configure the settings in the Method 1 field. If you want the Switch to check other sources for access privilege level specify them in Method 2 and Method 3 fields. Select local to have the Switch check the access privilege configured for local authentication. Select radius to have the Switch authenticate the administrator accounts through a RADIUS server. Select tacacs+ to have the Switch authenticate the administrator accounts through a TACACS+ server. ES-2108 Series User's Guide 157
-
 1
1 -
2
-
3
-
4
-
5
-
6
-
7
-
8
-
9
-
10
-
11
-
12
-
13
-
14
-
15
-
16
-
17
-
18
-
19
-
20
-
21
-
22
-
23
-
24
-
25
-
26
-
27
-
28
-
29
-
30
-
31
-
32
-
33
-
34
-
35
-
36
-
37
-
38
-
39
-
40
-
41
-
42
-
43
-
44
-
45
-
46
-
47
-
48
-
49
-
50
-
51
-
52
-
53
-
54
-
55
-
56
-
57
-
58
-
59
-
60
-
61
-
62
-
63
-
64
-
65
-
66
-
67
-
68
-
69
-
70
-
71
-
72
-
73
-
74
-
75
-
76
-
77
-
78
-
79
-
80
-
81
-
82
-
83
-
84
-
85
-
86
-
87
-
88
-
89
-
90
-
91
-
92
-
93
-
94
-
95
-
96
-
97
-
98
-
99
-
100
-
101
-
102
-
103
-
104
-
105
-
106
-
107
-
108
-
109
-
110
-
111
-
112
-
113
-
114
-
115
-
116
-
117
-
118
-
119
-
120
-
121
-
122
-
123
-
124
-
125
-
126
-
127
-
128
-
129
-
130
-
131
-
132
-
133
-
134
-
135
-
136
-
137
-
138
-
139
-
140
-
141
-
142
-
143
-
144
-
145
-
146
-
147
-
148
-
149
-
150
-
151
-
 152
152 -
 153
153 -
 154
154 -
 155
155 -
 156
156 -
 157
157 -
 158
158 -
 159
159 -
 160
160 -
 161
161 -
 162
162 -
163
-
164
-
165
-
166
-
167
-
168
-
169
-
170
-
171
-
172
-
173
-
174
-
175
-
176
-
177
-
178
-
179
-
180
-
181
-
182
-
183
-
184
-
185
-
186
-
187
-
188
-
189
-
190
-
191
-
192
-
193
-
194
-
195
-
196
-
197
-
198
-
199
-
200
-
201
-
202
-
203
-
204
-
205
-
206
-
207
-
208
-
209
-
210
-
211
-
212
-
213
-
214
-
215
-
216
-
217
-
218
-
219
-
220
-
221
-
222
-
223
-
224
-
225
-
226
-
227
-
228
-
229
-
230
-
231
-
232
-
233
-
234
-
235
-
236
-
237
-
238
-
239
-
240
-
241
-
242
-
243
-
244
-
245
-
246
-
247
-
248
-
249
-
250
-
251
-
252
-
253
-
254
-
255
-
256
-
257
-
258
-
259
-
260
-
261
-
262
-
263
-
264
-
265
-
266
-
267
-
268
-
269
-
270
-
271
-
272
-
273
-
274
-
275
-
276
-
277
-
278
-
279
-
280
-
281
-
282
-
283
-
284
 |
 |