Brother International HS-5300 Service Manual - Page 111
lever, Taptite, M2.6x6, guide, earth, plate, Carriage, eccentric, frame
 |
View all Brother International HS-5300 manuals
Add to My Manuals
Save this manual to your list of manuals |
Page 111 highlights
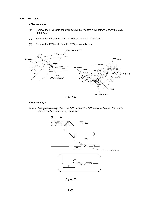
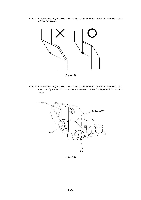
(5) Remove the screw, then remove the CR guide bar earth plate R. Head gap lever Taptite, cup B M3x6 Gap lever arm ,C= O Taptite, cup B M2.6x6 CR guide bar earth plate R Carriage eccentric lever R Fig. 4.94 (6) Remove the screw and Guide lever arm. (7) Remove the Stop ring. Rotate the Carriage eccentric lever R until the key matches the hole shape to remove it. CR guide bar Never loosen these screws! Main frame ASSY - CR guide bar plate R Carriage eccentric lever R Stop ring Fig. 4.95 Caution: The position of the Guide bar plate is not adjustable. The position of the Guide bar plate R and the Guide bar plate L, which is located on the left hand side of the Main frame ASSY, is severely adjusted and secured with those screws at the factory site to have parallelism between the CR guide bar and the PA roller. (8) Pull out the CR guide bar from the hole in the right hand side of the Main frame ASSY. III-59
-
 1
1 -
2
-
3
-
4
-
5
-
6
-
7
-
8
-
9
-
10
-
11
-
12
-
13
-
14
-
15
-
16
-
17
-
18
-
19
-
20
-
21
-
22
-
23
-
24
-
25
-
26
-
27
-
28
-
29
-
30
-
31
-
32
-
33
-
34
-
35
-
36
-
37
-
38
-
39
-
40
-
41
-
42
-
43
-
44
-
45
-
46
-
47
-
48
-
49
-
50
-
51
-
52
-
53
-
54
-
55
-
56
-
57
-
58
-
59
-
60
-
61
-
62
-
63
-
64
-
65
-
66
-
67
-
68
-
69
-
70
-
71
-
72
-
73
-
74
-
75
-
76
-
77
-
78
-
79
-
80
-
81
-
82
-
83
-
84
-
85
-
86
-
87
-
88
-
89
-
90
-
91
-
92
-
93
-
94
-
95
-
96
-
97
-
98
-
99
-
100
-
101
-
102
-
103
-
104
-
105
-
 106
106 -
 107
107 -
 108
108 -
 109
109 -
 110
110 -
 111
111 -
 112
112 -
 113
113 -
 114
114 -
 115
115 -
 116
116 -
117
-
118
-
119
-
120
-
121
-
122
-
123
-
124
-
125
-
126
-
127
-
128
-
129
-
130
-
131
-
132
-
133
-
134
-
135
-
136
-
137
-
138
-
139
-
140
-
141
-
142
-
143
-
144
-
145
-
146
-
147
-
148
-
149
-
150
-
151
-
152
-
153
-
154
-
155
-
156
-
157
-
158
-
159
-
160
-
161
-
162
-
163
-
164
-
165
-
166
-
167
-
168
 |
 |
