Brother International HS-5300 Service Manual - Page 121
Adjustment
 |
View all Brother International HS-5300 manuals
Add to My Manuals
Save this manual to your list of manuals |
Page 121 highlights
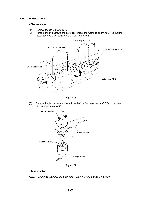
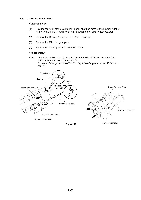
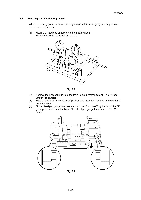
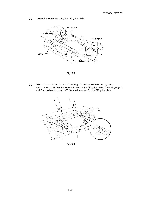
PR98122, PR99091 5. ADJUSTMENT 5.1 Head Gap When the Print head or other head related parts such as the Upper Nip Plate Unit is replaced, the following adjustment is required. (1) Move the Carriage to the center of the Main frame and remove the Encoder strip. (2) Set the Gap lever to the `Regular' position and check the Head gap. If the Print head is replaced, conduct Head Drive Voltage Adjustment (See section 5.3). If the Head gap is not correct, loosen the screw securing the Gap lever arm. 6> Head .",...„.. 7/,,,. .7.-- Carriage Thickness gauge Fig. 5.1 (3) Insert the thickness gauge between the Print head and the Platen. (4) Check that the head gap is 1.0 mm between the head nozzle plate of the Black and Yellow heads and platen. (5) Make sure that a 1.2 mm gauge will not fit into the gap. @ M-platen Thickness gauge Adjustment point Q-platen Fig. 5.2 Print head Note: The M-platen has a convex shape so that the head gap must be checked at the center. (6) Tighten the screw to secure the Gap lever arm. III-69
-
 1
1 -
2
-
3
-
4
-
5
-
6
-
7
-
8
-
9
-
10
-
11
-
12
-
13
-
14
-
15
-
16
-
17
-
18
-
19
-
20
-
21
-
22
-
23
-
24
-
25
-
26
-
27
-
28
-
29
-
30
-
31
-
32
-
33
-
34
-
35
-
36
-
37
-
38
-
39
-
40
-
41
-
42
-
43
-
44
-
45
-
46
-
47
-
48
-
49
-
50
-
51
-
52
-
53
-
54
-
55
-
56
-
57
-
58
-
59
-
60
-
61
-
62
-
63
-
64
-
65
-
66
-
67
-
68
-
69
-
70
-
71
-
72
-
73
-
74
-
75
-
76
-
77
-
78
-
79
-
80
-
81
-
82
-
83
-
84
-
85
-
86
-
87
-
88
-
89
-
90
-
91
-
92
-
93
-
94
-
95
-
96
-
97
-
98
-
99
-
100
-
101
-
102
-
103
-
104
-
105
-
106
-
107
-
108
-
109
-
110
-
111
-
112
-
113
-
114
-
115
-
 116
116 -
 117
117 -
 118
118 -
 119
119 -
 120
120 -
 121
121 -
 122
122 -
 123
123 -
 124
124 -
 125
125 -
 126
126 -
127
-
128
-
129
-
130
-
131
-
132
-
133
-
134
-
135
-
136
-
137
-
138
-
139
-
140
-
141
-
142
-
143
-
144
-
145
-
146
-
147
-
148
-
149
-
150
-
151
-
152
-
153
-
154
-
155
-
156
-
157
-
158
-
159
-
160
-
161
-
162
-
163
-
164
-
165
-
166
-
167
-
168
 |
 |
