Brother International HS-5300 Service Manual - Page 141
Brother International HS-5300 Manual
 |
View all Brother International HS-5300 manuals
Add to My Manuals
Save this manual to your list of manuals |
Page 141 highlights
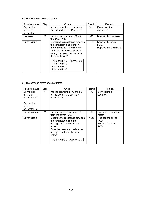
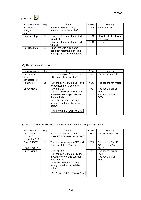
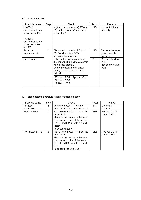
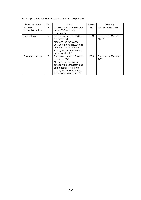
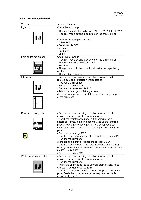
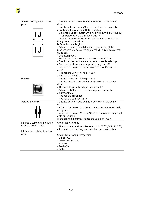
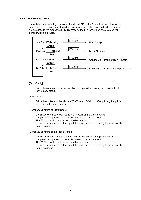
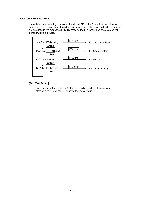
2.1.2 Print-image Related Trouble Light OJ Print edges not aligned -1 Ink splash 1 j i.1.. '. PR98064 PR98170 Action to be taken Check the followings: - The room temperature is between 10 to 35°C (59 to 90.5°F). - A correct media setting is selected on the printer driver. Check the following components: - Driver PCB - Power supply PCB - M-platen - Pre-baffle - Baffle Check the followings: - A correct media setting is selected on the printer driver. - The alignment of vertical print lines. - Print head. - The gap lever is in the correct position for the paper being printed. - The head gap is correct. - Perform the head cleaning operation several times to remove dust or air bubbles from its nozzles. - Replace the print head. - Replace the driver PCB. - Replace the power supply PCB. - Adjust the head gap with the gap lever. (If the problem persists, adjust the gap of the CR guide plate or the guide bar.) Random missing dots _ - _ White horizontal streaks I J - Perform the head cleaning operation several times to remove dust or air bubbles from its nozzles. - Check the Maintenance paper if it is jamming like an accordion. If yes, rotate its gear and wind up the jamming paper. Maintenance paper jam is likely to happen after transportation of the printer and replacing the Maintenance paper. - Replace the carriage PCB. - Check the connection of the FFC cable to the carriage PCB. - Replace the print head. (If the problem persists, replace the carriage ASSY.) - Check the connection of the head flat cables on the driver PCB. (If either or those cables is broken or damaged, replace the FFC cable ASSY.) - Replace the driver PCB. - Perform the head cleaning operation several times to remove dust or air bubbles from its nozzles. - Replace the print head. - Adjust the LF by using the adjustment tool software. (See Chapter 3, section 5 Adjustment) - Check the paper feed-related rollers. (Replacement of the paper feed roller or paper eject roller requires the special adjustment jig set.) IV-7
-
 1
1 -
2
-
3
-
4
-
5
-
6
-
7
-
8
-
9
-
10
-
11
-
12
-
13
-
14
-
15
-
16
-
17
-
18
-
19
-
20
-
21
-
22
-
23
-
24
-
25
-
26
-
27
-
28
-
29
-
30
-
31
-
32
-
33
-
34
-
35
-
36
-
37
-
38
-
39
-
40
-
41
-
42
-
43
-
44
-
45
-
46
-
47
-
48
-
49
-
50
-
51
-
52
-
53
-
54
-
55
-
56
-
57
-
58
-
59
-
60
-
61
-
62
-
63
-
64
-
65
-
66
-
67
-
68
-
69
-
70
-
71
-
72
-
73
-
74
-
75
-
76
-
77
-
78
-
79
-
80
-
81
-
82
-
83
-
84
-
85
-
86
-
87
-
88
-
89
-
90
-
91
-
92
-
93
-
94
-
95
-
96
-
97
-
98
-
99
-
100
-
101
-
102
-
103
-
104
-
105
-
106
-
107
-
108
-
109
-
110
-
111
-
112
-
113
-
114
-
115
-
116
-
117
-
118
-
119
-
120
-
121
-
122
-
123
-
124
-
125
-
126
-
127
-
128
-
129
-
130
-
131
-
132
-
133
-
134
-
135
-
 136
136 -
 137
137 -
 138
138 -
 139
139 -
 140
140 -
 141
141 -
 142
142 -
 143
143 -
 144
144 -
 145
145 -
 146
146 -
147
-
148
-
149
-
150
-
151
-
152
-
153
-
154
-
155
-
156
-
157
-
158
-
159
-
160
-
161
-
162
-
163
-
164
-
165
-
166
-
167
-
168
 |
 |
