Brother International HS-5300 Service Manual - Page 122
adjustment.
 |
View all Brother International HS-5300 manuals
Add to My Manuals
Save this manual to your list of manuals |
Page 122 highlights
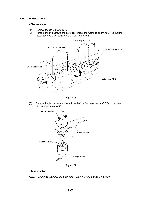
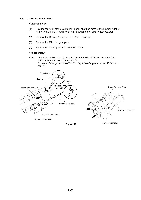
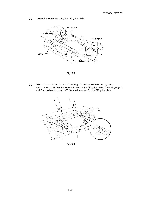
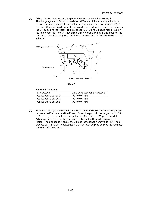
5.2 Head Gap and Parallel Alignment PR98064 When the head gap cannot be adjusted by using the thickness gauges, it may require the following adjustment. (1) Mount the Head gap gauges onto the master gauge. Make sure the dial gauges indicate "0". I i 0 0 I 0 CD CD Fig. 5.3 (2) Remove the Encoder strip from the Main frame. (Refer to section 4.10 Encoder Strip in this chapter.) (3) Set the Gap lever to the `Regular' position and move the Carriage to the center of the Main frame. (4) Fit the Head gap gauges so they are positioned from the CR guide bar to the CR guide plate. Make sure the bars of the Head gap gauge touch inside of the Main frame. -111-111- I-I-0 00 0 0 , - 111.111.1.111.111.1.111.111.1.1 111.111.1.111.111.1.111.111.11- rO -rr--L- L ) Fig. 5.4 III-70
-
 1
1 -
2
-
3
-
4
-
5
-
6
-
7
-
8
-
9
-
10
-
11
-
12
-
13
-
14
-
15
-
16
-
17
-
18
-
19
-
20
-
21
-
22
-
23
-
24
-
25
-
26
-
27
-
28
-
29
-
30
-
31
-
32
-
33
-
34
-
35
-
36
-
37
-
38
-
39
-
40
-
41
-
42
-
43
-
44
-
45
-
46
-
47
-
48
-
49
-
50
-
51
-
52
-
53
-
54
-
55
-
56
-
57
-
58
-
59
-
60
-
61
-
62
-
63
-
64
-
65
-
66
-
67
-
68
-
69
-
70
-
71
-
72
-
73
-
74
-
75
-
76
-
77
-
78
-
79
-
80
-
81
-
82
-
83
-
84
-
85
-
86
-
87
-
88
-
89
-
90
-
91
-
92
-
93
-
94
-
95
-
96
-
97
-
98
-
99
-
100
-
101
-
102
-
103
-
104
-
105
-
106
-
107
-
108
-
109
-
110
-
111
-
112
-
113
-
114
-
115
-
116
-
 117
117 -
 118
118 -
 119
119 -
 120
120 -
 121
121 -
 122
122 -
 123
123 -
 124
124 -
 125
125 -
 126
126 -
 127
127 -
128
-
129
-
130
-
131
-
132
-
133
-
134
-
135
-
136
-
137
-
138
-
139
-
140
-
141
-
142
-
143
-
144
-
145
-
146
-
147
-
148
-
149
-
150
-
151
-
152
-
153
-
154
-
155
-
156
-
157
-
158
-
159
-
160
-
161
-
162
-
163
-
164
-
165
-
166
-
167
-
168
 |
 |
