Brother International HS-5300 Service Manual - Page 68
Upper, plate, Encoder, strip, frame, guide, Carriage
 |
View all Brother International HS-5300 manuals
Add to My Manuals
Save this manual to your list of manuals |
Page 68 highlights
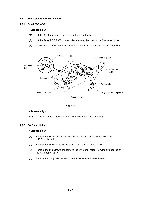
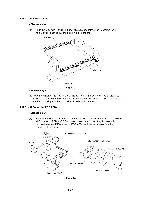
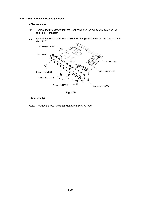
4.10 Encoder strip PR98064 Caution: This part is a very thin metal plate. Be careful with the sharp edge while handle it. (1) Remove the Encoder strip from the Upper nip plate unit by pulling the end of the Encoder strip on the left side of the Main frame ASSY towards the left. (2) Remove the Encoder strip from the Encoder strip spring on the right. Upper nip plate unit Hook 5 z Encoder strip Main frame ASSY Fig. 4.19 Note: Do not touch the grayed part of the Encoder strip. lill 150dpi , 41-5 mm I I 100 mm I (1) Before reassembling, check that it is not contaminated. If it is contaminated by finger prints or oil, replace it. Do not clean it with a cloth soaked in alcohol. If it is contaminated by the dust, blow it out by a air blush. (2) When reassembling, check the orientation of the Encoder strip. See below. Encoder strip guide Carriage ASSY ,sf7 . aorA- fzr- a Encoder strip --4-40-3' C) 1 4\ Fig. 4.20 III-16
-
 1
1 -
2
-
3
-
4
-
5
-
6
-
7
-
8
-
9
-
10
-
11
-
12
-
13
-
14
-
15
-
16
-
17
-
18
-
19
-
20
-
21
-
22
-
23
-
24
-
25
-
26
-
27
-
28
-
29
-
30
-
31
-
32
-
33
-
34
-
35
-
36
-
37
-
38
-
39
-
40
-
41
-
42
-
43
-
44
-
45
-
46
-
47
-
48
-
49
-
50
-
51
-
52
-
53
-
54
-
55
-
56
-
57
-
58
-
59
-
60
-
61
-
62
-
 63
63 -
 64
64 -
 65
65 -
 66
66 -
 67
67 -
 68
68 -
 69
69 -
 70
70 -
 71
71 -
 72
72 -
 73
73 -
74
-
75
-
76
-
77
-
78
-
79
-
80
-
81
-
82
-
83
-
84
-
85
-
86
-
87
-
88
-
89
-
90
-
91
-
92
-
93
-
94
-
95
-
96
-
97
-
98
-
99
-
100
-
101
-
102
-
103
-
104
-
105
-
106
-
107
-
108
-
109
-
110
-
111
-
112
-
113
-
114
-
115
-
116
-
117
-
118
-
119
-
120
-
121
-
122
-
123
-
124
-
125
-
126
-
127
-
128
-
129
-
130
-
131
-
132
-
133
-
134
-
135
-
136
-
137
-
138
-
139
-
140
-
141
-
142
-
143
-
144
-
145
-
146
-
147
-
148
-
149
-
150
-
151
-
152
-
153
-
154
-
155
-
156
-
157
-
158
-
159
-
160
-
161
-
162
-
163
-
164
-
165
-
166
-
167
-
168
 |
 |
