Brother International HS-5300 Service Manual - Page 124
lever, Screw, Carriage, eccentric
 |
View all Brother International HS-5300 manuals
Add to My Manuals
Save this manual to your list of manuals |
Page 124 highlights
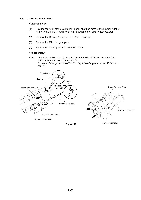
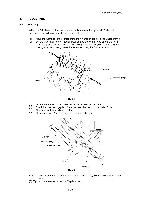
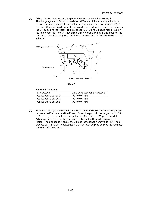
PR98064, PR99091 (7) Adjust the Gap lever arm angle against the Carriage eccentric bearing R. The dial gauge A and C should read around "30" and if the accuracy in the table below is achieved, secure the screw for the Gap lever arm. If not, return to (6) of 5.2 Head Gap and Parallel Adjustment in order to re-adjust the parallelism between the CR guide and the Platen. The dial gauge A, B, C and D should read a value in the range from "10" to "50". Then adjust again the Gap lever arm angle against the Carriage eccentric bearing R so that the accuracy shown in the table below can be achieved. Head gap lever CD 1_, Gap lever arm 0 - Screw 0 Carriage eccentric lever R Fig. 5.7 Required Accurac Dial gauges Gauge A and gauge B Gauge A and gauge C Gauge B and gauge D Difference between the gauges Up to 0.04 mm Up to 0.04 mm Up to 0.04 mm (8) Move the Carriage to the center of the Main frame and insert the thickness gauges between the Print head and the Platen. Check the gap is in the range from "1.0" to "1.2". If the gap is not in that range, return to (6) of 5.2 Head Gap and Parallel Adjustment and re-adjust the parallelism between the CR guide plate and the Platen. The dial gauge A and B should read in the range from "10" to "50". Then proceed to (7) in order to adjust again the Gap lever angle to achieve the accuracy shown in the above table. III-72
-
 1
1 -
2
-
3
-
4
-
5
-
6
-
7
-
8
-
9
-
10
-
11
-
12
-
13
-
14
-
15
-
16
-
17
-
18
-
19
-
20
-
21
-
22
-
23
-
24
-
25
-
26
-
27
-
28
-
29
-
30
-
31
-
32
-
33
-
34
-
35
-
36
-
37
-
38
-
39
-
40
-
41
-
42
-
43
-
44
-
45
-
46
-
47
-
48
-
49
-
50
-
51
-
52
-
53
-
54
-
55
-
56
-
57
-
58
-
59
-
60
-
61
-
62
-
63
-
64
-
65
-
66
-
67
-
68
-
69
-
70
-
71
-
72
-
73
-
74
-
75
-
76
-
77
-
78
-
79
-
80
-
81
-
82
-
83
-
84
-
85
-
86
-
87
-
88
-
89
-
90
-
91
-
92
-
93
-
94
-
95
-
96
-
97
-
98
-
99
-
100
-
101
-
102
-
103
-
104
-
105
-
106
-
107
-
108
-
109
-
110
-
111
-
112
-
113
-
114
-
115
-
116
-
117
-
118
-
 119
119 -
 120
120 -
 121
121 -
 122
122 -
 123
123 -
 124
124 -
 125
125 -
 126
126 -
 127
127 -
 128
128 -
 129
129 -
130
-
131
-
132
-
133
-
134
-
135
-
136
-
137
-
138
-
139
-
140
-
141
-
142
-
143
-
144
-
145
-
146
-
147
-
148
-
149
-
150
-
151
-
152
-
153
-
154
-
155
-
156
-
157
-
158
-
159
-
160
-
161
-
162
-
163
-
164
-
165
-
166
-
167
-
168
 |
 |
