Brother International HS-5300 Service Manual - Page 114
Connector, Carriage, Paper, width, senso, sensor, upper, guide, plate
 |
View all Brother International HS-5300 manuals
Add to My Manuals
Save this manual to your list of manuals |
Page 114 highlights
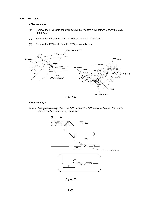
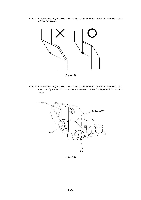
Note 1: When reassembling the Paper width sensor ASSY on the Carriage ASSY, push it in the direction A and B. Make sure that the line C and the line D are aligned When tightening the screw, securely hold the PCB so that it does not move. < View from the bottom of the Carriage ASSY > Connector Carriage ASSY 0 0 Paper width senso CI) Fig. 4.100 CI nu* 0 Paper width sensor Note 2: When remounting the Carriage ASSY on to the Math frame ASSY, insert the rib (A) under the CR guide plate. Make sure that the CR guide plate is held by the rib and the CR sub upper guide. Rib (A) CR sub upper guide CR guide plate Carriage ASSY Fig. 4.101 Note 3: For running of the sensor harness, refer to fig. 4.44 111-62
-
 1
1 -
2
-
3
-
4
-
5
-
6
-
7
-
8
-
9
-
10
-
11
-
12
-
13
-
14
-
15
-
16
-
17
-
18
-
19
-
20
-
21
-
22
-
23
-
24
-
25
-
26
-
27
-
28
-
29
-
30
-
31
-
32
-
33
-
34
-
35
-
36
-
37
-
38
-
39
-
40
-
41
-
42
-
43
-
44
-
45
-
46
-
47
-
48
-
49
-
50
-
51
-
52
-
53
-
54
-
55
-
56
-
57
-
58
-
59
-
60
-
61
-
62
-
63
-
64
-
65
-
66
-
67
-
68
-
69
-
70
-
71
-
72
-
73
-
74
-
75
-
76
-
77
-
78
-
79
-
80
-
81
-
82
-
83
-
84
-
85
-
86
-
87
-
88
-
89
-
90
-
91
-
92
-
93
-
94
-
95
-
96
-
97
-
98
-
99
-
100
-
101
-
102
-
103
-
104
-
105
-
106
-
107
-
108
-
 109
109 -
 110
110 -
 111
111 -
 112
112 -
 113
113 -
 114
114 -
 115
115 -
 116
116 -
 117
117 -
 118
118 -
 119
119 -
120
-
121
-
122
-
123
-
124
-
125
-
126
-
127
-
128
-
129
-
130
-
131
-
132
-
133
-
134
-
135
-
136
-
137
-
138
-
139
-
140
-
141
-
142
-
143
-
144
-
145
-
146
-
147
-
148
-
149
-
150
-
151
-
152
-
153
-
154
-
155
-
156
-
157
-
158
-
159
-
160
-
161
-
162
-
163
-
164
-
165
-
166
-
167
-
168
 |
 |

<Reassembly>
Note
1:
When
reassembling
the
Paper
width
sensor
ASSY
on
the
Carriage
ASSY,
push
it
in
the
direction
A
and
B.
Make
sure
that
the
line
C
and
the
line
D
are
aligned
When
tightening
the
screw,
securely
hold
the
PCB
so
that
it
does
not
move.
<
View
from
the
bottom
of
the
Carriage
ASSY
>
Connector
Carriage
ASSY
Paper
width
senso
0
0
C
I
nu*
CI)
0
Fig.
4.100
Paper
width
sensor
Note
2:
When
remounting
the
Carriage
ASSY
on
to
the
Math
frame
ASSY,
insert
the
rib
(A)
under
the
CR
guide
plate.
Make
sure
that
the
CR
guide
plate
is
held
by
the
rib
and
the
CR
sub
upper
guide.
Rib
(A)
CR
sub
upper
guide
CR
guide
plate
Carriage
ASSY
Fig.
4.101
Note
3:
For
running
of
the
sensor
harness,
refer
to
fig.
4.44
111-62