Brother International HS-5300 Service Manual - Page 125
Maintenance, frame, Driver, Extension, Voltage, meter, Screw, driver, Variable, register
 |
View all Brother International HS-5300 manuals
Add to My Manuals
Save this manual to your list of manuals |
Page 125 highlights
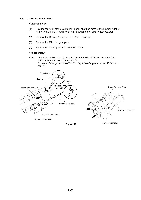
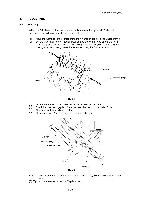
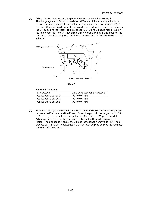
PR98064 5.3 Head Drive Voltage Adjustment When the Print head or the Power supply PCB ASSY is replaced, the following adjustment is required. (1) Go to the Head voltage adjustment in the Test 2 Mode. (Refer to Chapter 4, section 3.2.5 Test 2 Mode.) (2) Connect a Voltage meter to the connector on the Driver PCB ASSY. Maintenance frame ASSY Driver PCB Extension wire Voltage meter Fig. 5.8 (3) Adjust the head drive voltage to be adjusted by the variable resistors on the Power supply PCB ASSY. Adjust the voltage for 600 dpi first and then 300 dpi as the voltage for 300 dpi is made by adding a voltage onto the 600 dpi voltage. Screw driver Fig. 5.9 5.4 Offset, TOF and LF Adjustment Variable register 300 dpi Variable register 600 dpi Head Rank A B C D E F G 600 dpi 35.9 V 34.6V 33.4V 32.2V 31.0 V 29.7V 28.5 V 300 dpi 41.8 V 40.5V 39.2V 37.9V 36.6 V 35.3V 34.0 V When the Print head or the Main PCB ASSY is replaced, adjust the Offset, TOF, LF and nozzle alignment by using the support tool provided separately. III-73
-
 1
1 -
2
-
3
-
4
-
5
-
6
-
7
-
8
-
9
-
10
-
11
-
12
-
13
-
14
-
15
-
16
-
17
-
18
-
19
-
20
-
21
-
22
-
23
-
24
-
25
-
26
-
27
-
28
-
29
-
30
-
31
-
32
-
33
-
34
-
35
-
36
-
37
-
38
-
39
-
40
-
41
-
42
-
43
-
44
-
45
-
46
-
47
-
48
-
49
-
50
-
51
-
52
-
53
-
54
-
55
-
56
-
57
-
58
-
59
-
60
-
61
-
62
-
63
-
64
-
65
-
66
-
67
-
68
-
69
-
70
-
71
-
72
-
73
-
74
-
75
-
76
-
77
-
78
-
79
-
80
-
81
-
82
-
83
-
84
-
85
-
86
-
87
-
88
-
89
-
90
-
91
-
92
-
93
-
94
-
95
-
96
-
97
-
98
-
99
-
100
-
101
-
102
-
103
-
104
-
105
-
106
-
107
-
108
-
109
-
110
-
111
-
112
-
113
-
114
-
115
-
116
-
117
-
118
-
119
-
 120
120 -
 121
121 -
 122
122 -
 123
123 -
 124
124 -
 125
125 -
 126
126 -
 127
127 -
 128
128 -
 129
129 -
 130
130 -
131
-
132
-
133
-
134
-
135
-
136
-
137
-
138
-
139
-
140
-
141
-
142
-
143
-
144
-
145
-
146
-
147
-
148
-
149
-
150
-
151
-
152
-
153
-
154
-
155
-
156
-
157
-
158
-
159
-
160
-
161
-
162
-
163
-
164
-
165
-
166
-
167
-
168
 |
 |
