HP 4300n HP LaserJet 4200 and 4300 printers - Software Technical Reference Man - Page 176
Table 69: HP LaserJet Installer dialog text strings custom install
 |
UPC - 808736314381
View all HP 4300n manuals
Add to My Manuals
Save this manual to your list of manuals |
Page 176 highlights
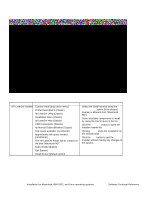
Figure 76: HP LaserJet Installer dialog box (custom install) Table 69: HP LaserJet Installer dialog text strings (custom install) Title of dialog box Text in dialog box User Options and Descriptions HP LaserJet Installer Custom Install [drop-down menu] Select the install location using the Printer Descriptions (Classic) hp LaserJet Utility (Classic) Installation Notes (Classic) hp LaserJet Help (Classic) Select Folder option (if the desired location is different from "Macintosh HD"). Select available components to install by using the check boxes in the list. USB Components (Classic) Click the Read Me button to open the hp Manual Duplex&Booklet (Classic) Installer readme file. Disk space available: [conditional] Approximate disk space needed: [conditional] The HP LaserJet Folder will be created on the disk "Macintosh HD." Clicking Install starts the installation on the selected disk. Click the Quit button to quit the Installer without making any changes to the system. Select Folder [button] Quit [button] Install [button] [default option] 174 Installation for Macintosh, IBM OS/2, and Linux operating systems Software Technical Reference
-
 1
1 -
2
-
3
-
4
-
5
-
6
-
7
-
8
-
9
-
10
-
11
-
12
-
13
-
14
-
15
-
16
-
17
-
18
-
19
-
20
-
21
-
22
-
23
-
24
-
25
-
26
-
27
-
28
-
29
-
30
-
31
-
32
-
33
-
34
-
35
-
36
-
37
-
38
-
39
-
40
-
41
-
42
-
43
-
44
-
45
-
46
-
47
-
48
-
49
-
50
-
51
-
52
-
53
-
54
-
55
-
56
-
57
-
58
-
59
-
60
-
61
-
62
-
63
-
64
-
65
-
66
-
67
-
68
-
69
-
70
-
71
-
72
-
73
-
74
-
75
-
76
-
77
-
78
-
79
-
80
-
81
-
82
-
83
-
84
-
85
-
86
-
87
-
88
-
89
-
90
-
91
-
92
-
93
-
94
-
95
-
96
-
97
-
98
-
99
-
100
-
101
-
102
-
103
-
104
-
105
-
106
-
107
-
108
-
109
-
110
-
111
-
112
-
113
-
114
-
115
-
116
-
117
-
118
-
119
-
120
-
121
-
122
-
123
-
124
-
125
-
126
-
127
-
128
-
129
-
130
-
131
-
132
-
133
-
134
-
135
-
136
-
137
-
138
-
139
-
140
-
141
-
142
-
143
-
144
-
145
-
146
-
147
-
148
-
149
-
150
-
151
-
152
-
153
-
154
-
155
-
156
-
157
-
158
-
159
-
160
-
161
-
162
-
163
-
164
-
165
-
166
-
167
-
168
-
169
-
170
-
 171
171 -
 172
172 -
 173
173 -
 174
174 -
 175
175 -
 176
176 -
 177
177 -
 178
178 -
 179
179 -
 180
180 -
 181
181 -
182
-
183
-
184
-
185
-
186
-
187
-
188
-
189
-
190
-
191
-
192
-
193
-
194
-
195
-
196
-
197
-
198
-
199
-
200
-
201
-
202
-
203
-
204
 |
 |
