HP Officejet J3500 User Guide - Page 120
Clean the exterior, Troubleshooting tips and resources, Solve printing problems - cartridge error
 |
View all HP Officejet J3500 manuals
Add to My Manuals
Save this manual to your list of manuals |
Page 120 highlights
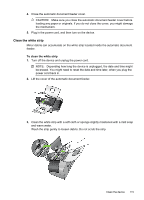
Chapter 8 4. If further cleaning is needed, repeat the previous steps using isopropyl (rubbing) alcohol, and wipe the strip thoroughly with a damp cloth to remove any residual alcohol. CAUTION: Be careful not to spill alcohol on the glass or exterior of the HP All-in-One, as this might damage the device. 5. Close the automatic document feeder cover. 6. Plug in the power cord, and then turn on the device. Clean the exterior NOTE: Before cleaning the device, turn off the power and unplug the power cord from the electrical socket. Use a soft, damp, lint-free cloth to wipe dust, smudges, and stains off of the case. The exterior of the device does not require cleaning. Keep fluids away from the interior of the device, as well as from the control panel. Troubleshooting tips and resources Use the following tips and resources to resolve printing problems. • For a paper jam, see Clear paper jams. • For paper-feed problems, such as the paper skew and paper pick, see Solve paper- feed problems. • Power light is on and not blinking. When the device is turned on for the first time, it takes approximately 12 minutes to initialize it after the print cartridges are installed. • Power cord and other cables are working, and are firmly connected to the device. Make sure the device is connected firmly to a functioning alternating current (AC) power outlet, and is turned on. For voltage requirements, see Electrical specifications. • Media is loaded correctly in the input tray and is not jammed in the device. • All packing tapes and materials are removed. • The device is set as the current or default printer. For Windows, set it as the default in the Printers folder. For the Mac OS, set it as the default in the Printer Setup Utility. See your computer's documentation for more information. • Pause Printing is not selected if you are using a computer running Windows. • You are not running too many programs when you are performing a task. Close programs that you are not using or restart the computer before attempting the task again. Solve printing problems • The device shuts down unexpectedly • Error message appears on control-panel display • The device is not responding (nothing prints) • Device takes a long time to print • Blank or partial page printed 116 Maintain and troubleshoot
-
 1
1 -
2
-
3
-
4
-
5
-
6
-
7
-
8
-
9
-
10
-
11
-
12
-
13
-
14
-
15
-
16
-
17
-
18
-
19
-
20
-
21
-
22
-
23
-
24
-
25
-
26
-
27
-
28
-
29
-
30
-
31
-
32
-
33
-
34
-
35
-
36
-
37
-
38
-
39
-
40
-
41
-
42
-
43
-
44
-
45
-
46
-
47
-
48
-
49
-
50
-
51
-
52
-
53
-
54
-
55
-
56
-
57
-
58
-
59
-
60
-
61
-
62
-
63
-
64
-
65
-
66
-
67
-
68
-
69
-
70
-
71
-
72
-
73
-
74
-
75
-
76
-
77
-
78
-
79
-
80
-
81
-
82
-
83
-
84
-
85
-
86
-
87
-
88
-
89
-
90
-
91
-
92
-
93
-
94
-
95
-
96
-
97
-
98
-
99
-
100
-
101
-
102
-
103
-
104
-
105
-
106
-
107
-
108
-
109
-
110
-
111
-
112
-
113
-
114
-
 115
115 -
 116
116 -
 117
117 -
 118
118 -
 119
119 -
 120
120 -
 121
121 -
 122
122 -
 123
123 -
 124
124 -
 125
125 -
126
-
127
-
128
-
129
-
130
-
131
-
132
-
133
-
134
-
135
-
136
-
137
-
138
-
139
-
140
-
141
-
142
-
143
-
144
-
145
-
146
-
147
-
148
-
149
-
150
-
151
-
152
-
153
-
154
-
155
-
156
-
157
-
158
-
159
-
160
-
161
-
162
-
163
-
164
-
165
-
166
-
167
-
168
-
169
-
170
-
171
-
172
-
173
-
174
-
175
-
176
-
177
-
178
-
179
-
180
-
181
-
182
-
183
-
184
-
185
-
186
 |
 |