HP Scitex LX600 HP Scitex LX Printer Family - Maintenance and troubleshooting - Page 16
Color calibration, Substrate, Calibrate
 |
View all HP Scitex LX600 manuals
Add to My Manuals
Save this manual to your list of manuals |
Page 16 highlights
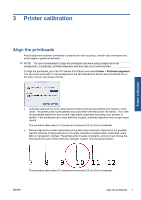
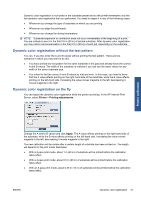
Printer calibration If you see some magenta slightly above or below any of the lines, modify the substrate advance as follows. ● If you see magenta above the black lines, increase the substrate-advance setting. ● If you see magenta below the black lines, decrease the substrate-advance setting. ● If you see magenta above in one column, and magenta below in another column, it is likely that the substrate is skewed. Check the distance between the substrate edge and the printer's side plate at the front and at the rear of the printer: the distances should be equal. Color calibration Color calibration enables your printer to produce consistent colors with a particular substrate type, even if printheads, ink cartridges and environmental conditions change. After color calibration, you can expect to get prints with the same colors from any two LX series printers situated in different geographical locations. The color calibration test chart is printed using the following print mode, depending on the ink density used with your substrate. ● 14 passes for 250% ink density ● 8 passes for 150% ink density ● 6 passes for 100% ink density For this reason, you are strongly recommended to have fine-tuned the appropriate print mode before starting color calibration. To fine-tune your substrate preset for a specific print mode, see the User's guide. The recommended print modes for normal printing are as follows. Maximum ink density 250% 150% 100% 80% 50% Print quality High quality plus High quality Production plus High quality plus High quality Production plus High quality plus High quality Production plus Production Billboard plus Billboard Draft Passes 18 14 10 10 8 6 8 6 5 4 3 2 1 To start color calibration from the HP Internal Print Server, select Substrate > Color calibration, then click the Calibrate button. 10 Chapter 3 Printer calibration ENWW
-
 1
1 -
2
-
3
-
4
-
5
-
6
-
7
-
8
-
9
-
10
-
 11
11 -
 12
12 -
 13
13 -
 14
14 -
 15
15 -
 16
16 -
 17
17 -
 18
18 -
 19
19 -
 20
20 -
 21
21 -
22
-
23
-
24
-
25
-
26
-
27
-
28
-
29
-
30
-
31
-
32
-
33
-
34
-
35
-
36
-
37
-
38
-
39
-
40
-
41
-
42
-
43
-
44
-
45
-
46
-
47
-
48
-
49
-
50
-
51
-
52
-
53
-
54
-
55
-
56
-
57
-
58
-
59
-
60
-
61
-
62
-
63
-
64
-
65
-
66
-
67
-
68
-
69
-
70
-
71
-
72
-
73
-
74
-
75
-
76
-
77
-
78
 |
 |