HP Scitex LX600 HP Scitex LX Printer Family - Maintenance and troubleshooting - Page 71
Table 10-2, Numerical error codes continued
 |
View all HP Scitex LX600 manuals
Add to My Manuals
Save this manual to your list of manuals |
Page 71 highlights
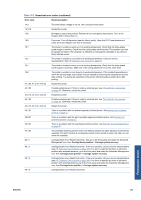
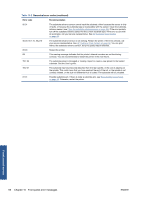
Table 10-2 Numerical error codes (continued) Error code Recommendation 14.3 The three-phase voltage is not set. Set it using the front panel. 14.5:12 Restart the printer. 14.8 Emergency stop button pushed. Release all four emergency stop buttons. Turn circuit breaker ACB-1 off and then on. 14.9 Fuse error. Turn off the printer (see the User's guide). Open the FH11 fuse holders and check the fuses. Replace any fuse if necessary. 15.1 The printer is unable to warm up to its working temperature. Check that the three-phase power supply is working. Check that the curing plates are horizontal. This problem can also be caused by holes in the substrate, by reflective or transparent substrates or by a dirty or faulty infrared sensor. 15.2 The printer is unable to cool down to its working temperature. Call your service representative. See HP Customer Care Centers on page 68. 16.1 The printer is unable to warm up to its working temperature. Check that the three-phase power supply is working. LX800 only: If the curing plates are horizontal, lower them. 16.2 The printer is unable to cool down to its working temperature. If the ambient temperature is within the normal range, this problem may be caused by removing the substrate too quickly after printing. Try leaving the substrate in the printer until temperatures settle down after printing. 41.1:03, 41.3:10, 41.4:03 Restart the printer. 44.1:03 Possible substrate jam. If there is really a substrate jam, see The substrate has jammed on page 40. Otherwise, restart the printer. 44.2:10, 44.3:10, 44.4:03 Restart the printer. 45.1:03 Possible substrate jam. If there is really a substrate jam, see The substrate has jammed on page 40. Otherwise, restart the printer. 45.2:10, 45.3:10, 45.4:03 Restart the printer. 46.1:01 There is a problem with the yellow/magenta printhead primer. See Maintain the printhead primers on page 27. 46.2:01 There is a problem with the light cyan/light magenta printhead primer. See Maintain the printhead primers on page 27. 46.3:01 There is a problem with the cyan/black printhead primer. See Maintain the printhead primers on page 27. 47.1:03 The printhead cleaning advance motor has failed to perfom the wiper advance movement as expected. The pinch module is not properly closed or the roll path is stuck, the roller can not move the substrate. 48.1.1 Carriage beam error. Restart the printer, then go to the front panel and select the Substrate Management icon, then Carriage beam position > Carriage system recovery. 48.1.3 Carriage beam error. Restart the printer. If the error persists, call your service representative (see HP Customer Care Centers on page 68). If no error is reported but there is still some problem with substrate advance, go to the front panel and select the Substrate Management icon, then Carriage beam position > Carriage system recovery. 48.1.4 Carriage beam error. Restart the printer. If the error persists, call your service representative (see HP Customer Care Centers on page 68). If no error is reported but there is still some problem with substrate advance, go to the front panel and select the Substrate Management icon, then Carriage beam position > Carriage system recovery. 48.1.5 Carriage beam error. Restart the printer. Front-panel errors ENWW 65
-
 1
1 -
2
-
3
-
4
-
5
-
6
-
7
-
8
-
9
-
10
-
11
-
12
-
13
-
14
-
15
-
16
-
17
-
18
-
19
-
20
-
21
-
22
-
23
-
24
-
25
-
26
-
27
-
28
-
29
-
30
-
31
-
32
-
33
-
34
-
35
-
36
-
37
-
38
-
39
-
40
-
41
-
42
-
43
-
44
-
45
-
46
-
47
-
48
-
49
-
50
-
51
-
52
-
53
-
54
-
55
-
56
-
57
-
58
-
59
-
60
-
61
-
62
-
63
-
64
-
65
-
 66
66 -
 67
67 -
 68
68 -
 69
69 -
 70
70 -
 71
71 -
 72
72 -
 73
73 -
 74
74 -
 75
75 -
 76
76 -
77
-
78
 |
 |