HP Scitex LX600 HP Scitex LX Printer Family - Maintenance and troubleshooting - Page 30
Clean the main roller, Clean the pinch wheels, Clean the platen, CAUTION, WARNING
 |
View all HP Scitex LX600 manuals
Add to My Manuals
Save this manual to your list of manuals |
Page 30 highlights
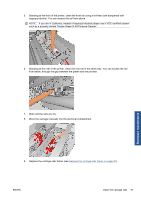
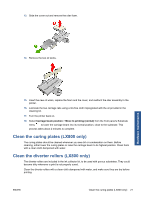
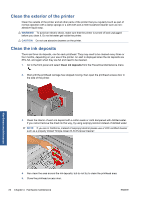
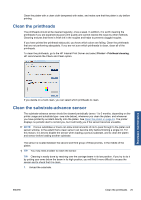
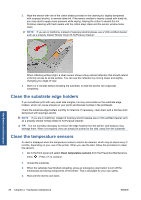
6. Use a brush to clean accumulated dust from the aerosol inlets. Do not use the brush on any other parts. Hardware maintenance 7. Look for condensation under the carriage, and remove it with a clean lint-free cloth if necessary. CAUTION: Do not touch the printhead nozzles, which could damage them. 8. Press the OK button on the front panel. The printer lowers the carriage beam to its normal position. WARNING! Do not insert your hands or anything else into the printer while the carriage is descending. Clean the main roller The main roller should be cleaned whenever it is visibly dirty, or when you notice that substrate advance is no longer smooth and regular. ● Unload the substrate. ● Go to the front panel and select Clean main roller from the Preventive Maintenance menu . The main roller will start moving slowly. ● Clean the roller with a clean cloth dampened with water; do not use petroleum-based cleaning liquids. ● The roller will continue turning until you press the Cancel key. You can also stop it temporarily with your finger. ● Ensure that the roller is dry before reloading the substrate. Clean the pinch wheels If the pinch wheels are dirty, they can be cleaned by advancing the substrate (less than a meter). Cleaning the wheels manually could damage them, and is not recommended. Clean the platen The platen should be cleaned whenever it is visibly dirty, or when you notice marks on the back of the substrate. Before cleaning the platen, locate the substrate-advance sensor and be careful to avoid scratching it (see Clean the substrate-advance sensor on page 25). 24 Chapter 4 Hardware maintenance ENWW
-
 1
1 -
2
-
3
-
4
-
5
-
6
-
7
-
8
-
9
-
10
-
11
-
12
-
13
-
14
-
15
-
16
-
17
-
18
-
19
-
20
-
21
-
22
-
23
-
24
-
 25
25 -
 26
26 -
 27
27 -
 28
28 -
 29
29 -
 30
30 -
 31
31 -
 32
32 -
 33
33 -
 34
34 -
 35
35 -
36
-
37
-
38
-
39
-
40
-
41
-
42
-
43
-
44
-
45
-
46
-
47
-
48
-
49
-
50
-
51
-
52
-
53
-
54
-
55
-
56
-
57
-
58
-
59
-
60
-
61
-
62
-
63
-
64
-
65
-
66
-
67
-
68
-
69
-
70
-
71
-
72
-
73
-
74
-
75
-
76
-
77
-
78
 |
 |
