HP Scitex LX600 HP Scitex LX Printer Family - Maintenance and troubleshooting - Page 28
Clean the exterior of the printer, Clean the ink deposits, WARNING, CAUTION
 |
View all HP Scitex LX600 manuals
Add to My Manuals
Save this manual to your list of manuals |
Page 28 highlights
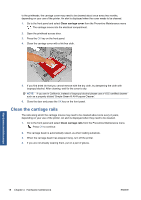
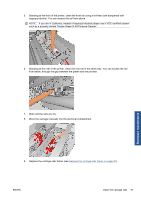
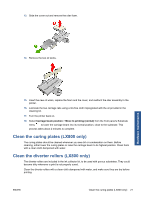
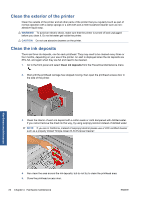
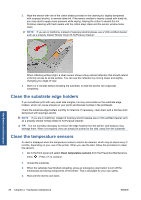
Clean the exterior of the printer Clean the outside of the printer and all other parts of the printer that you regularly touch as part of normal operation with a damp sponge or a soft cloth and a mild household cleaner such as nonabrasive liquid soap. WARNING! To avoid an electric shock, make sure that the printer is turned off and unplugged before you clean it. Do not let water get inside the printer. CAUTION: Do not use abrasive cleaners on the printer. Clean the ink deposits There are three ink deposits, one for each printhead. They may need to be cleaned every three or four months, depending on your use of the printer. An alert is displayed when the ink deposits are 85% full, and again when they are full and need to be cleaned. 1. Go to the front panel and select Clean ink deposits from the Preventive Maintenance menu . 2. Wait until the printhead carriage has stopped moving, then open the printhead access door in the side of the printer. Hardware maintenance 3. Clean the interior of each ink deposit with a cotton swab or cloth dampened with distilled water. If you cannot remove the dried ink this way, try using isopropyl alcohol instead of distilled water. NOTE: If you are in California, instead of isopropyl alcohol please use a VOC-certified cleaner such as a properly diluted 'Simple Green ® All-Purpose Cleaner'. 4. Also clean the area around the ink deposits; but do not try to clean the printhead area. 5. Close the printhead access door. 22 Chapter 4 Hardware maintenance ENWW
-
 1
1 -
2
-
3
-
4
-
5
-
6
-
7
-
8
-
9
-
10
-
11
-
12
-
13
-
14
-
15
-
16
-
17
-
18
-
19
-
20
-
21
-
22
-
 23
23 -
 24
24 -
 25
25 -
 26
26 -
 27
27 -
 28
28 -
 29
29 -
 30
30 -
 31
31 -
 32
32 -
 33
33 -
34
-
35
-
36
-
37
-
38
-
39
-
40
-
41
-
42
-
43
-
44
-
45
-
46
-
47
-
48
-
49
-
50
-
51
-
52
-
53
-
54
-
55
-
56
-
57
-
58
-
59
-
60
-
61
-
62
-
63
-
64
-
65
-
66
-
67
-
68
-
69
-
70
-
71
-
72
-
73
-
74
-
75
-
76
-
77
-
78
 |
 |