HP Scitex LX600 HP Scitex LX Printer Family - Maintenance and troubleshooting - Page 26
Remove the rear oiler assembly., To replace the rear oil wicks, first loosen the two screws.
 |
View all HP Scitex LX600 manuals
Add to My Manuals
Save this manual to your list of manuals |
Page 26 highlights
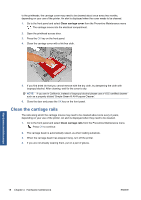
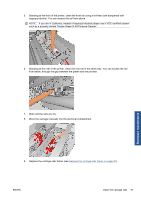
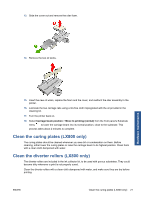
10. Replace the oil wicks, which are orange-colored and located under the oiler foams. The two front oil wicks are easy to remove once you have removed the oiler foam. 11. To replace the rear oil wicks, first loosen the two screws. 12. Remove the rear oiler assembly. Hardware maintenance 20 Chapter 4 Hardware maintenance ENWW
-
 1
1 -
2
-
3
-
4
-
5
-
6
-
7
-
8
-
9
-
10
-
11
-
12
-
13
-
14
-
15
-
16
-
17
-
18
-
19
-
20
-
 21
21 -
 22
22 -
 23
23 -
 24
24 -
 25
25 -
 26
26 -
 27
27 -
 28
28 -
 29
29 -
 30
30 -
 31
31 -
32
-
33
-
34
-
35
-
36
-
37
-
38
-
39
-
40
-
41
-
42
-
43
-
44
-
45
-
46
-
47
-
48
-
49
-
50
-
51
-
52
-
53
-
54
-
55
-
56
-
57
-
58
-
59
-
60
-
61
-
62
-
63
-
64
-
65
-
66
-
67
-
68
-
69
-
70
-
71
-
72
-
73
-
74
-
75
-
76
-
77
-
78
 |
 |

10.
Replace the oil wicks, which are orange-colored and located under the oiler foams. The two front
oil wicks are easy to remove once you have removed the oiler foam.
11.
To replace the rear oil wicks, first loosen the two screws.
12.
Remove the rear oiler assembly.
20
Chapter 4
Hardware maintenance
ENWW
Hardware maintenance