HP Scitex LX600 HP Scitex LX Printer Family - Maintenance and troubleshooting - Page 27
Clean the curing plates (LX800 only), Clean the diverter rollers (LX800 only
 |
View all HP Scitex LX600 manuals
Add to My Manuals
Save this manual to your list of manuals |
Page 27 highlights
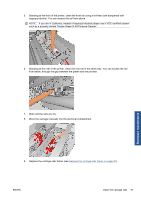
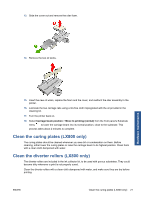
13. Slide the cover out and remove the oiler foam. 14. Remove the two oil wicks. Hardware maintenance 15. Insert the new oil wicks, replace the foam and the cover, and reattach the oiler assembly to the printer. 16. Lubricate the two carriage rails using a lint-free cloth impregnated with the oil provided in the cleaning kit. 17. Turn the printer back on. 18. Select Carriage beam position > Move to printing (normal) from the front panel's Substrate menu to lower the carriage beam into its normal position, close to the substrate. This process takes about 2 minutes to complete. Clean the curing plates (LX800 only) The curing plates should be cleaned whenever you see dirt or condensation on them. Before cleaning, either lower the curing plates or raise the carriage beam to its highest position. Clean them with a clean cloth dampened with water. Clean the diverter rollers (LX800 only) The diverter rollers are included in the ink collector kit, to be used with porous substrates. They could become dirty whenever a print is not properly cured. Clean the diverter rollers with a clean cloth dampened with water, and make sure they are dry before printing. ENWW Clean the curing plates (LX800 only) 21
-
 1
1 -
2
-
3
-
4
-
5
-
6
-
7
-
8
-
9
-
10
-
11
-
12
-
13
-
14
-
15
-
16
-
17
-
18
-
19
-
20
-
21
-
 22
22 -
 23
23 -
 24
24 -
 25
25 -
 26
26 -
 27
27 -
 28
28 -
 29
29 -
 30
30 -
 31
31 -
 32
32 -
33
-
34
-
35
-
36
-
37
-
38
-
39
-
40
-
41
-
42
-
43
-
44
-
45
-
46
-
47
-
48
-
49
-
50
-
51
-
52
-
53
-
54
-
55
-
56
-
57
-
58
-
59
-
60
-
61
-
62
-
63
-
64
-
65
-
66
-
67
-
68
-
69
-
70
-
71
-
72
-
73
-
74
-
75
-
76
-
77
-
78
 |
 |
