HP Scitex LX600 HP Scitex LX Printer Family - Maintenance and troubleshooting - Page 39
Replace the printhead cleaning roll, Replace cleaner roll
 |
View all HP Scitex LX600 manuals
Add to My Manuals
Save this manual to your list of manuals |
Page 39 highlights
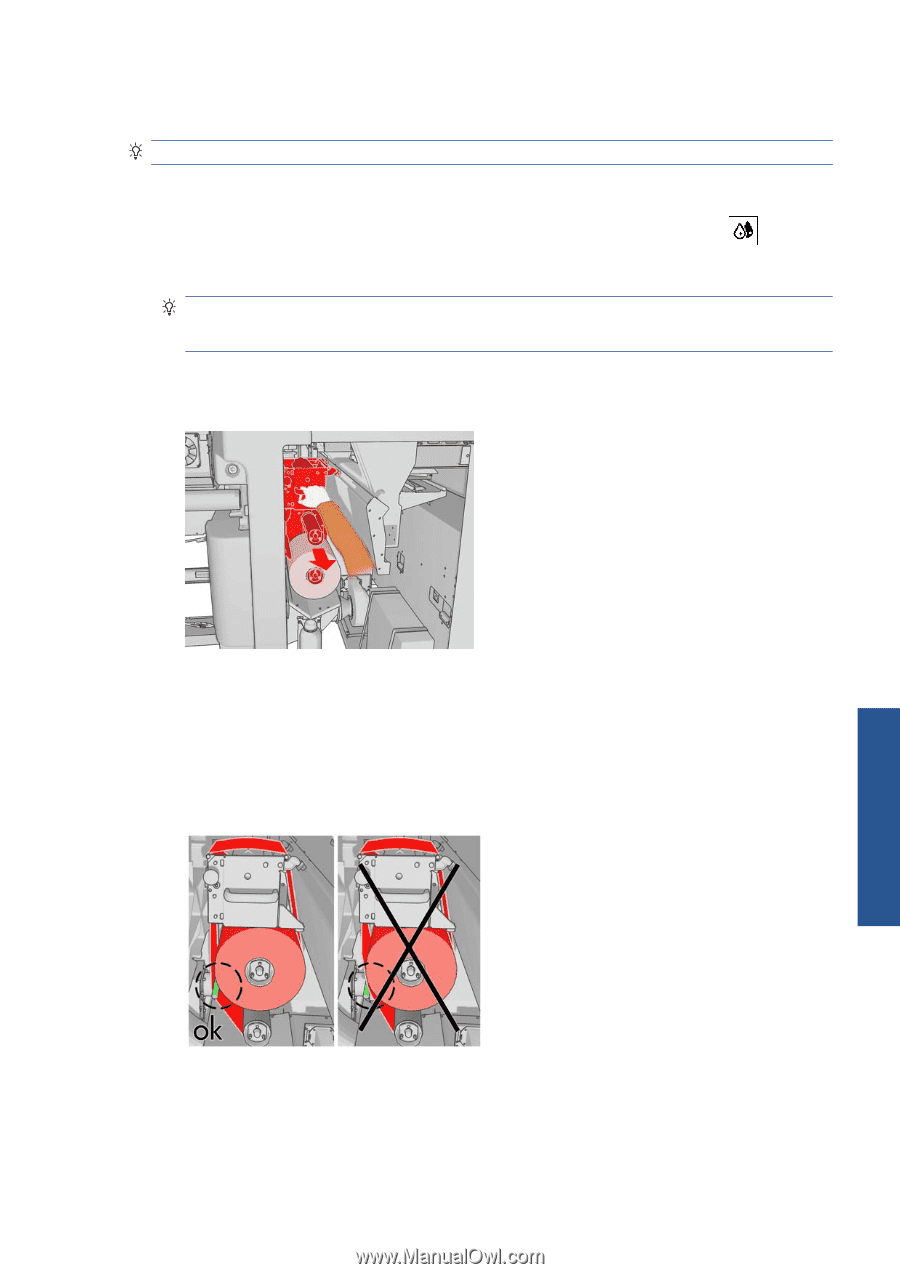
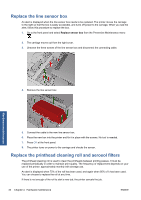
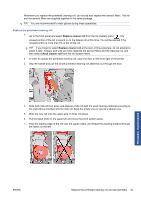
Whenever you replace the printhead cleaning roll, you should also replace the aerosol filters. The roll and the aerosol filters are supplied together in the same package. TIP: You are recommended to wear gloves during these operations. Replace the printhead cleaning roll 1. Go to the front panel and select Replace cleaner roll from the Ink System menu . Any unused portion of the roll is wound on to the takeup roll at this time. You will be warned if the unused portion is more than 5% of the whole roll. TIP: If you forget to select Replace cleaner roll at the start of this procedure, do not attempt to select it later. Instead, wait until you have replaced the aerosol filters and the cleaning roll, and then select Check cleaner roll from the Ink System menu. 2. In order to replace the printhead cleaning roll, open the door on the front right of the printer. 3. Grip the handle and pull the whole printhead cleaning roll assembly out through the door. 4. Slide both rolls off their axles and dispose of the roll with the used cleaning material according to the instructions provided with the new roll. Keep the empty core to use as a takeup core. 5. Slide the new roll onto the upper axle. It clicks into place. 6. Pull the black knob on the upper left and move the pinch system aside. 7. Pass the leading edge of the roll over the upper rollers, and thread the cleaning material through the rollers on the left. Hardware maintenance ENWW Replace the printhead cleaning roll and aerosol filters 33
-
 1
1 -
2
-
3
-
4
-
5
-
6
-
7
-
8
-
9
-
10
-
11
-
12
-
13
-
14
-
15
-
16
-
17
-
18
-
19
-
20
-
21
-
22
-
23
-
24
-
25
-
26
-
27
-
28
-
29
-
30
-
31
-
32
-
33
-
 34
34 -
 35
35 -
 36
36 -
 37
37 -
 38
38 -
 39
39 -
 40
40 -
 41
41 -
 42
42 -
 43
43 -
 44
44 -
45
-
46
-
47
-
48
-
49
-
50
-
51
-
52
-
53
-
54
-
55
-
56
-
57
-
58
-
59
-
60
-
61
-
62
-
63
-
64
-
65
-
66
-
67
-
68
-
69
-
70
-
71
-
72
-
73
-
74
-
75
-
76
-
77
-
78
 |
 |