Kyocera TASKalfa 3051ci Printing System (11),(12),(13),(14) Printing Guide (Fi - Page 13
Setting up the Mac OS X computer for printing, Setting up printing with Mac OS X v10.6.x
 |
View all Kyocera TASKalfa 3051ci manuals
Add to My Manuals
Save this manual to your list of manuals |
Page 13 highlights
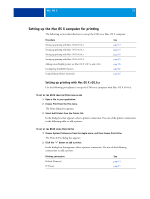
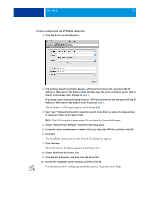
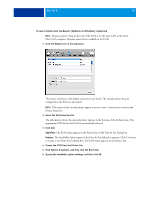
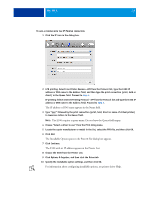
MAC OS X 13 Setting up the Mac OS X computer for printing The following section describes how to set up the E100 on a Mac OS X computer. Procedure Setting up printing with Mac OS X v10.6.x Setting up printing with Mac OS X v10.5.x Setting up printing with Mac OS X v10.4.x Setting up printing with Mac OS X v10.3.9 Adding a non-English printer on Mac OS X v10.5.x and v10.6 Configuring Installable Options Using Desktop Printer (optional) See page 13 page 16 page 20 page 24 page 26 page 26 page 26 Setting up printing with Mac OS X v10.6.x Use the following procedures to set up the E100 on a computer with Mac OS X v10.6.x. TO SET UP THE E100 FROM THE PRINT DIALOG BOX 1 Open a file in your application. 2 Choose Print from the File menu. The Print dialog box appears. 3 Select Add Printer from the Printer list. In the dialog box that appears, select a printer connection. Use one of the printer connections in the following table to add a printer. TO SET UP THE E100 USING PRINT & FAX 1 Choose System Preferences from the Apple menu, and then choose Print & Fax. The Print & Fax dialog box appears. 2 Click the "+" button to add a printer. In the dialog box that appears, select a printer connection. Use one of the following connections to add a printer. Printing connection Default (Bonjour) IP Printer See page 14 page 15
-
 1
1 -
2
-
3
-
4
-
5
-
6
-
7
-
 8
8 -
 9
9 -
 10
10 -
 11
11 -
 12
12 -
 13
13 -
 14
14 -
 15
15 -
 16
16 -
 17
17 -
 18
18 -
19
-
20
-
21
-
22
-
23
-
24
-
25
-
26
-
27
-
28
-
29
-
30
-
31
-
32
-
33
-
34
-
35
-
36
-
37
-
38
-
39
-
40
-
41
-
42
-
43
-
44
-
45
-
46
-
47
-
48
-
49
-
50
-
51
-
52
-
53
-
54
-
55
-
56
-
57
-
58
-
59
-
60
-
61
-
62
-
63
-
64
-
65
-
66
-
67
-
68
-
69
-
70
-
71
-
72
-
73
-
74
-
75
-
76
-
77
-
78
-
79
-
80
-
81
-
82
-
83
-
84
-
85
-
86
-
87
-
88
-
89
-
90
-
91
-
92
-
93
-
94
-
95
-
96
-
97
-
98
-
99
-
100
-
101
-
102
-
103
-
104
-
105
-
106
-
107
-
108
-
109
-
110
 |
 |
