Kyocera TASKalfa 3051ci Printing System (11),(12),(13),(14) Printing Guide (Fi - Page 22
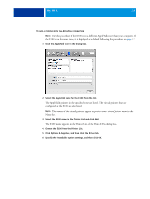
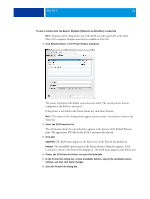
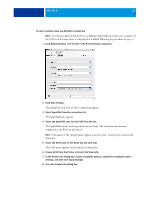
Choose E100 from the Printer List and click Show Info.
 |
View all Kyocera TASKalfa 3051ci manuals
Add to My Manuals
Save this manual to your list of manuals |
Page 22 highlights
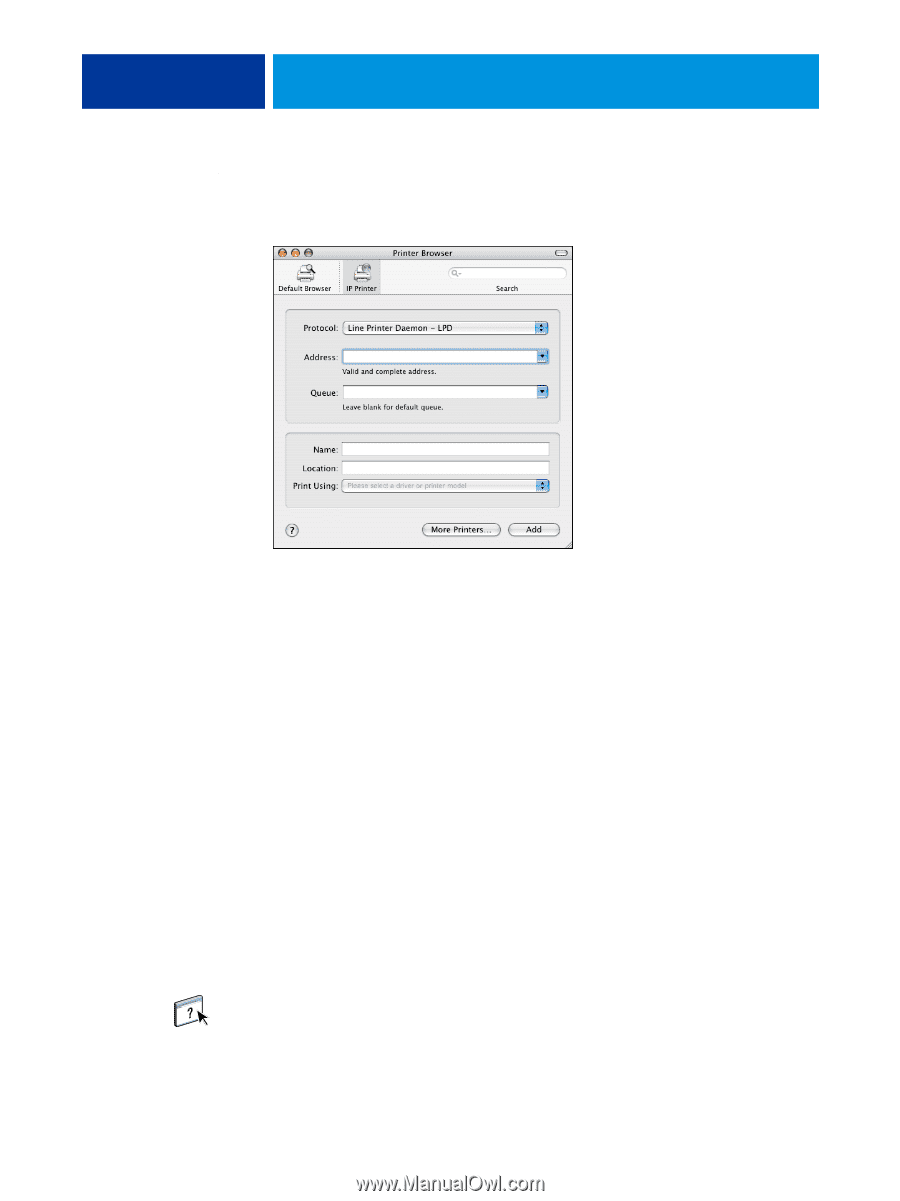
MAC OS X 22 TO ADD A PRINTER WITH THE IP PRINTER CONNECTION 1 Click IP Printer in the Printer Browser dialog box. 2 LPD printing: Select Line Printer Daemon - LPD from the Protocol list, type the E100 IP address or DNS name in the Address field, and then type the print connection (print, hold or direct) in the Queue field. Proceed to step 6. IP printing: Select Internet Printing Protocol - IPP from the Protocol list and type the E100 IP address or DNS name in the Address field. Proceed to step 3. The IP address or DNS name appears in the Name field. 3 Type "ipp/" followed by the print connection (print, hold, direct or name of virtual printer) in lowercase letters in the Queue field. NOTE: The E100 requires a queue name. Do not leave the Queue field empty. 4 Print Using: Locate the copier manufacturer or model in the list, and then select the PPD file. 5 Click Add. The Installable Options pane in the Printer Browser dialog box appears. 6 Click Continue. The E100 with its IP address appears in the Printer List. 7 Choose E100 from the Printer List and click Show Info. 8 In the Printer Info dialog box, choose Installable Options, specify the installable option settings, and then click Apply Changes. For information about configuring installable options, see printer driver Help. 9 Close the Printer Info dialog box.
-
 1
1 -
2
-
3
-
4
-
5
-
6
-
7
-
8
-
9
-
10
-
11
-
12
-
13
-
14
-
15
-
16
-
 17
17 -
 18
18 -
 19
19 -
 20
20 -
 21
21 -
 22
22 -
 23
23 -
 24
24 -
 25
25 -
 26
26 -
 27
27 -
28
-
29
-
30
-
31
-
32
-
33
-
34
-
35
-
36
-
37
-
38
-
39
-
40
-
41
-
42
-
43
-
44
-
45
-
46
-
47
-
48
-
49
-
50
-
51
-
52
-
53
-
54
-
55
-
56
-
57
-
58
-
59
-
60
-
61
-
62
-
63
-
64
-
65
-
66
-
67
-
68
-
69
-
70
-
71
-
72
-
73
-
74
-
75
-
76
-
77
-
78
-
79
-
80
-
81
-
82
-
83
-
84
-
85
-
86
-
87
-
88
-
89
-
90
-
91
-
92
-
93
-
94
-
95
-
96
-
97
-
98
-
99
-
100
-
101
-
102
-
103
-
104
-
105
-
106
-
107
-
108
-
109
-
110
 |
 |