Kyocera TASKalfa 3051ci Printing System (11),(12),(13),(14) Printing Guide (Fi - Page 48
Completing IPP connections, Click OK to close the Con Standard TCP/IP Port Monitor dialog box.
 |
View all Kyocera TASKalfa 3051ci manuals
Add to My Manuals
Save this manual to your list of manuals |
Page 48 highlights
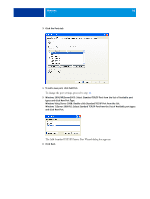
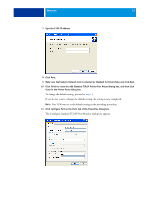
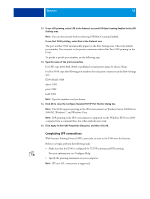
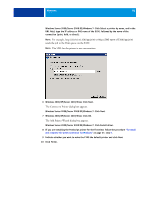
WINDOWS 48 12 To use LPR printing, select LPR in the Protocol area and LPR Byte Counting Enabled in the LPR Settings area. NOTE: You can also proceed without selecting LPR Byte Counting Enabled. To use Port 9100 printing, select Raw in the Protocol area. The port number 9100 automatically appears in the Raw Settings area. This is the default port number. You can print to the printer connection selected for Port 9100 printing on the E100. To specify a specific port number, see the following step. 13 Type the name of the print connection. For LPR, type print, hold, direct or published virtual printer name for Queue Name. For Port 9100, type the following port numbers for each print connection in the Raw Settings area: E100 default: 9100 direct: 9101 print: 9102 hold: 9103 NOTE: Type the number exactly as shown. 14 Click OK to close the Configure Standard TCP/IP Port Monitor dialog box. NOTE: The E100 supports printing in the IPv6 environment on Windows Server 2008/Server 2008 R2, Windows 7, and Windows Vista. NOTE: LPR printing in the IPv6 environment is supported on the Windows XP/Server 2003 computer from a command line, but other methods may work. 15 Click Apply in the E100 Properties dialog box, and then click OK. Completing IPP connections With Internet Printing Protocol (IPP), print jobs are sent to the E100 over the Internet. Before you begin, perform the following tasks: • Make sure that the E100 is configured for TCP/IP printing and IPP printing. For more information, see Configure Help. • Specify the printing destination on your computer. NOTE: IPP over SSL connections is supported.
-
 1
1 -
2
-
3
-
4
-
5
-
6
-
7
-
8
-
9
-
10
-
11
-
12
-
13
-
14
-
15
-
16
-
17
-
18
-
19
-
20
-
21
-
22
-
23
-
24
-
25
-
26
-
27
-
28
-
29
-
30
-
31
-
32
-
33
-
34
-
35
-
36
-
37
-
38
-
39
-
40
-
41
-
42
-
 43
43 -
 44
44 -
 45
45 -
 46
46 -
 47
47 -
 48
48 -
 49
49 -
 50
50 -
 51
51 -
 52
52 -
 53
53 -
54
-
55
-
56
-
57
-
58
-
59
-
60
-
61
-
62
-
63
-
64
-
65
-
66
-
67
-
68
-
69
-
70
-
71
-
72
-
73
-
74
-
75
-
76
-
77
-
78
-
79
-
80
-
81
-
82
-
83
-
84
-
85
-
86
-
87
-
88
-
89
-
90
-
91
-
92
-
93
-
94
-
95
-
96
-
97
-
98
-
99
-
100
-
101
-
102
-
103
-
104
-
105
-
106
-
107
-
108
-
109
-
110
 |
 |
