Kyocera TASKalfa 3051ci Printing System (11),(12),(13),(14) Printing Guide (Fi - Page 29
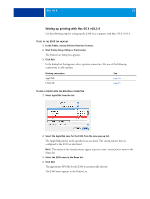
Setting print options and printing from Mac OS X applications
 |
View all Kyocera TASKalfa 3051ci manuals
Add to My Manuals
Save this manual to your list of manuals |
Page 29 highlights
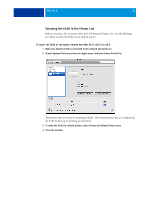
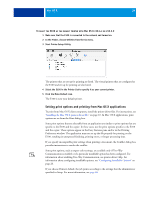
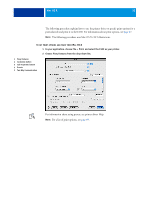
MAC OS X 29 TO SELECT THE E100 AS THE DEFAULT PRINTER WITH MAC OS X V10.4.X OR V10.3.9 1 Make sure that the E100 is connected to the network and turned on. 2 In the Finder, choose Utilities from the Go menu. 3 Start Printer Setup Utility. The printers that are set up for printing are listed. The virtual printers that are configured at the E100 and set up for printing are also listed. 4 Select the E100 in the Printer List to specify it as your current printer. 5 Click the Make Default icon. The E100 is now your default printer. Setting print options and printing from Mac OS X applications To print from Mac OS X client computers, install the printer driver files. For instructions, see "Installing the Mac OS X printer driver files" on page 10. In Mac OS X applications, print options are set from the Print dialog box. Some print options that are selectable from an application are similar to print options that are specific to the E100 and the copier. In these cases, use the print options specific to the E100 and the copier. These options appear in the Fiery Features pane and/or in the Printing Preferences window. The application may not set up the file properly for printing on the E100, resulting in unexpected finishing, printing errors, or longer processing time. If you specify incompatible print settings when printing a document, the Conflict dialog box provides instructions to resolve the conflict. Some print options, such as expert color settings, are available only if Two-Way Communication is enabled or if a particular installable option has been configured. For information about enabling Two-Way Communication, see printer driver Help. For information about configuring installable options, see "Configuring Installable Options" on page 26. If you choose Printer's default, the job prints according to the settings that the administrator specified in Setup. For more information, see page 68.
-
 1
1 -
2
-
3
-
4
-
5
-
6
-
7
-
8
-
9
-
10
-
11
-
12
-
13
-
14
-
15
-
16
-
17
-
18
-
19
-
20
-
21
-
22
-
23
-
 24
24 -
 25
25 -
 26
26 -
 27
27 -
 28
28 -
 29
29 -
 30
30 -
 31
31 -
 32
32 -
 33
33 -
 34
34 -
35
-
36
-
37
-
38
-
39
-
40
-
41
-
42
-
43
-
44
-
45
-
46
-
47
-
48
-
49
-
50
-
51
-
52
-
53
-
54
-
55
-
56
-
57
-
58
-
59
-
60
-
61
-
62
-
63
-
64
-
65
-
66
-
67
-
68
-
69
-
70
-
71
-
72
-
73
-
74
-
75
-
76
-
77
-
78
-
79
-
80
-
81
-
82
-
83
-
84
-
85
-
86
-
87
-
88
-
89
-
90
-
91
-
92
-
93
-
94
-
95
-
96
-
97
-
98
-
99
-
100
-
101
-
102
-
103
-
104
-
105
-
106
-
107
-
108
-
109
-
110
 |
 |
