Kyocera TASKalfa 3051ci Printing System (11),(12),(13),(14) Printing Guide (Fi - Page 41
Installing and connecting to a virtual printer
 |
View all Kyocera TASKalfa 3051ci manuals
Add to My Manuals
Save this manual to your list of manuals |
Page 41 highlights
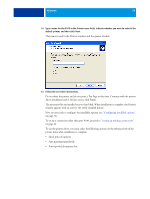
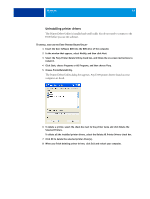
WINDOWS 41 Installing and connecting to a virtual printer A virtual printer allows you to print to the E100 using a predefined set of job settings. You do not have to set print options manually. Before you can print to a virtual printer, the administrator must create and configure the virtual printer using Command WorkStation. After the virtual printer is set up, you can install the printer driver and printer description files on your computer from the E100 using Point and Print. For more information about setting up virtual printers, see Command WorkStation Help. When you install the printer driver using Point and Print, you cannot configure installable options manually. Installable options are configured automatically. The installed options are displayed in the printer driver when you select the Two-Way Communication option. TO SET UP A VIRTUAL PRINTER ON WINDOWS COMPUTERS USING POINT AND PRINT 1 Windows 2000/XP/Server 2003: Right-click Network Neighborhood or My Network Places and select Find Computer or Search for Computers. Windows Vista/Server 2008: Right-click Network and choose Open from the menu. Windows 7/Server 2008 R2: Click Start, choose Control Panel, choose Network and Internet, choose Network and Sharing Center, and then click the View network computers and devices link. 2 Windows 2000/XP/Server 2003: Type the name or IP address of the E100 and click Search Now or Search. Windows Vista/Windows 7/Server 2008 R2: Type the name of the E100 in the Search field and click Enter. Windows Server 2008: Type the name or \\IP address of the E100 in the Search field and click Enter. If you cannot locate the E100, contact your network administrator. 3 Double-click the E100 name to display enabled print connections. Virtual printers are listed along with the Print queue, Hold queue, and Direct connection (if those connections are enabled). Virtual printers usually have names that indicate the type of job they are set up for. 4 Right-click the virtual printer that you want and choose Connect. The files are installed on your computer. 5 Windows 2000: Click Start, choose Settings, and then choose Printers. Windows XP: Click Start and choose Printers and Faxes. Windows Server 2003: Click Start, choose Control Panel, and then choose Printers and Faxes. Windows Vista: Click Start, choose Control Panel, and then double-click Printers. Windows Server 2008: Click Start, choose Control Panel, and under Classic View, double-click Printers. Windows 7/Server 2008 R2: Click Start and choose Devices and Printers. The virtual printer is displayed in the Printers or Printers and Faxes window.
-
 1
1 -
2
-
3
-
4
-
5
-
6
-
7
-
8
-
9
-
10
-
11
-
12
-
13
-
14
-
15
-
16
-
17
-
18
-
19
-
20
-
21
-
22
-
23
-
24
-
25
-
26
-
27
-
28
-
29
-
30
-
31
-
32
-
33
-
34
-
35
-
 36
36 -
 37
37 -
 38
38 -
 39
39 -
 40
40 -
 41
41 -
 42
42 -
 43
43 -
 44
44 -
 45
45 -
 46
46 -
47
-
48
-
49
-
50
-
51
-
52
-
53
-
54
-
55
-
56
-
57
-
58
-
59
-
60
-
61
-
62
-
63
-
64
-
65
-
66
-
67
-
68
-
69
-
70
-
71
-
72
-
73
-
74
-
75
-
76
-
77
-
78
-
79
-
80
-
81
-
82
-
83
-
84
-
85
-
86
-
87
-
88
-
89
-
90
-
91
-
92
-
93
-
94
-
95
-
96
-
97
-
98
-
99
-
100
-
101
-
102
-
103
-
104
-
105
-
106
-
107
-
108
-
109
-
110
 |
 |
