Lexmark C782 Service Manual - Page 176
Input Config Error, User primary, message, Explanation - hard drive location
 |
View all Lexmark C782 manuals
Add to My Manuals
Save this manual to your list of manuals |
Page 176 highlights
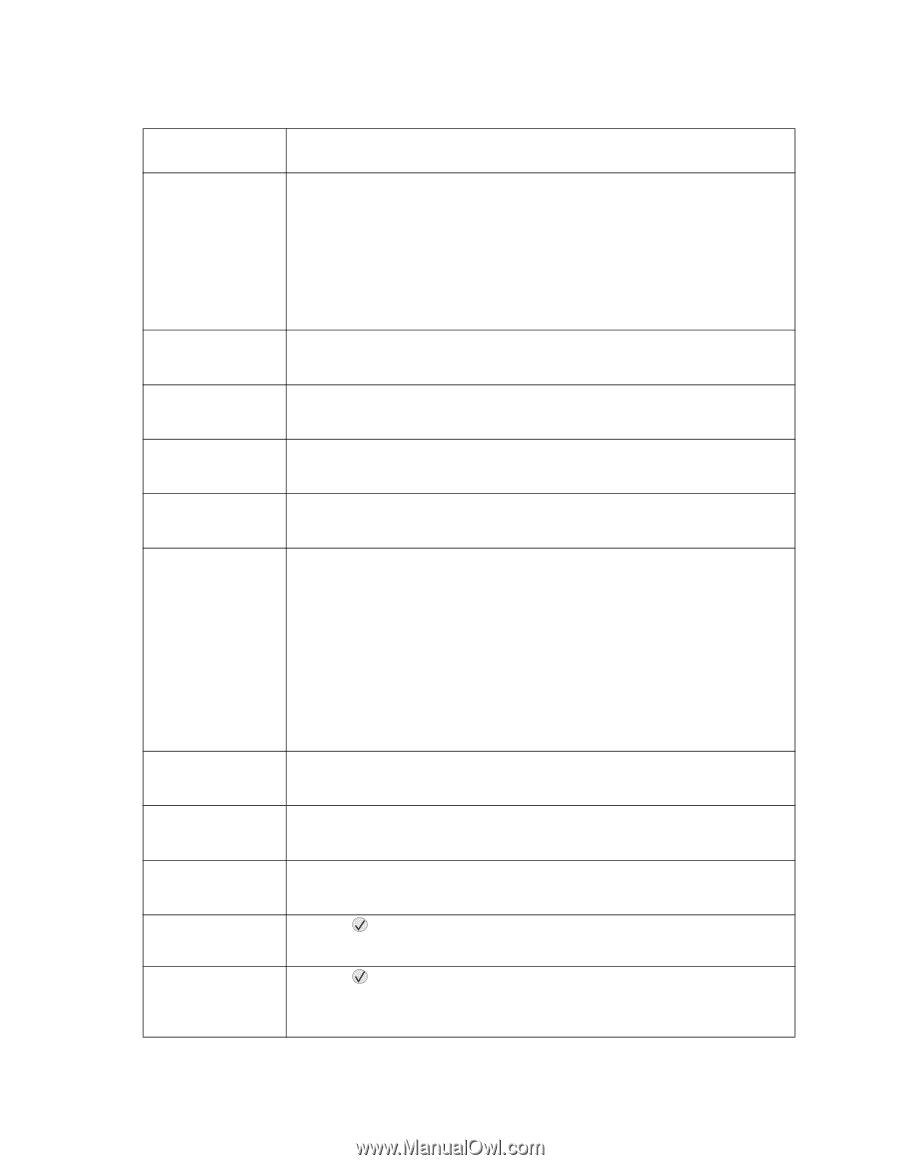
5061 User attendance messages (continued) User primary message 57 Configuration Change 58 Too many bins attached 58 Too many disks installed 58 Too many flash options installed 58 Too many trays attached 58 Input Config Error 59 Incompatible duplex 59 Incompatible output bin 59 Incompatible tray 61 Remove defective disk 62 Disk full Explanation This message are displays when the printer has attempted to Print and Hold jobs from the disk and found that some or all of the jobs could not be restored. The printer firmware could not restore jobs from the disk because the configuration of the printer has changed. Some configuration changes that can cause a 57 Configuration Change message are: • Code version change • Paper handling option removed • Disk drive has been moved to a different printer. Note: Some of the held jobs may not be restored. They remain on the disk, but cannot be accessed. 1. Turn off and unplug the printer. 2. Remove the additional bins. 3. Plug in the printer, and turn it on. 1. Turn off and unplug the printer. 2. Remove the excess disks. 3. Plug in the printer, and turn it on. 1. Turn off and unplug the printer. 2. Remove the excess flash memory. 3. Plug in the printer, and turn it on. 1. Turn off and unplug the printer. 2. Remove the additional trays. 3. Plug in the printer, and turn it on. This message is displayed when: • An high-capacity input tray (HCIT) is connected when it is not supported (C770). • More than one duplex unit is installed. • More than one option tray (500-sheet tray, envelope feeder, or outdoor media tray) are connected above the HCIT. • The duplex unit and HCIT are installed without a tray. • The duplex unit is located in the wrong location, for example if an option tray is in installed above the duplex unit. To fix the problem: 1. Turn off, and unplug the printer. 2. Remove the non-compliant input option or properly configure the printer options. 3. Plug in the printer, and turn it on. 1. Turn off and unplug the printer. 2. Remove the incompatible duplex unit. 3. Plug in the printer, and turn it on. 1. Turn off and unplug the printer. 2. Remove the specified incompatible output bin. 3. Plug in the printer, and turn it on. 1. Turn off and unplug the printer. 2. Remove the specified incompatible tray. 3. Plug in the printer, and turn it on. • Press to clear the message and continue printing. • Install a different hard disk before you perform any operations that require a hard disk. • Press to clear the message and continue processing. Any information not previously stored on the hard disk is deleted. • Delete fonts, macros, and other data stored on the hard disk. • Install a larger hard disk. 2-134 Service Manual
-
 1
1 -
2
-
3
-
4
-
5
-
6
-
7
-
8
-
9
-
10
-
11
-
12
-
13
-
14
-
15
-
16
-
17
-
18
-
19
-
20
-
21
-
22
-
23
-
24
-
25
-
26
-
27
-
28
-
29
-
30
-
31
-
32
-
33
-
34
-
35
-
36
-
37
-
38
-
39
-
40
-
41
-
42
-
43
-
44
-
45
-
46
-
47
-
48
-
49
-
50
-
51
-
52
-
53
-
54
-
55
-
56
-
57
-
58
-
59
-
60
-
61
-
62
-
63
-
64
-
65
-
66
-
67
-
68
-
69
-
70
-
71
-
72
-
73
-
74
-
75
-
76
-
77
-
78
-
79
-
80
-
81
-
82
-
83
-
84
-
85
-
86
-
87
-
88
-
89
-
90
-
91
-
92
-
93
-
94
-
95
-
96
-
97
-
98
-
99
-
100
-
101
-
102
-
103
-
104
-
105
-
106
-
107
-
108
-
109
-
110
-
111
-
112
-
113
-
114
-
115
-
116
-
117
-
118
-
119
-
120
-
121
-
122
-
123
-
124
-
125
-
126
-
127
-
128
-
129
-
130
-
131
-
132
-
133
-
134
-
135
-
136
-
137
-
138
-
139
-
140
-
141
-
142
-
143
-
144
-
145
-
146
-
147
-
148
-
149
-
150
-
151
-
152
-
153
-
154
-
155
-
156
-
157
-
158
-
159
-
160
-
161
-
162
-
163
-
164
-
165
-
166
-
167
-
168
-
169
-
170
-
 171
171 -
 172
172 -
 173
173 -
 174
174 -
 175
175 -
 176
176 -
 177
177 -
 178
178 -
 179
179 -
 180
180 -
 181
181 -
182
-
183
-
184
-
185
-
186
-
187
-
188
-
189
-
190
-
191
-
192
-
193
-
194
-
195
-
196
-
197
-
198
-
199
-
200
-
201
-
202
-
203
-
204
-
205
-
206
-
207
-
208
-
209
-
210
-
211
-
212
-
213
-
214
-
215
-
216
-
217
-
218
-
219
-
220
-
221
-
222
-
223
-
224
-
225
-
226
-
227
-
228
-
229
-
230
-
231
-
232
-
233
-
234
-
235
-
236
-
237
-
238
-
239
-
240
-
241
-
242
-
243
-
244
-
245
-
246
-
247
-
248
-
249
-
250
-
251
-
252
-
253
-
254
-
255
-
256
-
257
-
258
-
259
-
260
-
261
-
262
-
263
-
264
-
265
-
266
-
267
-
268
-
269
-
270
-
271
-
272
-
273
-
274
-
275
-
276
-
277
-
278
-
279
-
280
-
281
-
282
-
283
-
284
-
285
-
286
-
287
-
288
-
289
-
290
-
291
-
292
-
293
-
294
-
295
-
296
-
297
-
298
-
299
-
300
-
301
-
302
-
303
-
304
-
305
-
306
-
307
-
308
-
309
-
310
-
311
-
312
-
313
-
314
-
315
-
316
-
317
-
318
-
319
-
320
-
321
-
322
-
323
-
324
-
325
-
326
-
327
-
328
-
329
-
330
-
331
-
332
-
333
-
334
-
335
-
336
-
337
-
338
-
339
-
340
-
341
-
342
-
343
-
344
-
345
-
346
-
347
-
348
-
349
-
350
-
351
-
352
-
353
-
354
-
355
-
356
-
357
-
358
-
359
-
360
-
361
-
362
-
363
-
364
-
365
-
366
-
367
-
368
-
369
-
370
-
371
-
372
-
373
-
374
-
375
-
376
-
377
-
378
-
379
-
380
-
381
-
382
-
383
-
384
-
385
-
386
-
387
-
388
-
389
-
390
-
391
-
392
-
393
-
394
-
395
-
396
-
397
-
398
-
399
-
400
-
401
-
402
-
403
-
404
-
405
-
406
-
407
-
408
-
409
-
410
-
411
-
412
-
413
-
414
-
415
-
416
-
417
-
418
-
419
-
420
-
421
-
422
-
423
-
424
-
425
-
426
-
427
-
428
-
429
-
430
-
431
-
432
-
433
-
434
-
435
-
436
-
437
-
438
-
439
-
440
-
441
-
442
-
443
-
444
-
445
-
446
-
447
-
448
-
449
-
450
-
451
-
452
-
453
-
454
-
455
-
456
-
457
-
458
-
459
-
460
-
461
-
462
-
463
-
464
-
465
-
466
-
467
-
468
-
469
-
470
-
471
-
472
-
473
-
474
 |
 |