Lexmark C782 Service Manual - Page 215
Understanding jam messages, Paper jam messages
 |
View all Lexmark C782 manuals
Add to My Manuals
Save this manual to your list of manuals |
Page 215 highlights
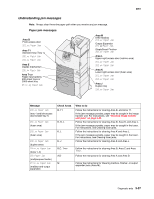
5061 Understanding jam messages Note: Always clear the entire paper path when you receive any jam message. Paper jam messages Area D Front access door 201.xx Paper Jam Area T1 Standard tray (Tray 1) 200.xx Paper Jam 241.xx Paper Jam Area E Duplex mechanism 230.xx Paper Jam Area T Paper input options: 500-sheet trays or 2000-sheet tray 24.yy Paper Jam Area M 5-Bin Mailbox 272.xx Paper Jam Output Expander 271.xx Paper Jam StapleSmart Finisher 28x.xx Paper Jam Area L Upper right access door (redrive area) 201.xx Paper Jam 202.xx Paper Jam Area K Lower right access door (fuser area) 201.xx Paper Jam 202.xx Paper Jam Area J Duplex tray 230.xx Paper Jam Message 200.xx Paper Jam (tray 1 and left access door beside tray 1) 201.xx Paper Jam (fuser area) 202.xx Paper Jam (fuser area) 230.xx Paper Jam (duplex area) 24.xx Paper Jam (trays 1-4) 250 Paper Jam (multipurpose feeder) 27.xx Paper Jam (mailbox and output expander) Check Areas B, T1 D, K, L K, L E, J What to do Follow the instructions for clearing Area B, and Area T1. If the jam message persists, paper may be caught in the image transfer unit. For instructions, see "Clearing image transfer unit jams" on page 3-45. Follow the instructions for clearing Area D, Area K, and Area L. If the jam message persists, paper may be caught in the fuser. For instructions, see Clearing fuser jams. Follow the instructions for clearing Area K and Area L. If the jam message persists, paper may be caught in the fuser. For instructions, see Clearing fuser jams. Follow the instructions for clearing Area E and Area J. B,C, T A,D Follow the instructions for clearing Area B, Area C and Area T. Follow the instructions for clearing Area A and Area D. M Follow the instructions for Clearing mailbox, finisher, or output expander jams (Area M). Diagnostic aids 3-37
-
 1
1 -
2
-
3
-
4
-
5
-
6
-
7
-
8
-
9
-
10
-
11
-
12
-
13
-
14
-
15
-
16
-
17
-
18
-
19
-
20
-
21
-
22
-
23
-
24
-
25
-
26
-
27
-
28
-
29
-
30
-
31
-
32
-
33
-
34
-
35
-
36
-
37
-
38
-
39
-
40
-
41
-
42
-
43
-
44
-
45
-
46
-
47
-
48
-
49
-
50
-
51
-
52
-
53
-
54
-
55
-
56
-
57
-
58
-
59
-
60
-
61
-
62
-
63
-
64
-
65
-
66
-
67
-
68
-
69
-
70
-
71
-
72
-
73
-
74
-
75
-
76
-
77
-
78
-
79
-
80
-
81
-
82
-
83
-
84
-
85
-
86
-
87
-
88
-
89
-
90
-
91
-
92
-
93
-
94
-
95
-
96
-
97
-
98
-
99
-
100
-
101
-
102
-
103
-
104
-
105
-
106
-
107
-
108
-
109
-
110
-
111
-
112
-
113
-
114
-
115
-
116
-
117
-
118
-
119
-
120
-
121
-
122
-
123
-
124
-
125
-
126
-
127
-
128
-
129
-
130
-
131
-
132
-
133
-
134
-
135
-
136
-
137
-
138
-
139
-
140
-
141
-
142
-
143
-
144
-
145
-
146
-
147
-
148
-
149
-
150
-
151
-
152
-
153
-
154
-
155
-
156
-
157
-
158
-
159
-
160
-
161
-
162
-
163
-
164
-
165
-
166
-
167
-
168
-
169
-
170
-
171
-
172
-
173
-
174
-
175
-
176
-
177
-
178
-
179
-
180
-
181
-
182
-
183
-
184
-
185
-
186
-
187
-
188
-
189
-
190
-
191
-
192
-
193
-
194
-
195
-
196
-
197
-
198
-
199
-
200
-
201
-
202
-
203
-
204
-
205
-
206
-
207
-
208
-
209
-
 210
210 -
 211
211 -
 212
212 -
 213
213 -
 214
214 -
 215
215 -
 216
216 -
 217
217 -
 218
218 -
 219
219 -
 220
220 -
221
-
222
-
223
-
224
-
225
-
226
-
227
-
228
-
229
-
230
-
231
-
232
-
233
-
234
-
235
-
236
-
237
-
238
-
239
-
240
-
241
-
242
-
243
-
244
-
245
-
246
-
247
-
248
-
249
-
250
-
251
-
252
-
253
-
254
-
255
-
256
-
257
-
258
-
259
-
260
-
261
-
262
-
263
-
264
-
265
-
266
-
267
-
268
-
269
-
270
-
271
-
272
-
273
-
274
-
275
-
276
-
277
-
278
-
279
-
280
-
281
-
282
-
283
-
284
-
285
-
286
-
287
-
288
-
289
-
290
-
291
-
292
-
293
-
294
-
295
-
296
-
297
-
298
-
299
-
300
-
301
-
302
-
303
-
304
-
305
-
306
-
307
-
308
-
309
-
310
-
311
-
312
-
313
-
314
-
315
-
316
-
317
-
318
-
319
-
320
-
321
-
322
-
323
-
324
-
325
-
326
-
327
-
328
-
329
-
330
-
331
-
332
-
333
-
334
-
335
-
336
-
337
-
338
-
339
-
340
-
341
-
342
-
343
-
344
-
345
-
346
-
347
-
348
-
349
-
350
-
351
-
352
-
353
-
354
-
355
-
356
-
357
-
358
-
359
-
360
-
361
-
362
-
363
-
364
-
365
-
366
-
367
-
368
-
369
-
370
-
371
-
372
-
373
-
374
-
375
-
376
-
377
-
378
-
379
-
380
-
381
-
382
-
383
-
384
-
385
-
386
-
387
-
388
-
389
-
390
-
391
-
392
-
393
-
394
-
395
-
396
-
397
-
398
-
399
-
400
-
401
-
402
-
403
-
404
-
405
-
406
-
407
-
408
-
409
-
410
-
411
-
412
-
413
-
414
-
415
-
416
-
417
-
418
-
419
-
420
-
421
-
422
-
423
-
424
-
425
-
426
-
427
-
428
-
429
-
430
-
431
-
432
-
433
-
434
-
435
-
436
-
437
-
438
-
439
-
440
-
441
-
442
-
443
-
444
-
445
-
446
-
447
-
448
-
449
-
450
-
451
-
452
-
453
-
454
-
455
-
456
-
457
-
458
-
459
-
460
-
461
-
462
-
463
-
464
-
465
-
466
-
467
-
468
-
469
-
470
-
471
-
472
-
473
-
474
 |
 |
