Pioneer SC-27 Owner's Manual - Page 126
Speaker Distance, X-Curve, Adjust the level of each channel using
 |
UPC - 012562957487
View all Pioneer SC-27 manuals
Add to My Manuals
Save this manual to your list of manuals |
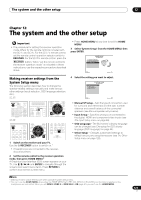
Page 126 highlights
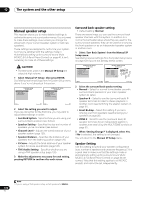
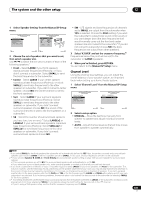
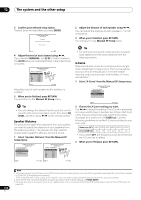
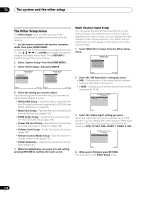
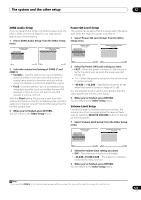
12 The system and the other setup 3 Confirm your selected setup option. The test tones will start after you press ENTER. 4a3.Channel Level A/V RECEIVER CAUTION Loud test tones will be output. Please wait...** Exit Cancel 4 Adjust the level of each channel using /. If you selected MANUAL, use / to switch speakers. The AUTO setup will output test tones in the order shown on-screen: 4a3.Channel Level A/V RECEIVER MCACC : M1.MEMORY 1 L : 0.0 dB C : 0.0 dB R : 0.0 dB SR : 0.0 dB SBR : 0.0 dB SBL : 0.0 dB SL : 0.0 dB SW : 0.0 dB Exit Finish Adjust the level of each speaker as the test tone is emitted.1 5 When you're finished, press RETURN. You will return to the Manual SP Setup menu. Tip • You can change the channel levels by set the remote control to the receiver operation mode, then press CH LEVEL, and then using / on the remote control.2 Speaker Distance For good sound depth and separation from your system, you need to specify the distance of your speakers from the listening position. The receiver can then add the proper delay needed for effective surround sound. 1 Select 'Speaker Distance' from the Manual SP Setup menu. 4a.Manual SP Setup A/V RECEIVER 1. Surr Back System 2. Speaker Setting 3. Channel Level 4. Speaker Distance 5. X-Curve 6. THX Audio Setting Exit Return 4a4.Speaker Distance A/V RECEIVER MCACC : M1.MEMORY 1 L : 10'10" C : 9'10" R : 10'10" SR : 9'00" SBR : 10'00" SBL : 10'00" SL : 9'00" SW : 12'10" Exit Finish 2 Adjust the distance of each speaker using /. You can adjust the distance of each speaker in 1/2 inch increments. 3 When you're finished, press RETURN. You will return to the Manual SP Setup menu. Tip • For best surround sound, make sure the surround back speakers are the same distance from the listening position. X-Curve Most soundtracks mixed for cinema sound too bright when played back in large rooms. The X-Curve setting acts as a kind of re-equalization for home theater listening, and restores proper tonal balance of movie soundtracks.3 1 Select 'X-Curve' from the Manual SP Setup menu. 4a.Manual SP Setup A/V RECEIVER 1. Surr Back System 2. Speaker Setting 3. Channel Level 4. Speaker Distance 5. X-Curve 6. THX Audio Setting Exit Return 2 Choose the X-Curve setting you want. Use / to adjust the setting. The X-Curve is expressed as a downwards slope in decibels per octave, starting at 2 kHz. The sound becomes less bright as the slope increases (to a maximum of -3.0dB/oct). Use the following guidelines to set the X-Curve according to your room size: Room size (ft2) ≤400 ≤550 ≤650 ≤800 ≤2200 ≤12000 X-Curve (dB/oct) -0.5 -1.0 -1.5 -2.0 -2.5 -3.0 • If you select OFF, the frequency curve will be flat and the X-Curve has no effect. 3 When you're finished, press RETURN. 126 en Note 1 • If you are using a Sound Pressure Level (SPL) meter, take the readings from your main listening position and adjust the level of each speaker to 75 dB SPL (C-weighting/slow reading). • The subwoofer test tone is output at low volumes. You may need to adjust the level after testing with an actual soundtrack. 2 The channel level cannot be adjusted using this procedure while making settings on HOME MENU. 3 Since the principal is the same, X-Curve isn't applied when you're using any of the Home THX modes (see Using the Home THX modes on page 63).
-
 1
1 -
2
-
3
-
4
-
5
-
6
-
7
-
8
-
9
-
10
-
11
-
12
-
13
-
14
-
15
-
16
-
17
-
18
-
19
-
20
-
21
-
22
-
23
-
24
-
25
-
26
-
27
-
28
-
29
-
30
-
31
-
32
-
33
-
34
-
35
-
36
-
37
-
38
-
39
-
40
-
41
-
42
-
43
-
44
-
45
-
46
-
47
-
48
-
49
-
50
-
51
-
52
-
53
-
54
-
55
-
56
-
57
-
58
-
59
-
60
-
61
-
62
-
63
-
64
-
65
-
66
-
67
-
68
-
69
-
70
-
71
-
72
-
73
-
74
-
75
-
76
-
77
-
78
-
79
-
80
-
81
-
82
-
83
-
84
-
85
-
86
-
87
-
88
-
89
-
90
-
91
-
92
-
93
-
94
-
95
-
96
-
97
-
98
-
99
-
100
-
101
-
102
-
103
-
104
-
105
-
106
-
107
-
108
-
109
-
110
-
111
-
112
-
113
-
114
-
115
-
116
-
117
-
118
-
119
-
120
-
 121
121 -
 122
122 -
 123
123 -
 124
124 -
 125
125 -
 126
126 -
 127
127 -
 128
128 -
 129
129 -
 130
130 -
 131
131 -
132
-
133
-
134
-
135
-
136
-
137
-
138
-
139
-
140
-
141
-
142
-
143
-
144
-
145
-
146
-
147
-
148
-
149
-
150
-
151
-
152
-
153
-
154
 |
 |
