Pioneer SC-27 Owner's Manual - Page 81
Checking the network settings, Checking about the Accounts, Edit Proxy Port - firmware
 |
UPC - 012562957487
View all Pioneer SC-27 manuals
Add to My Manuals
Save this manual to your list of manuals |
Page 81 highlights
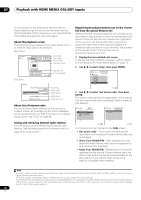
Playback with HOME MEDIA GALLERY inputs 07 9 Select 'No' or 'Yes' for the proxy server setting to deactivate or activate the proxy server. In case you select 'No', proceed with Step 14. In case you select 'Yes', on the other hand, proceed with Step 10. The Proxy Hostname screen appears. Top Menu Enable Proxy Server A/V RECEIVER No Yes 1/ 2 Return 10 Select 'Change' and press ENTER to confirm your selection. The Edit Proxy Hostname screen appears. Top Menu Proxy Hostname A/V RECEIVER abcdefghijklmnopqrstuv Change Top Menu Edit Proxy Hostname A/V RECEIVER abcdefghijklmnopqrstuv 2/ 2 Return Return 11 Enter the address of your proxy server or the domain name. After entry, press or ENTER. The Proxy Port screen appears. 12 Select 'Change' and press ENTER to confirm your selection. The Edit Proxy Port screen appears. Top Menu 11111 Change Proxy Port A/V RECEIVER Top Menu Edit Proxy Port A/V RECEIVER 11111 2/ 2 Return Return 13 Enter the port number of your proxy server. Use the numeric buttons to enter the port number. After entry, press or ENTER. The Settings OK? screen appears. 14 Press ENTER to complete the network setup procedure. The Top Menu screen appears. 15 Switch off the receiver. Use RECEIVER to switch off. Checking the network settings You can check the following network settings of this receiver: the MAC address, the IP address, the gateway IP address, the proxy server, the Subnet mask, and the firmware version (for the Home Media Gallery of this receiver). Before proceeding with the following steps, check whether you have followed Steps from 1 to 3 on page 80. 1 Select 'Information' and press ENTER to confirm your selection. The Firmware Version (for the Home Media Gallery of this receiver) screen appears. Top Menu Firmware Version A/V RECEIVER X.X.XX.XXX 1/ 6 Return (The version of the illustration is not the latest.) 2 Check the network settings. Press / to switch the display. Each time you press / , the display switches as follows. Firmware Version MAC Address IP address Gateway IP Proxy Server Subnet Mask 3 Press RETURN. The Setup screen appears. To return to the Top Menu screen, press RETURN again. Checking about the Accounts Screen concerning Rhapsody or Sirius Internet Radio account registration. Before proceeding with the following steps, check whether you have followed Steps from 1 to 3 on page 80. 1 Select Accounts and press ENTER to confirm your selection. 2 Select Rhapsody or Sirius and press ENTER.1 The contents below can be checked when Rhapsody is selected. • Sign in to Rhapsody (Set Account) • Account Info The contents below can be checked when Sirius is selected. • Set Account When disposing of the product, we recommend you reset it to delete the data. See Resetting the system on page 95. Note 1 Some operating procedures, etc., may be changed at the discretion of Rhapsody and Sirius. 81 en
-
 1
1 -
2
-
3
-
4
-
5
-
6
-
7
-
8
-
9
-
10
-
11
-
12
-
13
-
14
-
15
-
16
-
17
-
18
-
19
-
20
-
21
-
22
-
23
-
24
-
25
-
26
-
27
-
28
-
29
-
30
-
31
-
32
-
33
-
34
-
35
-
36
-
37
-
38
-
39
-
40
-
41
-
42
-
43
-
44
-
45
-
46
-
47
-
48
-
49
-
50
-
51
-
52
-
53
-
54
-
55
-
56
-
57
-
58
-
59
-
60
-
61
-
62
-
63
-
64
-
65
-
66
-
67
-
68
-
69
-
70
-
71
-
72
-
73
-
74
-
75
-
 76
76 -
 77
77 -
 78
78 -
 79
79 -
 80
80 -
 81
81 -
 82
82 -
 83
83 -
 84
84 -
 85
85 -
 86
86 -
87
-
88
-
89
-
90
-
91
-
92
-
93
-
94
-
95
-
96
-
97
-
98
-
99
-
100
-
101
-
102
-
103
-
104
-
105
-
106
-
107
-
108
-
109
-
110
-
111
-
112
-
113
-
114
-
115
-
116
-
117
-
118
-
119
-
120
-
121
-
122
-
123
-
124
-
125
-
126
-
127
-
128
-
129
-
130
-
131
-
132
-
133
-
134
-
135
-
136
-
137
-
138
-
139
-
140
-
141
-
142
-
143
-
144
-
145
-
146
-
147
-
148
-
149
-
150
-
151
-
152
-
153
-
154
 |
 |
