Pioneer SC-27 Owner's Manual - Page 49
Input function default and possible settings, Input, function, Input Terminals, Digital, Component
 |
UPC - 012562957487
View all Pioneer SC-27 manuals
Add to My Manuals
Save this manual to your list of manuals |
Page 49 highlights
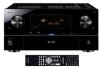
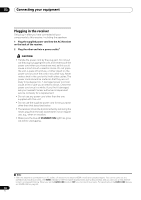
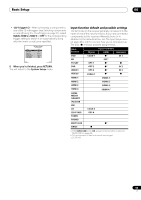
Basic Setup 04 • 12V Trigger1/2 - After connecting a component to one of the 12 volt triggers (see Switching components on and off using the 12 volt trigger on page 41), select MAIN, ZONE 2, ZONE 3 or OFF for the corresponding trigger setting to switch it on automatically along with the (main or sub) zone specified. 4b.Input Setup A/V RECEIVER Input Input Name Input Skip : DVD : Rename : OFF Digital In : HDMI Input : Component In : 12V Trigger1 : 12V Trigger2 : COAX-1 --- Comp-1 OFF OFF Exit Finish 8 When you're finished, press RETURN. You will return to the System Setup menu. Input function default and possible settings The terminals on the receiver generally correspond to the name of one of the input functions. If you have connected components to this receiver differently from (or in addition to) the defaults below, see The Input Setup menu on page 48 to tell the receiver how you've connected up. The dots () indicate possible assignments. Input function DVD BD TV/SAT DVR VIDEO1 VIDEO2 Digital COAX-1 OPT-1 OPT-2 OPT-3 COAX-3c Input Terminals HDMI a (BD)b a a a a Component IN 1 IN 2 IN 3 HDMI 1 (HDMI-1) HDMI 2 (HDMI-2) HDMI 3 (HDMI-3) HDMI 4 (HDMI-4)b HOME MEDIA GALLERY iPod/USB XM CD COAX-2 CD-R/TAPE OPT-4 TUNER PHONO MULTI CH IN a SIRIUS a.With KURO LINK set to ON, assignments cannot be made (see KURO LINK on page 84). b.This assignment is fixed and cannot be changed. c.SC-27 only 49 en
-
 1
1 -
2
-
3
-
4
-
5
-
6
-
7
-
8
-
9
-
10
-
11
-
12
-
13
-
14
-
15
-
16
-
17
-
18
-
19
-
20
-
21
-
22
-
23
-
24
-
25
-
26
-
27
-
28
-
29
-
30
-
31
-
32
-
33
-
34
-
35
-
36
-
37
-
38
-
39
-
40
-
41
-
42
-
43
-
 44
44 -
 45
45 -
 46
46 -
 47
47 -
 48
48 -
 49
49 -
 50
50 -
 51
51 -
 52
52 -
 53
53 -
 54
54 -
55
-
56
-
57
-
58
-
59
-
60
-
61
-
62
-
63
-
64
-
65
-
66
-
67
-
68
-
69
-
70
-
71
-
72
-
73
-
74
-
75
-
76
-
77
-
78
-
79
-
80
-
81
-
82
-
83
-
84
-
85
-
86
-
87
-
88
-
89
-
90
-
91
-
92
-
93
-
94
-
95
-
96
-
97
-
98
-
99
-
100
-
101
-
102
-
103
-
104
-
105
-
106
-
107
-
108
-
109
-
110
-
111
-
112
-
113
-
114
-
115
-
116
-
117
-
118
-
119
-
120
-
121
-
122
-
123
-
124
-
125
-
126
-
127
-
128
-
129
-
130
-
131
-
132
-
133
-
134
-
135
-
136
-
137
-
138
-
139
-
140
-
141
-
142
-
143
-
144
-
145
-
146
-
147
-
148
-
149
-
150
-
151
-
152
-
153
-
154
 |
 |